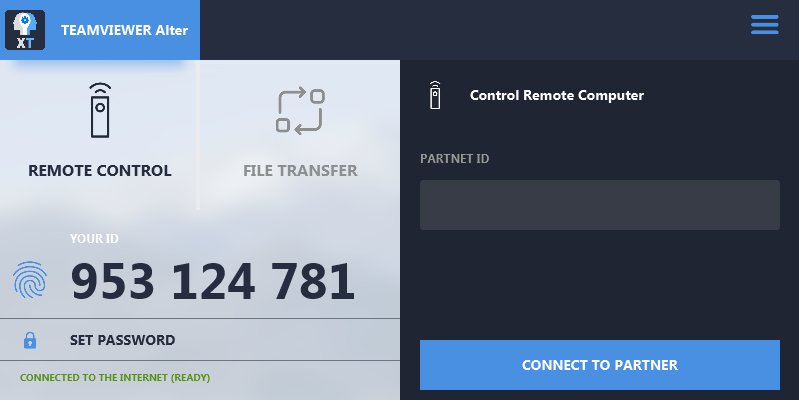
Would it be possible to write a full blown TeamViewer in B4X in just 30 days? That was the question posed about a week ago on the B4X forum. Not a small thing to ask, because how would one get started with something huge as this?
TeamViewer has a lot to offer:
Remote control a PC/Mobile
File Transfer
Clipboard copy between host and client
Advanced Remote functionalities like doing a Reboot
Reduce resolution/remove wallpaper on slow connections
Address book
Multiple connections
…
Could this be done?
Saif Sameer and his team of B4XCode.com say they can. And they even upped the ante by saying they would do it in just 30 days!
They have released the source code of some excellent Android/Desktop apps written in B4X the past few weeks so I have full confidence if they say they can, they will.
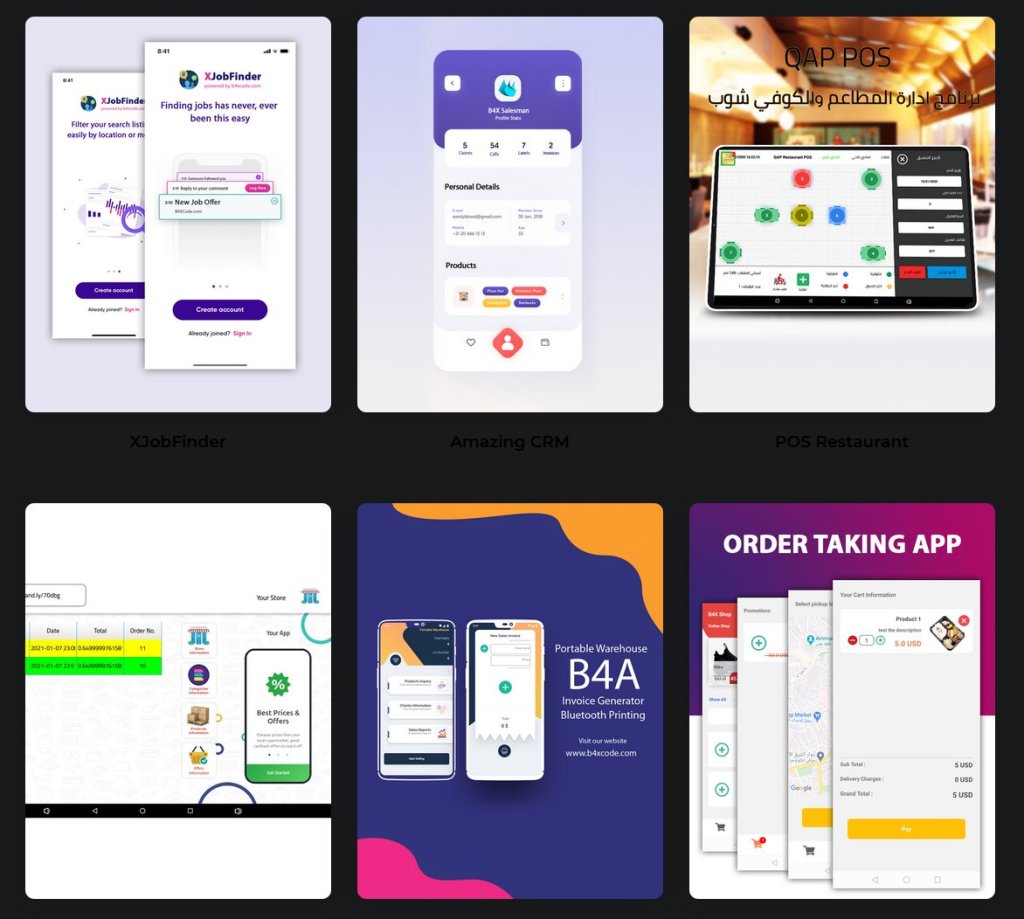
This small team of gifted programmers and UX designers have been selling the source code of some eye catching programs made in B4X:
Some of the projects B4XCode.com is selling
They have taken on this challenge in sort of a ‘crowdfunding’ way: if you sign in for just $50, you will receive the full source code of the project! (EDIT: extended to 2021-02-1, normal price $350)
I already did and many others and so should you. Even if you do not plan to use it, the learning experience on how they did it is probably the best money you will spend this year! I’m very excited about this project and am following its progress like a hawk.
We are only one week in, and the first results they’ve shown are very promising indeed.
The latest version of BANano introduces the BANanoServer.b4xlib library, which is an easy to use wrapper around jServer, the same B4J lib ABMaterial uses. One can now use BANano to make stand-alone Web sites, but also interfaces for e.g. IoT and Raspberry Pi (when using the BANanoServer lib: as this is a normal B4J app, it can use all B4J libs on the server side) and build complex Web Apps.
NOTE: BANano still works without the BANAnoServer Library as it did before in case you want to use another backend like PHP, but only having to program in one language has huge advantages and is what RAD is al about.
When you will look at the code of BANanoServer, ABM users will recognize the powerful Caching system, Root, Websocket support and HTTP/2 filters. In BANano, all that code is removed from your own projects view (but still accessible as it is an open source .b4xlib).
Some ‘easy-to-use’ methods to communicate between the browser and the server are added (to call methods from each other and to exchange files).
More info and download BANano for free here: BANano Download
But the biggest news this week must have been the BOMB Erel from Anywhere Software dropped: B4A, the tool to make native Android apps, is from now on free to use for everyone!
From his announcement a couple of weeks ago:
I’m very proud in the continuing progress of B4X tools. I’m also very proud to be part of this amazing developers community.
In the last couple of years, I have a growing feeling that B4X tools do not realize their potential. While there are all kinds of development tools, B4X offers a unique set of features: simple, powerful, mature, great community, RAD, native, cross platform and more.
B4X tools are an excellent choice for a wide range of real-world use cases.
So, the question is how to make B4X more popular? Obviously, it is not a simple nor a short-term task.
A clear growth barrier is the fact that unlike most development tools today, B4A and B4i are not free. This wasn’t the case 10 years ago.
The big announcement today is that B4A will become free in a few weeks. The framework – set of internal libraries, will be open sourced.
We will accept contributions for B4A like currently done with B4J.
We’ve also secured funds from a US investor who shares my vision of making B4X a popular development tool. These resources will allow us to further expand.
Two huge points were raised here: for one, the tool that started it all (B4A) to make native Android apps, is now 100% free (download it here)! It is clear that nowadays paying for a development platform is so 2009. Some development vendors may exist for 20+ years, but haven’t grown accordingly and seem to be stuck in overprotecting their (outdated?) technology. Clearly, Erel is not one of them and is thinking on how to expand his tools into the next decade.
But the second part may be even more exciting: a private US investor has shown interest in the potential of B4X and shares Erel view of the future. This opens a whole new world to the development tool and allows to think a lot bigger. He can expand his team not only with new developers, but even more important, surround himself with professionals to market his brand and let the world know of the big impact his technology can have on any software developer.
Just read up on the forum (100K+ members) and one quickly realizes the brought spectrum of apps that can be written with B4X. It is used by big corporations like NASA, IBM and Bosch to name a few, but also by small companies and citizen developers. I for one use it daily in my day job at OneTwo and we feel so secure with the tools we use it as the foundation of all our software. Very rarely one comes across a tool where the developers are so close to its users and actually listens to their concerns and wishes. I remember having found a bug (yeah, you really have to go deep to find one) and after reporting it to the Anywhere Software team, 10 minutes(!) later, an update was released. This has never been seen and blocked me zero time in my own development.
I am a big fan of the B4X suite. It allowed me to write ABMaterial and BANano, two libraries to make modern Websites and Webapps. Something I can’t see me do in any other tool, at least not with such ease and speed. And it is fun, really fun to work with too. 🙂
So I think Yoda would concur: ‘The future, bright it is!’
The big change is the introduction of being able to make and use BANano libraries in the B4X .b4xlib format.
This has a couple of profound advantages over normal .jar libraries for BANano:
a. Because the libraries are compiled at the same time as the app, BANano can remove classes that are not used in the app. This works best for libraries that use Custom Views.
E.g. suppose you made a big library with a lot of components like DatePickers, Grids, etc. If you don’t use a certain component, then that code is not included in your final app. This can reduce the size of the generated app considerably.
I think the way BANano generates a build (very modular) is now paying off big time.
But, this really depends on how modular the library builder has written his library.
e.g. if a class is used in a method in a module, but this method is never called in your app, all the classes (and the DependsOnAsset, see 6) will still be included.
b. As all the assets are included in the .b4xlib, you don’t have to worry about adding them in your app anymore: they are copied and included automatically. This means less clutter in your Files tab and no more .AddCSSFile or .AddJavascriptFile that are just needed for a library. You just have to worry about the assets you use in your app.
c. No more need to make a library in two steps (BuildAsLibrary + Compile to Library)
As a Library Builder, there is nothing special you have to do in B4X, except using:
BANano.BuildAsB4Xlib("1.01")
I’ve tried it on all the libs and projects I have and it looks like it works, but maybe there are still some problems in it. I had to make a lot of changes to the core of BANano to make this possible, so the chance exists.
In short: TAKE A BACKUP!
2. NEW: The generated .js files are in Build (release) modus a lot smaller (tests showed sometimes 50% smaller)
3. CHANGE: UseServiceWorker is now by default false. You will have to set it to True if you want to use a Service worker.
4. NEW: MinifyOnline now also minifies CSS files
5. NEW: MergeAllCSSFiles and MergeAllJavascript files: will create one CSS and one JS file by mergin them.
6. NEW: DependsOnAsset
When creating e.g. a Custom View, you can set if it Depends on certain CSS, Javascript or other asset files.
For CSS and Javascript, you must still use the AddCSSFile & AddJavascriptFile in AppStart.
7. Because the Transpiler gets more and more options, I created a new object BANano.TranspilerOptions that hosts those options.
The old ones are marked DEPRECIATED (they still work, but will eventually be removed). A warning is shown.
8. NEW options: ShowWarningsDeadCode & RemoveDeadCode
Only works in Build
Shows a warning in the log if the transpiler suspects some code is dead (never used).
This is handy, especially in the final stage of development to remove code (or comment out) that is never used.
Methods with a _ in their name are always considerd to be needed.
You can then use the RemoveDeadCode property to prevent GENERATING dead javascript code.
Some young and interested African tech enthusiasts completed their first IoT course using the free B4X tools from Anywhere Software, congratulations!
In a hackathon event in celebration with International Arduino Day 2019, a deep overview as seminar on B4X products and specifically utilizing B4R with famous micro controllers and technologies was organized.
1. GetViewFromLayoutArray() and GetAllViewsFromLayoutArray() has now an extra first parameter to allow adding the B4J class where the layout was loaded.
2. New params to config the paths for a build:
SCRIPTS_FOLDER
ASSETS_FOLDER
STYLES_FOLDER
3. BANanoSkeletonCSS added some properties. You will need to copy the new Library to your Additional Libraries folder if you have already used it. The CSS file was also changed.
4. New example Website with multiple pages. I made two versions, one using a Router, one without a Router.
IMPORTANT: they need to run on a real server (or e.g. the Chrome Server plugin!)
It is a real world example I wrote for a friend of mine who owns a B&B.
Demonstrates:
multi-pages
multilingual supports
browsers Back/Forward buttons support.
floating navigation bar
It is ridiculous how little programming I had to do to make his site. Finished the whole thing in a morning. 🙂
Both examples are heavily commented.
5. The following JavaScript DOM objects have been wrapped:
6. BANanoSkeleton added SKRange, SKRadio, SKSwitch and SKNaviagationBar.
All views now have a Visibility property.
IMPORTANT:
– BANanoSkeleton_Files.zip contains new files. If you use it already in a project, you must copy the new files in your projects Files folder.
– Open all your layouts and save them so the new property Visible will be saved in the layout.
Now that we have our custom view created, let’s use it. As said in part 1, there are a couple of ways which I will go in to deeper now.
But first, I give you the steps on how to create a library out of part 1. This will allow us to use Sub + TAB in the B4J IDE.
CREATING A LIBRARY
This is a two step process. Make sure you have the following lines in your library AppStart code:
' start the build
#if release
       BANano.BuildAsLibrary()
#else
       BANano.Build(File.DirApp)
#end if
Now for step 1, run your library in release mode. The .js, .dependson (.php if you use it) and _Files.zip (if you have assets in the Files tab) will be created in your Additional Libraries folder. It will transpile everything in each .bas file. The Main class will be skipped.
Step 2 is just compiling the library with the B4J IDE ‘Compile To Library’
Give it the same name as you have used in the BANano.Initialize declaration. The .jar and .xml files will also be generated in your Additional Libraries folder.
So to summerize: you will now have the following files in your Additional Libraries folder:
yourlib.js
yourlib.dependsOn
yourlib.jar
yourlib.xml
yourlib.php (if you have used inline php in your library)
yourlib_Files.zip (if you had assets in your Files tab)
1. USING THE CUSTOM VIEW IN A LAYOUT
Make a new B4J UI project, and the BAnano.jar and yourlib.jar in the libraries. Also, unzip the yourlib_Files.zip file to your projects Files folder (watch out that you do not make a subfolder!).
Again let’s start with adding the default BANano project main code:
#Region Project Attributes
   #MainFormWidth: 600
   #MainFormHeight: 600
   #IgnoreWarnings: 16, 10, 14, 15
#End Region

Sub Process_Globals
   Private BANano As BANano 'ignore
End Sub

Sub AppStart (Form1 As Form, Args() As String)
   ' you can change some output params here
   BANano.Initialize("BANano", "BANanoSkeleton",12)
   BANano.HTML_NAME = "index.html"

   BANano.Header.Title="BANano Skeleton"
   BANano.ExternalTestConnectionServer = "http://gorgeousapps.com"
   BANano.Header.AddCSSFile("skeleton-all.min.css")

   ' start the build
   BANano.Build(File.DirApp)

   ExitApplication
End Sub

' HERE STARTS YOUR APP
Sub BANano_Ready()

End Sub
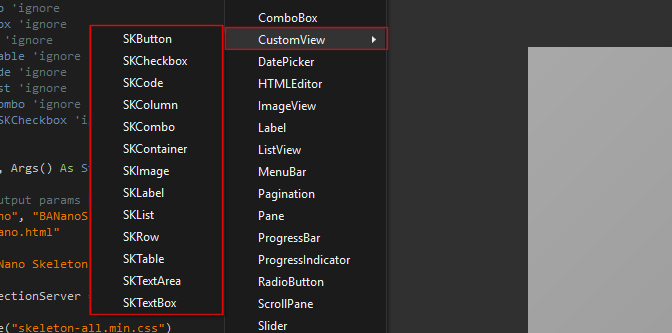
Save and open the Abstract Designer. In the Views Menu, under custom views you will find your newly created custom views:
Before we start using our views, a quick note: as currently B4J Custom views can only set their parent to main, make sure there is some space between each view to allow BANanos own algorithm to determine who is the parent. The absolute position of a view in the Designer has no relevance in BANano anyway.
Example:
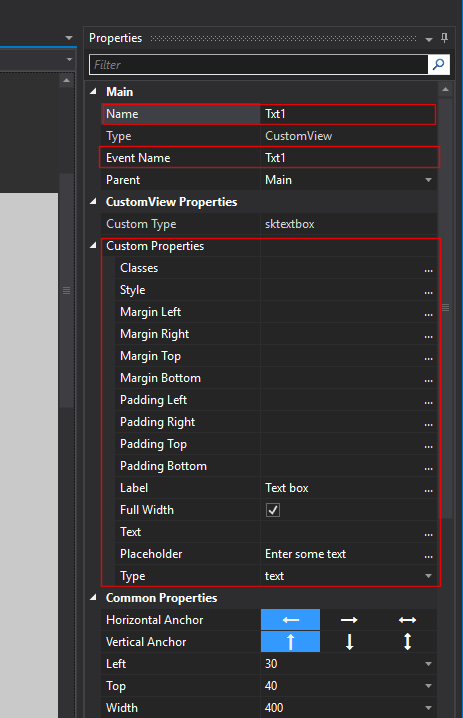
So, now we add our Custom views. You will notice the Custom properties in the Properties Pane. Only the following properties can be used (the rest is ignored):
Once you are satisfied with your design, save it and generate the events you want to use:
IMPORTANT: If you plan to load this layout only ONCE at the time with BANano.LoadLayout(), you can select the view itself (e.g. Txt1 in this example) to generate the Private Txt1 As SKTextBox line. If you plan to use BANano.LoadLayoutArray(), then you can NOT use this.
This makes sense, as a single layout matches up with one single view. In case of an array of such layouts, the is no One-to-One relation. But we go into this deeper in just a second.
The code will be generated for you:
Sub Process_Globals
   Private BANano As BANano
   ...
   Private Txt1 As SKTextBox
End Sub

...

Sub Txt1_Focus (event As BANanoEvent)

End Sub

Sub Txt1_Blur (event As BANanoEvent)

End Sub

Sub Txt1_Keydown (event As BANanoEvent)

End Sub

Sub Txt1_KeyUp (event As BANanoEvent)

End Sub

Sub Txt1_Change (event As BANanoEvent)

End Sub

Sub Button1_Click (event As BANanoEvent)

End Sub

Sub SKTable1_Click (event As BANanoEvent)

End Sub
All you have to do now is load your newly created layout:
' HERE STARTS YOUR APP
Sub BANano_Ready()
   ...
   BANano.LoadLayout("#body", "layout1")
   ...
End Sub
This is just normal B4J stuff! Now you can code as you are used to.
2. ADDING CUSTOM VIEWS BY CODE
This is equally similar to normal B4J behaviour. First add a declaration of a View in globals:
Private btn As SKButton
Now initialize and add the button:
' create a dynamic button, not located in the Layout
btn.Initialize(Me, "Button2", "Button2")
btn.Text = "Dynamic Button"
btn.AddToParent("R2")
IMPORTANT NOTE: The first param in Initialize() MUST be Me. Only the class where the View is added to will be able to handle the events.
3. LOADING A LAYOUT MULTIPLE TIMES
Sometimes, you are going to want to re-use a certain layout multiple times. This can for example be because you made a layout for a list item, and now want to re-use it for each item in your list.
This can be done using the BANano.LoadLayoutArray method:
' loading layouts as array (multiple times loading the same layout)
For i = 0 To 4
       Dim Ret As Long
       Dim AllViews As Map

       Ret = BANano.LoadLayoutArray("#r3", "MultiLayout", (i=0)) ' only clear the parent if it is the first layout that is loaded

       ' ret returns a unique number you can use to get all views
       AllViews = BANano.GetAllViewsFromLayoutArray("MultiLayout", Ret)

       Dim mLabel As SKLabel = AllViews.Get("multilabel") ' always lowercase
       mLabel.Text = "I'm {C:#FF0000}{U}row " & (i+1) & "{/U}{/C} of a multi layout!"

       Dim mButton As SKButton = AllViews.Get("multibutton") ' always lowercase
       mButton.Text = "Multi Button " & Ret
Next
Nothing difficult here. The final parameter in LoadLayoutArray() can be used to clear the parent on which you are loading the layout (in this case #r3).
The method does return a ‘unique’ number. This is very useful to get all the views from your layout. We do this with the BANano.GetAllViewsFromLayoutArray() method.
The GetAllViewsFromLayoutArray() method returns a map with all the Views in it, for that layout, with instance ‘unique number’.
So you can just grab Views and start manipulating them.
NOTE: you may think you should ‘buffer’ this AllViews in a map yourself but this is not needed! In the generated Javascript, this will already be done for you so you would do it twice.
There is also a ‘helper’ method BANano.GetSuffixFromID() to know what this ‘unique’ number is, in case for example you want to make changes further in your code in a certain event.
Sub MultiButton_Click (event As BANanoEvent)
   Log(event.ID)
   Dim Ret As Long = BANano.GetSuffixFromID(event.ID)

   Dim Allviews As Map = BANano.GetAllViewsFromLayoutArray("MultiLayout", Ret)
   If Allviews <> Null Then
       Dim mButton As SKButton = Allviews.Get("multibutton") ' always lowercase
       mButton.Text = "Multi Button " & Ret & " changed!"
   End If
End Sub
This concludes the 2 part tutorial of the new UI system in BAnano v2. Possibilities are endless and so much closer to standard B4J than the UI system v1.
Alwaysbusy
BANano is a new B4J library to create one-page websites/webapps with (offline) Progressive Web App support. Unlike its big brother ABMaterial, BANano does not rely on any particular framework like Materialize CSS. You will have to write that part yourself, but on the other hand, you have the choice to pick which one.
Why a second framework? Well, from the start ABMaterial was build with a back server in mind. B4J has great support to setup a very powerful jServer to handle web requests. Which does mean all intelligence is at the server side and you have the full power of B4J to do whatever you want (secure database access, serial communication, cache control etc). With B4JS, some of this intelligence could be transferred to the browser side, but the app still needs internet/intranet access so this is as far as it could go.
BANano is a different animal. It can use a Service Worker to ‘install’ the web app in the browser, so it can also work when the user is offline. While ABMaterial builds the page from the server side, BANano builds it from the browser side. This means EVERYTHING you write in B4J is transpiled to JavaScript, HTML and CSS.
But with great power comes great responsibility! Unlike ABMaterial, knowledge of HTML, CSS and to some extend JavaScript is needed to build BANano apps. It makes excellent use of B4X’s SmartStrings to create the HTML part of the app. BANano gives you a set of tools to write your own wrapper around any framework (MiniCSS, Skeleton, Spectre, Bootstrap, …), which then can be easily used to quickly build webapps/websites.
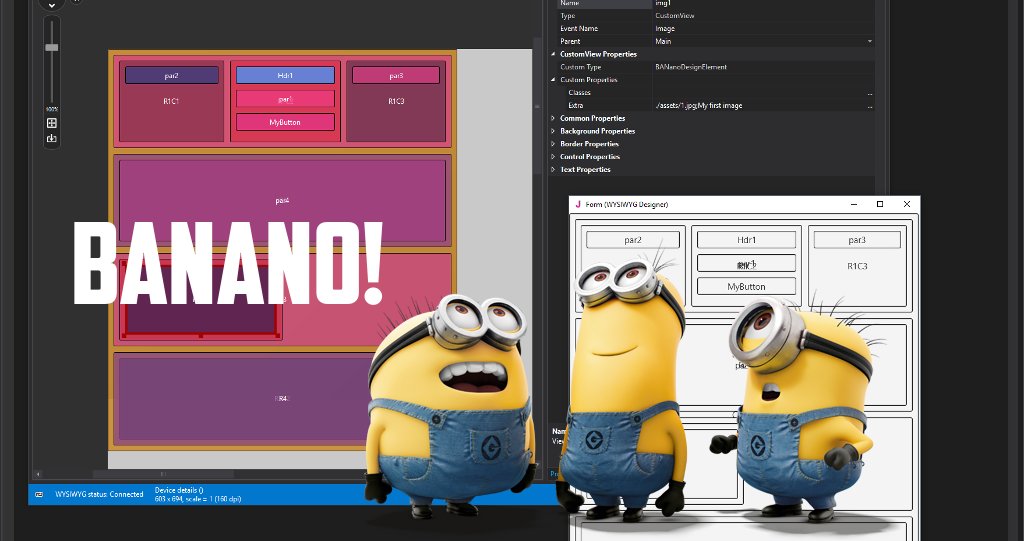
v1.21+: Abstract Designer support:
It is a rather simple and elegant system I think:
1. You set BANanoDesignElement elements in the designer (Add View, Custom view).
Only these properties apply:
2. Each has a Build event where you can do your specific html stuff
3. You load a layout with BANano.LoadLayout. At this time, the bjl file is parsed (as B4J custom components do not support a different parent than main yet, I had to write an alogorithm to find the parent myself) and translated to _Build commands (you will see it in the DemoUI library file).
Sub Class_Globals
End Sub

'Initializes the object. You can add parameters to this method if needed.
Public Sub Initialize

End Sub

Sub Div_Build (el As BANanoDesignElement)
   el.Target.Append($"
<div id="${el.Name.ToLowerCase}" class="${el.Classes}"></div>

"$)
End Sub

Sub Row_Build (el As BANanoDesignElement)
   el.target.Append($"
<div id="${el.Name.ToLowerCase}" class="${el.Classes}"></div>

"$)
End Sub

Sub Column_Build (el As BANanoDesignElement)
   el.target.Append($"
<div id="${el.Name.ToLowerCase}" class="${el.Classes}"></div>

"$)
End Sub

' extra: the level of h;the text
Sub H_Build (el As BANanoDesignElement)
   el.target.Append($"<h${el.Extra(0)} id="${el.Name.ToLowerCase}" class="${el.Classes}">${el.Extra(1)}</h${el.Extra(0)}>"$)
End Sub

Sub P_Build (el As BANanoDesignElement)
   el.target.Append($"

${el.Extra(0)}</p}>"$)
End Sub

Sub Button_Build (el As BANanoDesignElement)
   Dim btn() As BANanoElement = el.target.RenderAppend($"<button id="${el.Name.ToLowerCase}" class="${el.Classes}">${el.Extra(0)}</button>"$,"").Children("#" & el.Name.ToLowerCase)
   ' defining events is very simple. Note that it has to be run AFTER adding it to the HTML DOM!
   ' eventName must be lowercase!
   btn(0).HandleEvents("click", el.ModuleEventHandler, el.Name.ToLowerCase & "_clicked")
End Sub

' extra: image source;alt text
Sub Image_Build (el As BANanoDesignElement)
   el.target.Append($"<img id="${el.Name.ToLowerCase}" src="${el.Extra(0)}" alt="${el.Extra(1)}"/>"$)
End Sub
Using this in a real app is now very simple:
Sub Process_Globals
   Private BANano As BANano 'ignore
   Private Builder As BANanoMiniCSSBuilder '<-------- defining our BANano Library
End Sub

Sub AppStart (Form1 As Form, Args() As String)

   ' you can change some output params here
   BANano.Initialize("BANano", "BANanoMiniCSS",12)
   BANano.HTML_NAME = "banano.html"

   BANano.Header.Title="BANano MiniCSS"

   BANano.ExternalTestConnectionServer = "http://gorgeousapps.com"

   BANano.Header.AddCSSFile("mini-nord.min.css")

   ' start the build
   BANano.Build(File.DirApp)

   ExitApplication
End Sub

'Return true to allow the default exceptions handler to handle the uncaught exception.
Sub Application_Error (Error As Exception, StackTrace As String) As Boolean
   Return True
End Sub

' HERE STARTS YOUR APP
Sub BANano_Ready()
   Builder.Initialize '<------- initialize the library

   BANano.LoadLayout("#body", "Layout1", Builder, Me) '<--- load the layout
End Sub

Sub MyButton_Clicked(event As BANanoEvent)
   Log("Clicked on " & event.ID)
   BANano.GetElement("#r3c2").Empty
   BANano.LoadLayout("#r3c2", "SubLayout1", Builder, Me) ' <---- load a sub layout
End Sub
Builder is the library (the one who will handle the Build() events) Me (the one who will handle e.g. the MyButton_Clicked event: so like all other events except Build)
An example project using the MiniCSS javascript library is included in the zip (both the library and a demo project using it) in the DemoUi folder.
Couple of important notes:
1. Both the library and App must be a B4J UI project, not a console project
2. When you now run BuildAsLibrary, the assets in the Files folder will be zipped to Files.zip, next to the .js and .dependsOn files.
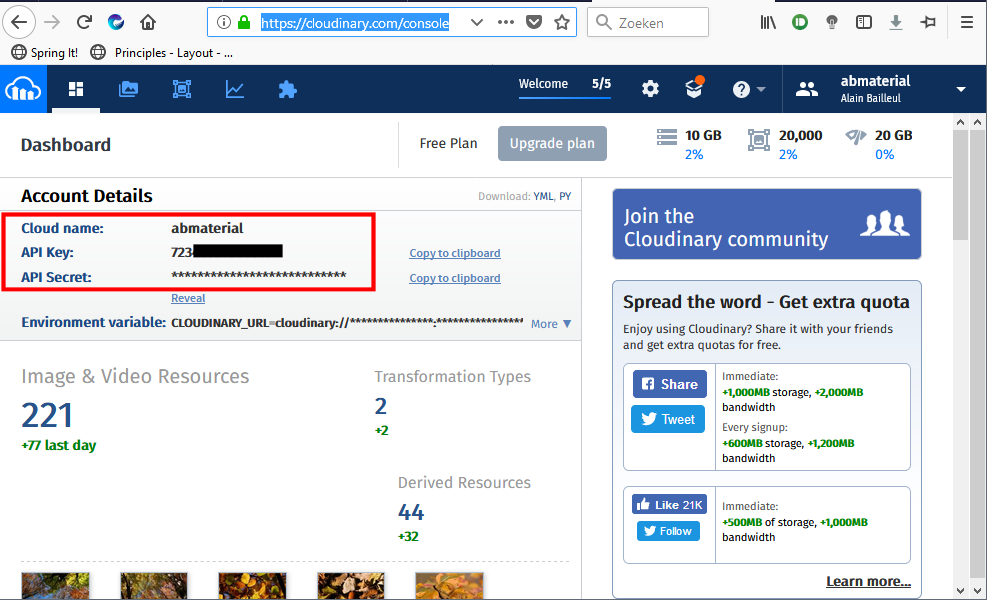
Cloudinary has a great free plan which can cover a great deal of the webapps you make without any additional cost:
Total images and videos: 300,000
Managed storage: 10 GB
Monthly net viewing bandwidth: 20 GB
In ABM, it can be used for two things:
1. Automatic upload/update of the generated CSS/JS files (the ones you find next to each index.html).
2. Your own assets, like images, videos or outer ‘RAW’ files (xls, doc, …)
Creating a free account on Cloudinary is pretty straight forward. You make a login and give your ‘cloud’ a name. You will then be able to get your API_KEY and API_SECRET from the management console: https://cloudinary.com/console:
1. Automatic upload/update when starting the .jar file.
Activate it in the main class:
' just some clear consts to explain the parameters
Dim UPLOAD_GENERATED_JSCSS As Boolean = True
Dim DO_NOT_UPLOAD_GENERATED_JSCSS As Boolean = False
Dim SHOW_DEBUG As Boolean = True
Dim DO_NOT_SHOW_DEBUG As Boolean = False
Dim CLEAR As Boolean = True
Dim DO_NOT_CLEAR As Boolean = False

#If RELEASE
       ABM.ActivateCloudinary("DONATOR_KEY","CLOUD_NAME", "API_KEY", "API_SECRET",UPLOAD_GENERATED_JSCSS, "APPNAME", DO_NOT_SHOW_DEBUG)
#else
       ABM.ActivateCloudinary("DONATOR_KEY","CLOUD_NAME", "API_KEY", "API_SECRET",DO_NOT_UPLOAD_GENERATED_JSCSS, "APPNAME", SHOW_DEBUG)
#end if
' this is for 2, your own assets
ABM.CloudinaryLoadImages(CLEAR)
ABM.CloudinaryLoadAudioVideos(DO_NOT_CLEAR)
ABM.CloudinaryLoadRawFiles(DO_NOT_CLEAR)
What will this code do?
It will create a folder structure in you Cloudinary cloud:
APPNAME/css
APPNAME/js
Every time you start your jar, both these folders will be emptied (so do not put anything else in it!) and the most recent generated .js/.css files will be uploaded. Note: depending on the size of your app, this can take quite some time. e.g. for the demo app it takes about 3 minutes.
There is nothing more you have to do, ABM will have changed all the calls in the HTML from your local drive to the CDN.
2. Your own Assests:
As you can see in (1), we pre-load all the urls of the images/videos and other files. That way it is pretty simple to use the e.g. if we want to use an image using the ABM.CloudinaryGet() command:
Dim img4 As ABMImage
img4.Initialize(page, "img4", ABM.CloudinaryGet("demo/images/sample-1"), 1)
page.Cell(6,1).AddComponent(img4)
As parameter it takes the ‘publicId’ of the asset. In my case my APPNAME was demo, I created a folder images in it in the Cloudinary console and uploaded a file called sample-1.jpg so the public id becomes:
demo/images/sample-1
Note: I’ve noticed when uploading images via the cloudinary console, the public id cuts of the file extension.
The result of the ABM.CloudinaryGet command will be something like:
It is very easy to upload and organize you assets through the Cloudinary console app:
but sometimes you will want to upload it through B4X code.
So the following API methods do exist:
' using these 3 methods will automatically add them the the internal Cloudinary map
' so you can use them with the ABM.CloudinaryGet() method without reloading.
' The next time you restart your .jar, they will also be loaded.
ABM.CloudinaryUploadImage("publicId", fullFilePath)
ABM.CloudinaryUploadVideo("publicId", fullFilePath)
ABM.CloudinaryUploadRawFile("publicId", fullFilePath)

ABM.CloudinaryDeleteImage("publicId")
ABM.CloudinaryDeleteVideo("publicId")
ABM.CloudinaryDeleteRawFile("publicId")

ABM.CloudinaryDeleteAllImagesWithPrefix("prefix")
ABM.CloudinaryDeleteAllVideosWithPrefix("prefix")
ABM.CloudinaryDeleteAllRawFilesWithPrefix("prefix")
For the last 3 methods, you use a ‘prefix’ to delete files in bulk:
e.g. if I want to delete all images from my images folder, I would do:
Cloudinary has a wide range of API methods (e.g. for image manipulation etc), and maybe I will expand the B4X API to support it too, but for the moment using it as a CDN only, it suffices.
Note that this is a Donator only feature. ABM 4.35 will be available in a couple of weeks.
So now that we know the basics of B4JS, lets make something real using a lot of what we have learned together with some ABMaterial components.
In this tutorial, we are going to create a simple calculator where all our ‘logic’ happens on the browsers side.
A video of what we are going to make:
Great, so lets get started!
First we are going to create the B4JS part: the logic of the calculator. This is pretty simple and we make use of the JavaScript eval() function to do the actual calculation.
'Class module
Sub Class_Globals
   ' use public or dim if you want to share this variable over ALL B4JS classes
   ' use private if only within this class
   Public CurrentInput As String

   ' to access the constants
   Public ABM As ABMaterial 'ignore
   ' so we can use an msgbox
   Public Page As ABMPage 'ignore, just to be able to run ABMPage functions
End Sub

'Initializes the object. You can NOT add parameters to this method.
'MUST be called InitializeB4JS is automatically called when using this class
Public Sub InitializeB4JS

End Sub

public Sub ButtonPressed(key As String) As Boolean
   Select Case key
       Case "="
           If CurrentInput  "" Then
               CurrentInput = Page.B4JSRunInlineJavascriptMethod("evaluate", Array As String(CurrentInput))
           End If
       Case "Del"
           If CurrentInput.Length > 0 Then
               CurrentInput = CurrentInput.SubString2(0, CurrentInput.Length - 1)
           End If
       Case Else
           CurrentInput = CurrentInput & key
   End Select
   Dim ResultLabel As ABMLabel 'ignore
   ' use the same key as when you created it
   ResultLabel.B4JSUniqueKey = "ResultLabel"
   ' we must use the B4JSText, not the normal Text property in a B4JS class
   ResultLabel.B4JSText = CurrentInput
   ' consume the event, if any server one should exist
   Return True
End Sub

public Sub OnMouseEnter(uniqueID As String) As Boolean
   Page.B4JSRunInlineJavascriptMethod("setCSS", Array As String(uniqueID, "background-color: #cacaca !important"))
   ' consume the event, if any server one should exist
   Return True
End Sub

public Sub OnMouseLeave(uniqueID As String) As Boolean
   Page.B4JSRunInlineJavascriptMethod("setCSS", Array As String(uniqueID, "background-color: #f5f5f5 !important"))
   ' consume the event, if any server one should exist
   Return True
End Sub

#if JAVASCRIPT
function evaluate(s) {
    // so we get back a string
   return '' + eval(s);
}

function setCSS(id, val) {
    // we got the button, but we want the cell (which is its parent parent)
   $('#' + id).parent().parent().attr('style', val);
}
#End If
Notes:
As said in a previous tutorial, when we use a B4JS class in a ABM components B4JSOn… method, it gets its own instance. This is not very practical for our calculator as the CurrentInput variable must be shared. If we don’t make CurrentInput public, then each button will have its own CurrentInput.
As we don’t want any communication with the server, each method we are going to call returns true: consuming the event on the browser side.
When we dim the ResultLabel label, we do not initialize it again. To remove the warning in B4J, you can just add the ‘ignore after the dim. But what we MUST do, is set the B4JSUniqueKey. It must be the same as what we will set in the next part, the normal ABM Web Page.
Now we are ready to build the graphical UI part in ABMaterial and use the B4JS methods we created here.
We make some themes for our buttons and input field:
public Sub BuildPage()
   ' initialize the theme
   BuildTheme

   ' initialize this page using our theme
   page.InitializeWithTheme(Name, "/ws/" & ABMShared.AppName & "/" & Name, False, ABMShared.SessionMaxInactiveIntervalSeconds, theme)
   page.ShowLoader=True
   page.PageHTMLName = "index.html"
   page.PageTitle = "Template"
   page.PageDescription = "Template"
   page.PageKeywords = ""
   page.PageSiteMapPriority = ""
   page.PageSiteMapFrequency = ABM.SITEMAP_FREQ_YEARLY

   page.ShowConnectedIndicator = True

   ' create the page grid
   page.AddRows(1,True,"").AddCells12(1,"")
   page.AddRowsM(1,True, 0,0,"").AddCellsOSMP(1,0,0,0,12,12,12,0,0,0,0,"border")
   page.AddRowsM(4,True, 0,0,"white").AddCellsOSMP(4,0,0,0,3,3,3,0,0,0,0,"")
   page.AddRowsM(1,True, 0,0,"").AddCellsOSMP(1,0,0,0,12,12,12,0,0,0,0,"")
   page.AddRows(5,True,"").AddCells12(1,"")

   page.BuildGrid 'IMPORTANT once you loaded the complete grid AND before you start adding components
End Sub
And in ConnectPage() we build the calculator:
public Sub ConnectPage()
   Dim ResultLabel As ABMLabel
   ResultLabel.Initialize(page, "ResultLabel", "", ABM.SIZE_H4, True, "right")
   ' we are going to use this component on the B4JS side, so give it a UNIQUE key
   ResultLabel.B4JSUniqueKey = "ResultLabel"
   ResultLabel.PaddingRight = "10px"
   page.Cell(2,1).AddComponent(ResultLabel)

   ' setting a fixed height to the cell
   page.Cell(2, 1).SetFixedHeight(90, False)

   ' a list with all the buttons so we can easily iterate through them to build the buttons
   Dim Buttons As List = Array As String("7", "8", "9", "/", "4", "5", "6", "*", "1", "2", "3", "-", ".", "0", "Del", "+", "=")
   Dim ButtonPos As Int = 0

   For x = 1 To 4
       For y = 1 To 4
           ' we use just a label for the 'button'
           Dim btn As ABMLabel
           ' as we will raise events from the cell this time, we must give it also a UNIQUE key
           page.Cell(2+x, y).B4JSUniqueKey = "btn" & ButtonPos
           If y < 4 Then
               ' the first three button (white) of the row
               btn.Initialize(page, "" & ButtonPos, Buttons.Get(ButtonPos), ABM.SIZE_H4, True, "black")
               btn.IsTextSelectable = False
               ' setting the white theme
               page.Cell(2+x, y).UseTheme("white")
               ' attaching our B4JS methods to the Cell events.  We pass the labels ID that we can then use in the Javascript SetCSS method
               page.Cell(2+x, y).B4JSOnMouseEnter("B4JSCalculator", "OnMouseEnter", Array As String("btn" & ButtonPos))
               page.Cell(2+x, y).B4JSOnMouseLeave("B4JSCalculator", "OnMouseLeave", Array As String("btn" & ButtonPos))
           Else
               ' the last button in the row (black).  We don't set a hover effect on theù
               btn.Initialize(page, "" & ButtonPos, Buttons.Get(ButtonPos), ABM.SIZE_H4, True, "white")
               btn.IsTextSelectable = False
               page.Cell(2+x, y).UseTheme("black")
           End If
           ' all the cells have a click event and we pass the labels text to the B4JS function to use in the Select Case
           page.Cell(2+x, y).B4JSOnClick("B4JSCalculator", "ButtonPressed", Array As String(Buttons.Get(ButtonPos)))
           ' also setting a fixed height
           page.Cell(2+x, y).SetFixedHeight(90, False)
           ' add we add the component as an Array component
           page.Cell(2+x, y).AddArrayComponent(btn, "btn")
           ' next button
           ButtonPos = ButtonPos + 1
       Next
   Next
   ' finally we also add our last button, the =
   Dim btn As ABMLabel
   ' setting the UNIQUE key
   page.Cell(7, 1).B4JSUniqueKey = "btn" & ButtonPos

   btn.Initialize(page, "" & ButtonPos, Buttons.Get(ButtonPos), ABM.SIZE_H4, True, "white")
   btn.IsTextSelectable = False
   ' using the green theme
   page.Cell(7, 1).UseTheme("green")

   ' also using the ButtonPressed function from B4JS
   page.Cell(7, 1).B4JSOnClick("B4JSCalculator", "ButtonPressed", Array As String(Buttons.Get(ButtonPos)))
   ' setting the height
   page.Cell(7, 1).SetFixedHeight(90, False)
   ' and finally adding it as an Array component
   page.Cell(7, 1).AddArrayComponent(btn, "btn")

   ' and just to be sure if our server is still synced with the browser when we need it, lets show an msgbox
   Dim btnServerResult As ABMButton
   btnServerResult.InitializeFlat(page, "btnServerResult", "", "", "Hey, server what is my current result?", "")
   page.Cell(9, 1).AddComponent(btnServerResult)

   ' refresh the page
   page.Refresh
   ' Tell the browser we finished loading
   page.FinishedLoading
   ' restoring the navigation bar position
   page.RestoreNavigationBarPosition
End Sub
Finally, we add the msgbox to the button on the server so we can prove our server can still receive the current browser situation of the ABMInput field when needed.
Sub btnServerResult_Clicked(Target As String)
Dim ResultLabel As ABMLabel = page.Component("ResultLabel")
page.Msgbox("msgbox", "Your complex calculation is now " & ResultLabel.Text, "Result", "OK", False, ABM.MSGBOX_POS_CENTER_CENTER, "")
End Sub
I've added a lot of comments in the source code so it will be easier to follow.
I've thought a long time on how we could connect the ABM UI in a clean way with the B4JS classes and I'm satisfied with the result. Some may argue why the introduction of B4JSUniqueKey and not just using the ID but it was a real necessity. ABM is actually very smart in how IDs work. It keeps track of its parents and makes it unique if needed. However, as B4JS is ‘compiled’ it doesn’t has this information when running.
For example it is quite possible that at compile time some components don’t even exist yet. (actually, most of them don’t as they are created in ConnectPage()). So the link between the B4JS component and its future ABM counterpart must be done by you, the programmer.
Another thing you could ask is why having .Text and .B4JSText, why can’t the same be used. In theorie there wouldn’t be a problem with that, except an ABMComponent has a lot more properties and methods than what B4JS can do. To distinguish which properties are available in B4JS, I gave them a prefix.
Not all ABM Components properties and methods will be converted. Gradually, some may be added but it is never the intention to convert them all to B4JS. Frankly, it would be an impossible task. ABM is so huge (took me over 2 years day and night to get where we are now). Other components will also be ‘converted’ in the future too, but they will be done on a ‘on-need’ base.
In conclusion, as Mindful mentioned: this paves the way to progressive web apps!
I’ll try to make a download of ABM 4.25 As soon as possible so the donators can have a go with B4JS very soon.
For the ones interested in the relevant JavaScript source code of our B4JS class:
var _currentinput="";
var _abm;
var _page;

function b4js_b4jscalculator() {
     var self;
     this.initializeb4js=function(){
          self=this;
          try {
          }
          catch(err) {
               console.log(err.message + ' ' + err.stack);
          }
     };
     this.buttonpressed=function(_key){
          try {
               switch ("" + _key) {
                    case "" + "=":
                         if (_currentinput!="") {
                              _currentinput = evaluate(_currentinput);
                         }
                         break;
                    case "" + "Del":
                         if (_currentinput.length>0) {
                              _currentinput = _currentinput.substring(0,_currentinput.length-1);
                         }
                         break;
                    default:
                         _currentinput = _currentinput+_key;
                         break;
               }
               var _resultlabel={};
               _resultlabel.b4jsvar=$('[data-b4js="resultlabel"]');
               _resultlabel.b4jsvar.html(b4js_buildtext(_currentinput, false));
               return true;
          }
          catch(err) {
               console.log(err.message + ' ' + err.stack);
          }
     };
     this.onmouseenter=function(_uniqueid){
          try {
               setCSS(_uniqueid, "background-color: #cacaca !important");
               return true;
          }
          catch(err) {
               console.log(err.message + ' ' + err.stack);
          }
     };
     this.onmouseleave=function(_uniqueid){
          try {
               setCSS(_uniqueid, "background-color: #f5f5f5 !important");
               return true;
          }
          catch(err) {
               console.log(err.message + ' ' + err.stack);
          }
     };
};

function evaluate(s) {
    // so we get back a string
   return '' + eval(s);
}
function setCSS(id, val) {
    // we got the button, but we want the cell (which is its parent parent)
   $('#' + id).parent().parent().attr('style', val);
}
I’ve put JSON and Ajax calls in one tutorial, as in many cases they go together anyway.
JSON
The JSONParser and JSONGenerator in B4JS are almost identical as their B4X versions. The only method not supported (yet) is NextValue. To be honest, I haven’t needed it in any of my projects yet so if someone knows a good example of its usage, please let me know.
This example is based on Erels example, without the reading from file part as this is not supported in B4JS.
public Sub TestJson()
   ' String -> JSON
   Dim JSON As JSONParser
   JSON.Initialize($"{"menu": {
  "id": "file",
  "value": "File",
  "popup": {
    "menuitem": [
      {"value": "New", "onclick": "CreateNewDoc()"},
      {"value": "Open", "onclick": "OpenDoc()"},
      {"value": "Close", "onclick": "CloseDoc()"}
    ]
  }
}}"$)

   ' exploring the JSON tree
   Dim Map1 As Map
   Map1 = JSON.NextObject
   Dim m As Map 'helper map for navigating
   Dim MenuItems As List
   m = Map1.Get("menu")
   m = m.Get("popup")
   MenuItems = m.Get("menuitem")
   For i = 0 To MenuItems.Size - 1
       m = MenuItems.Get(i)
       Log(m.Get("value"))
   Next

   ' manipulating and generating a new JSON file
   Dim Data As List
   Data.Initialize
   Data.Add(1)
   Data.Add(2)
   Data.Add(3)
   Data.Add(Map1) 'add the previous map loaded
   Dim JSONGenerator As JSONGenerator
   JSONGenerator.Initialize2(Data)

   Log(JSONGenerator.ToPrettyString(2))
End Sub
AJAX Calls
In many cases, when you call a REST API you receive a JSON string. We can use what we’ve learned in the previous topic to retrieve the data we want.
Making an AJAX call (to your own B4J server or an external one) can be done like this. The example is getting a test json file from JSONPlaceholder, a Fake Online REST API for testing and protoyping (https://jsonplaceholder.typicode.com).
Note: because I’m running this test locally, I use ‘jsonp’ as the dataType otherwise Chrome will not allow a cross-domain call.
the first parameter is the ‘jobID’ (somewhat like you are used to with JobDone in B4X)
The last parameter is where you want to get the events back (an empty string returns to the ABM Page class, else to the B4JS class name specified)
In the ABM Page class we can do something similar, but the events are always returned to the server (ABM Page class)
Note: in this example I’m using the B4JS versions:
Page_AjaxResult and Page_B4JSAjaxResult
Sub Page_B4JSAjaxResult(uniqueId As String, result As String) As Boolean
   Log("Result from: " & uniqueId & " = " & result)
   Dim JSON As JSONParser
   JSON.Initialize(result)
   Dim Map1 As Map
   Map1 = JSON.NextObject
   Log("UsedID: " & Map1.Get("userId"))
   ' if True, it will not call the Page_ajaxResult declared in the Page class!
   Return True
End Sub
Page_AjaxError and Page_B4JSAjaxError
Sub Page_B4JSAjaxError(uniqueId As String, error As String)
   Log("We got an error: " & error)
End Sub
The result is what we would expect:
Result from: myJob1 = {"userId":1,"id":1,"title":"sunt aut facere repellat provident occaecati excepturi optio reprehenderit","body":"quia et suscipit\nsuscipit recusandae consequuntur expedita et cum\nreprehenderit molestiae ut ut quas totam\nnostrum rerum est autem sunt rem eveniet architecto"}
UsedID: 1
Notice our ‘myJob1’ identifier we used in the CallAjax method.
This concludes the basic B4X to B4JS tools. In the next tutorial(s) we’ll dive into how to use this together with ABMaterial.
As we have seen in our previous tutorial, we can call B4JS subs and JavaScript subs from withing our B4JS class and also from within our ABM page class.
But what if we could call our JavaScript validateCCNum from our B4J server, even if no browser is connected to our server?
To do this, me must first ‘load’ our B4JS classes into our B4J app. They are loaded onto our server.
This code is placed in our Main AppStart() method.
' we are loading our B4JS.  In the final parameter, we can even load other .js files: Array as String("myJS1.js", "myJS2.js")
   ABM.B4JSLoadOnServer(File.DirApp & "/www/js/", Null)
Note 1: we are NOT using a browser on our server side. Note 2: this does also mean that this engine can NOT use any DOM JavaScript code (yet)!
First method: we are calling a pure JavaScript method (validateCCNum):
Dim CardNumber As String = "5105105105105100"

Dim myB4JClassVar As B4JSServerVariable
' a pure javascript function does not belong to a B4JS class, so we pass an empty string
myB4JClassVar.Initialize("myVar", "")

Dim isValid As Boolean = myB4JClassVar.B4JSRunMethod("validateCCNum", Array As Object(CardNumber))
If isValid Then
       Log("Server Card '" & CardNumber & "' is a valid card. Please continue...")
Else
       Log("Server Card '" & CardNumber & "' is NOT valid. Please check the number...")
End If
Second method: we are calling our own B4JS sub CheckCard:
Dim myB4JClassVar2 As B4JSServerVariable
' Our CheckCard method DOES belong to our B4JSCalculateDistance class, so pass it
myB4JClassVar2.Initialize("myVar2", "B4JSCalculateDistance")

myB4JClassVar2.B4JSRunMethod("CheckCard", Array As Object(CardNumber))
The result (all in the B4J log of course as we do not have a browser):
' from method 1
Server Card '5105105105105100' is a valid card. Please continue...
' from method 2
Card '5105105105105100' is a valid card. Please continue...<span id="mce_SELREST_start" style="overflow:hidden;line-height:0;"></span>
So what happens here? We create a new calculator variable: B4JSServerVariable
This variable is aware of all the B4JS/JavaScript we have in our app (because of the ABM.B4JSLoadOnServer method).
Now we can use this variable to run a JavaScript method (a native one, or one of our own written in B4JS). For the latter, we do need to specify the B4JS class the method is defined in.
This system could have great potential in the future. Why not acting as a mini NodeJS server… But we’ll see!
This is another one of those fantastic B4X features that I wanted in B4JS: Inline Javascript.
Just like its big brothers, you can easily put javascript functions in a B4JS class. This last part is important: you can ONLY declare it in a B4JS class. But, as we will see further, you will be able to call the method in your normal ABM Page class.
So, suppose we found a nice method in Javascript to check a credit card. In your B4JS class, you can use #If JAVASCRIPT and #End If to define a javascript region. You can add multiple methods in one block if you want.
Public Sub InitializeB4JS
   Page.B4JSRunMethod("B4JSCalculateDistance", "cHECKCard", Array As String("5105105105105100"))
   Page.B4JSRunMethod("B4JSCalculateDistance", "CheckCard", Array As String("111111"))
End Sub

public Sub CheckCard(cardNumber As String)
   Dim isValid As Boolean = Page.B4JSRunInlineJavascriptMethod("validateCCNum", Array As Object(cardNumber))
   If isValid Then
       Log("Card '" & cardNumber & "' is a valid card. Please continue...")
   Else
       Log("Card '" & cardNumber & "' is NOT valid. Please check the number...")
   End If
End Sub
#If JAVASCRIPT
function validateCCNum(ccnum) {
   var ccCheckRegExp = /[^\d\s-]/;
    var isValid = !ccCheckRegExp.test(ccnum);
    var i;
    if (isValid) {
        var cardNumbersOnly = ccnum.replace(/[\s-]/g,"");
        var cardNumberLength = cardNumbersOnly.length;
        var arrCheckTypes = ['visa', 'mastercard', 'amex', 'discover', 'dinners', 'jcb'];
        for(i=0; i<arrCheckTypes.length; i++) {
            var lengthIsValid = false;
            var prefixIsValid = false;
            var prefixRegExp;
            switch (arrCheckTypes[i]) {
                case "mastercard":
                    lengthIsValid = (cardNumberLength === 16);
                    prefixRegExp = /^5[1-5]/;
                    break;
                case "visa":
                    lengthIsValid = (cardNumberLength === 16 || cardNumberLength === 13);
                    prefixRegExp = /^4/;
                    break;
                case "amex":
                    lengthIsValid = (cardNumberLength === 15);
                    prefixRegExp = /^3([47])/;
                    break;
                case "discover":
                    lengthIsValid = (cardNumberLength === 15 || cardNumberLength === 16);
                    prefixRegExp = /^(6011|5)/;
                    break;
                case "dinners":
                    lengthIsValid = (cardNumberLength === 14);
                    prefixRegExp = /^(300|301|302|303|304|305|36|38)/;
                    break;
                case "jcb":
                    lengthIsValid = (cardNumberLength === 15 || cardNumberLength === 16);
                    prefixRegExp = /^(2131|1800|35)/;
                    break;
                default:
                    prefixRegExp = /^$/;
            }
            prefixIsValid = prefixRegExp.test(cardNumbersOnly);
            isValid = prefixIsValid && lengthIsValid;

            // Check if we found a correct one
            if(isValid) {
                break;
            }
        }
    }

    if (!isValid) {
        return false;
    }

    // Remove all dashes for the checksum checks to eliminate negative numbers
    ccnum = ccnum.replace(/[\s-]/g,"");
    // Checksum ("Mod 10")
    // Add even digits in even length strings or odd digits in odd length strings.
    var checksum = 0;
    for (i = (2 - (ccnum.length % 2)); i <= ccnum.length; i += 2) {
        checksum += parseInt(ccnum.charAt(i - 1));
    }

    // Analyze odd digits in even length strings or even digits in odd length strings.
    for (i = (ccnum.length % 2) + 1; i < ccnum.length; i += 2) {
        var digit = parseInt(ccnum.charAt(i - 1)) * 2;
        if (digit < 10) {
            checksum += digit;
        } else {
            checksum += (digit - 9);
        }
    }

    return (checksum % 10) === 0;
}
#End If
The result in the browsers log:
Card '5105105105105100' is a valid card. Please continue...
Card '111111' is NOT valid. Please check the number...
Pretty cool no?
A couple of things we see here in the code (besides the #if JAVASCRIPT part.
1. Calling a javascript function in your B4JS code using Page.B4JSRunInlineJavascriptMethod:
Dim isValid As Boolean = Page.B4JSRunInlineJavascriptMethod("validateCCNum", Array As Object(cardNumber))
It is VERY important (unlike we are used in B4J, that the method name (here validateCCNum) matches the case. e.g. VAlidateCCNum will NOT work!
2. Calling a B4JS function in your B4JS code using Page.B4JSRunMethod:
Page.B4JSRunMethod("B4JSCalculateDistance", "cHECKCard", Array As String("5105105105105100"))
And we’re back on familiar B4X ground The case of the method (or class) does not matter as all is lowercased anyway. Why do we have to mention the class, I hear you think. Well this is because we can call a method from ANOTHER B4JS class too!
And moreover, we can also call these methods in our normal ABM webpage!
sub ConnectPage()
 ...
' method 1: calling our own B4JS sub and handeling the result on thebrowser side
   page.B4JSRunMethod("B4JSCalculateDistance", "cHECKCard", Array As String(CardNumber))

   ' method 2: directly calling the Javascript function and handeling the result on the server side
   Dim isValid As Boolean = page.B4JSRunInlineJavascriptMethod("validateCCNum", Array As Object(CardNumber))
   If isValid Then
       Log("Server Card '" & CardNumber & "' is a valid card. Please continue...")
   Else
       Log("Server Card '" & CardNumber & "' is NOT valid. Please check the number...")
   End If
   ...
End Sub
So the result of method 1 (in the Browser log):
Card '5105105105105100' is a valid card. Please continue...
Card '111111' is NOT valid. Please check the number...
And the result of method 2 (in the B4J log):
Server Card '5105105105105100' is a valid card. Please continue...
In the next tutorial (04 – Running Javascript on the server side) I’ll show how you can even run this on the server side, not even needing a browser open.
A final note: #if JAVASCRIPT regions do not really belong to the class. They are shared between all B4JS classes you create.
I can be short here: all the Core functions in B4J that are mentioned in the B4JS Introduction can be used. So, on a Sunday morning, some light reading which goes perfectly together with a nice breakfast…
Lets look a little into some topics.
Smart String Literal:
This is such an extraordinary B4X feature that I definitely wanted at least some kind of support for it.
An example:
Sub Class_Globals
   Dim myString As String
   Dim myGlobalName As String = "GlobalAlain"
End Sub

'Initializes the object. You can NOT add parameters.
Public Sub InitializeB4JS()
   Dim myName As String = "Alain"

   ' smartstrings (does not support date, time or xml function
   myString = $"Hello planet "B4X"! This is a test
    from ${myName} and ${myGlobalName}"$

   Log("myString.Contains('planet'): " & myString.Contains("planet"))
End Sub
The result in the browsers log:
Hello planet "B4X"! This is a test
    from Alain and GlobalAlain

myString.Contains('planet'): true
As you can see, it can handle quotes in the string, and variables. It does not support the special $DateTime{}, $Date{}, $Time{} and $xml{} tags. But you can make a workaround for it by putting it in a variable first:
Dim myDate as String = DateTime.Date(DateTime.Now)
Dim myTime as String = DateTime.Time(DateTime.Now)

Dim myString as String = $"Here is the current date: ${myDate} and the current time: ${myTime}"$
The result in the console is something like this:
Here is the current date: 03/11/2018 and the current time: 08:25:37
Timer:
When using a timer, you must keep in mind that it runs in the browser. This means, even when your server is down, your timer will keep running.
The usage is exactly as the B4J counterpart:
Sub Class_Globals
   Private lblTimer As Timer

   Private Page As ABMPage 'ignore, just to be able to run ABMPage functions
   Private ToastID As Int
   Private ABM As ABMaterial 'ignore, just to be able to use ABM constants
End Sub

' Initializes the object. You can NOT add parameters and MUST be called InitializeB4JS.
' is automatically called when the class is created in Javascript
Public Sub InitializeB4JS()
   lblTimer.Initialize("lblTimer", 5000)
End Sub

Sub lblTimer_Tick
       ToastID = ToastID + 1
       Page.B4JSShowToast("TimerToast" & ToastID, "green", "I'm shown in the timer without the server every 5 seconds!", 3000, False)
End Sub
StringBuilder:
Although the Smart String Literal is still better to use, B4JS does also support the StringBuilder.
Dim sb As StringBuilder
sb.Initialize
sb.Append("0123456789").Append(CRLF).Append("0123456789")
Log("sb.ToString: " & sb.ToString)
Log("Length: " & sb.Length)  ' should show 21, including the return
sb.Insert(2,"X")
Log("sb.ToString: " & sb.ToString)
sb.Remove(2,3)
Log("sb.ToString: " & sb.ToString)
This concludes this tutorial. As a B4X developer, there are not many differences between B4JS and the familiar B4X syntax, which makes it very easy to get started with.
The next tutorial will dig a bit deeper into using inline JavaScript, another feature that speeds up development considerably.
In this first tutorial, we are going to create a killer method to calculate the distance between two GEO locations. There are better ways to do so, but for demos sake…
Creating a B4JS class is very simple. Just use the menu in B4J and add a Standard Class.
'Class module
Sub Class_Globals

End Sub

Public Sub Initialize

End Sub
First thing we MUST do is renaming the Initialize method to InitializeB4JS. This is because the transpiler uses this method name to determine it has to translate this class to JavaScript.
This InitializeB4JS method can NOT have parameters!
Now we can start adding our code, just as usual in B4J. As almost the whole Core library of B4J is available, this is pretty forward. Except from the ABM methods, this could easily be seen as B4J.
'Class module
Sub Class_Globals
   ' use public or dim if you want to share this variable over ALL B4JS classes
   ' use private if only within this class
   Dim ToKM As Double = 1.609344
   Dim ToMiles As Double = 0.8684

   ' to access the constants
   Public ABM As ABMaterial 'ignore
   ' so we can use an msgbox
   Public Page As ABMPage 'ignore, just to be able to run ABMPage functions
End Sub

'Initializes the object. You can NOT add parameters to this method.
'MUST be called InitializeB4JS is automatically called when using this class
Public Sub InitializeB4JS

End Sub

public Sub CalcDistance(Lat1 As Double, Lon1 As Double, Lat2 As Double, Lon2 As Double, Unit As String)
   Dim theta As Double
   Dim Distance As Double
   theta = Lon1 - Lon2
   Distance = Sin(deg2rad(Lat1)) * Sin(deg2rad(Lat2)) + Cos(deg2rad(Lat1)) * Cos(deg2rad(Lat2)) * Cos(deg2rad(theta))
   ' logging some intermediate value
   Log("Distance = " & Distance)
   Distance = ACos(Distance)
   Distance = rad2deg(Distance)
   ' logging some intermediate value
   Log("Distance = " & Distance)
   Distance = Distance * 60 * 1.1515
   ' if we would use Page.Msgbox here, we would see in the logs an error: msgbox is NOT supported in B4JS!
   ' we must use the B4JS equivalent method Page.B4JSMsgbox
   Select Case Unit.ToUpperCase
       Case "K"
           Page.B4JSMsgbox("msgbox", "The distance is " & (Distance * ToKM) & " kilometers!", "Tutorial", "OK", False, ABM.MSGBOX_POS_CENTER_CENTER, "")
       Case "N"
           Page.B4JSMsgbox("msgbox", "The distance is " & (Distance * ToMiles) & " miles!", "Tutorial", "OK", False, ABM.MSGBOX_POS_CENTER_CENTER, "")
       Case Else
           Page.B4JSMsgbox("msgbox", "No idea what you are doing :-)", "Tutorial", "OK", False, ABM.MSGBOX_POS_CENTER_CENTER, "")
   End Select
End Sub

' some helper methods
Sub deg2rad(Deg As Double) As Double
   Return Deg * cPI / 180
End Sub

Sub rad2deg(Rad As Double) As Double
   Return Rad * 180 / cPI
End Sub
VERY IMPORTANT!!!
Depending on how you declare the variable in Class_Globals, a variable is shared between class instances or not:
This concept becomes very important when we start using ABMComponents because when you attach a B4JSOn… event to an ABMComponent, it gets its own instance of your class. The Public/Dim variables will be shared among all the components using this B4JS Class
To use our new method, I’ll make a button in ConnectPage() on the ABM page (this will be explained in a future tutorial) and when we click, we do a calculation:
Dim btn As ABMButton
btn.InitializeFlat(page, "btn", "", "", "Calculate", "")
' B4JSUniqueKey is explained in a later turorial
btn.B4JSUniqueKey = "btn001"
' define the B4JS OnClickedEvent
btn.B4JSOnClick("B4JSCalculateDistance", "CalcDistance", Array As Object(32.9697, -96.80322, 29.46786, -98.53506, "K"))
page.Cell(2,1).AddComponent(btn)
Alternative, not using an ABMButton but calling our method directly:
page.B4JSRunMethod("B4JSCalculateDistance", "CalcDistance", Array As Object(32.9697, -96.80322, 29.46786, -98.53506, "K"))
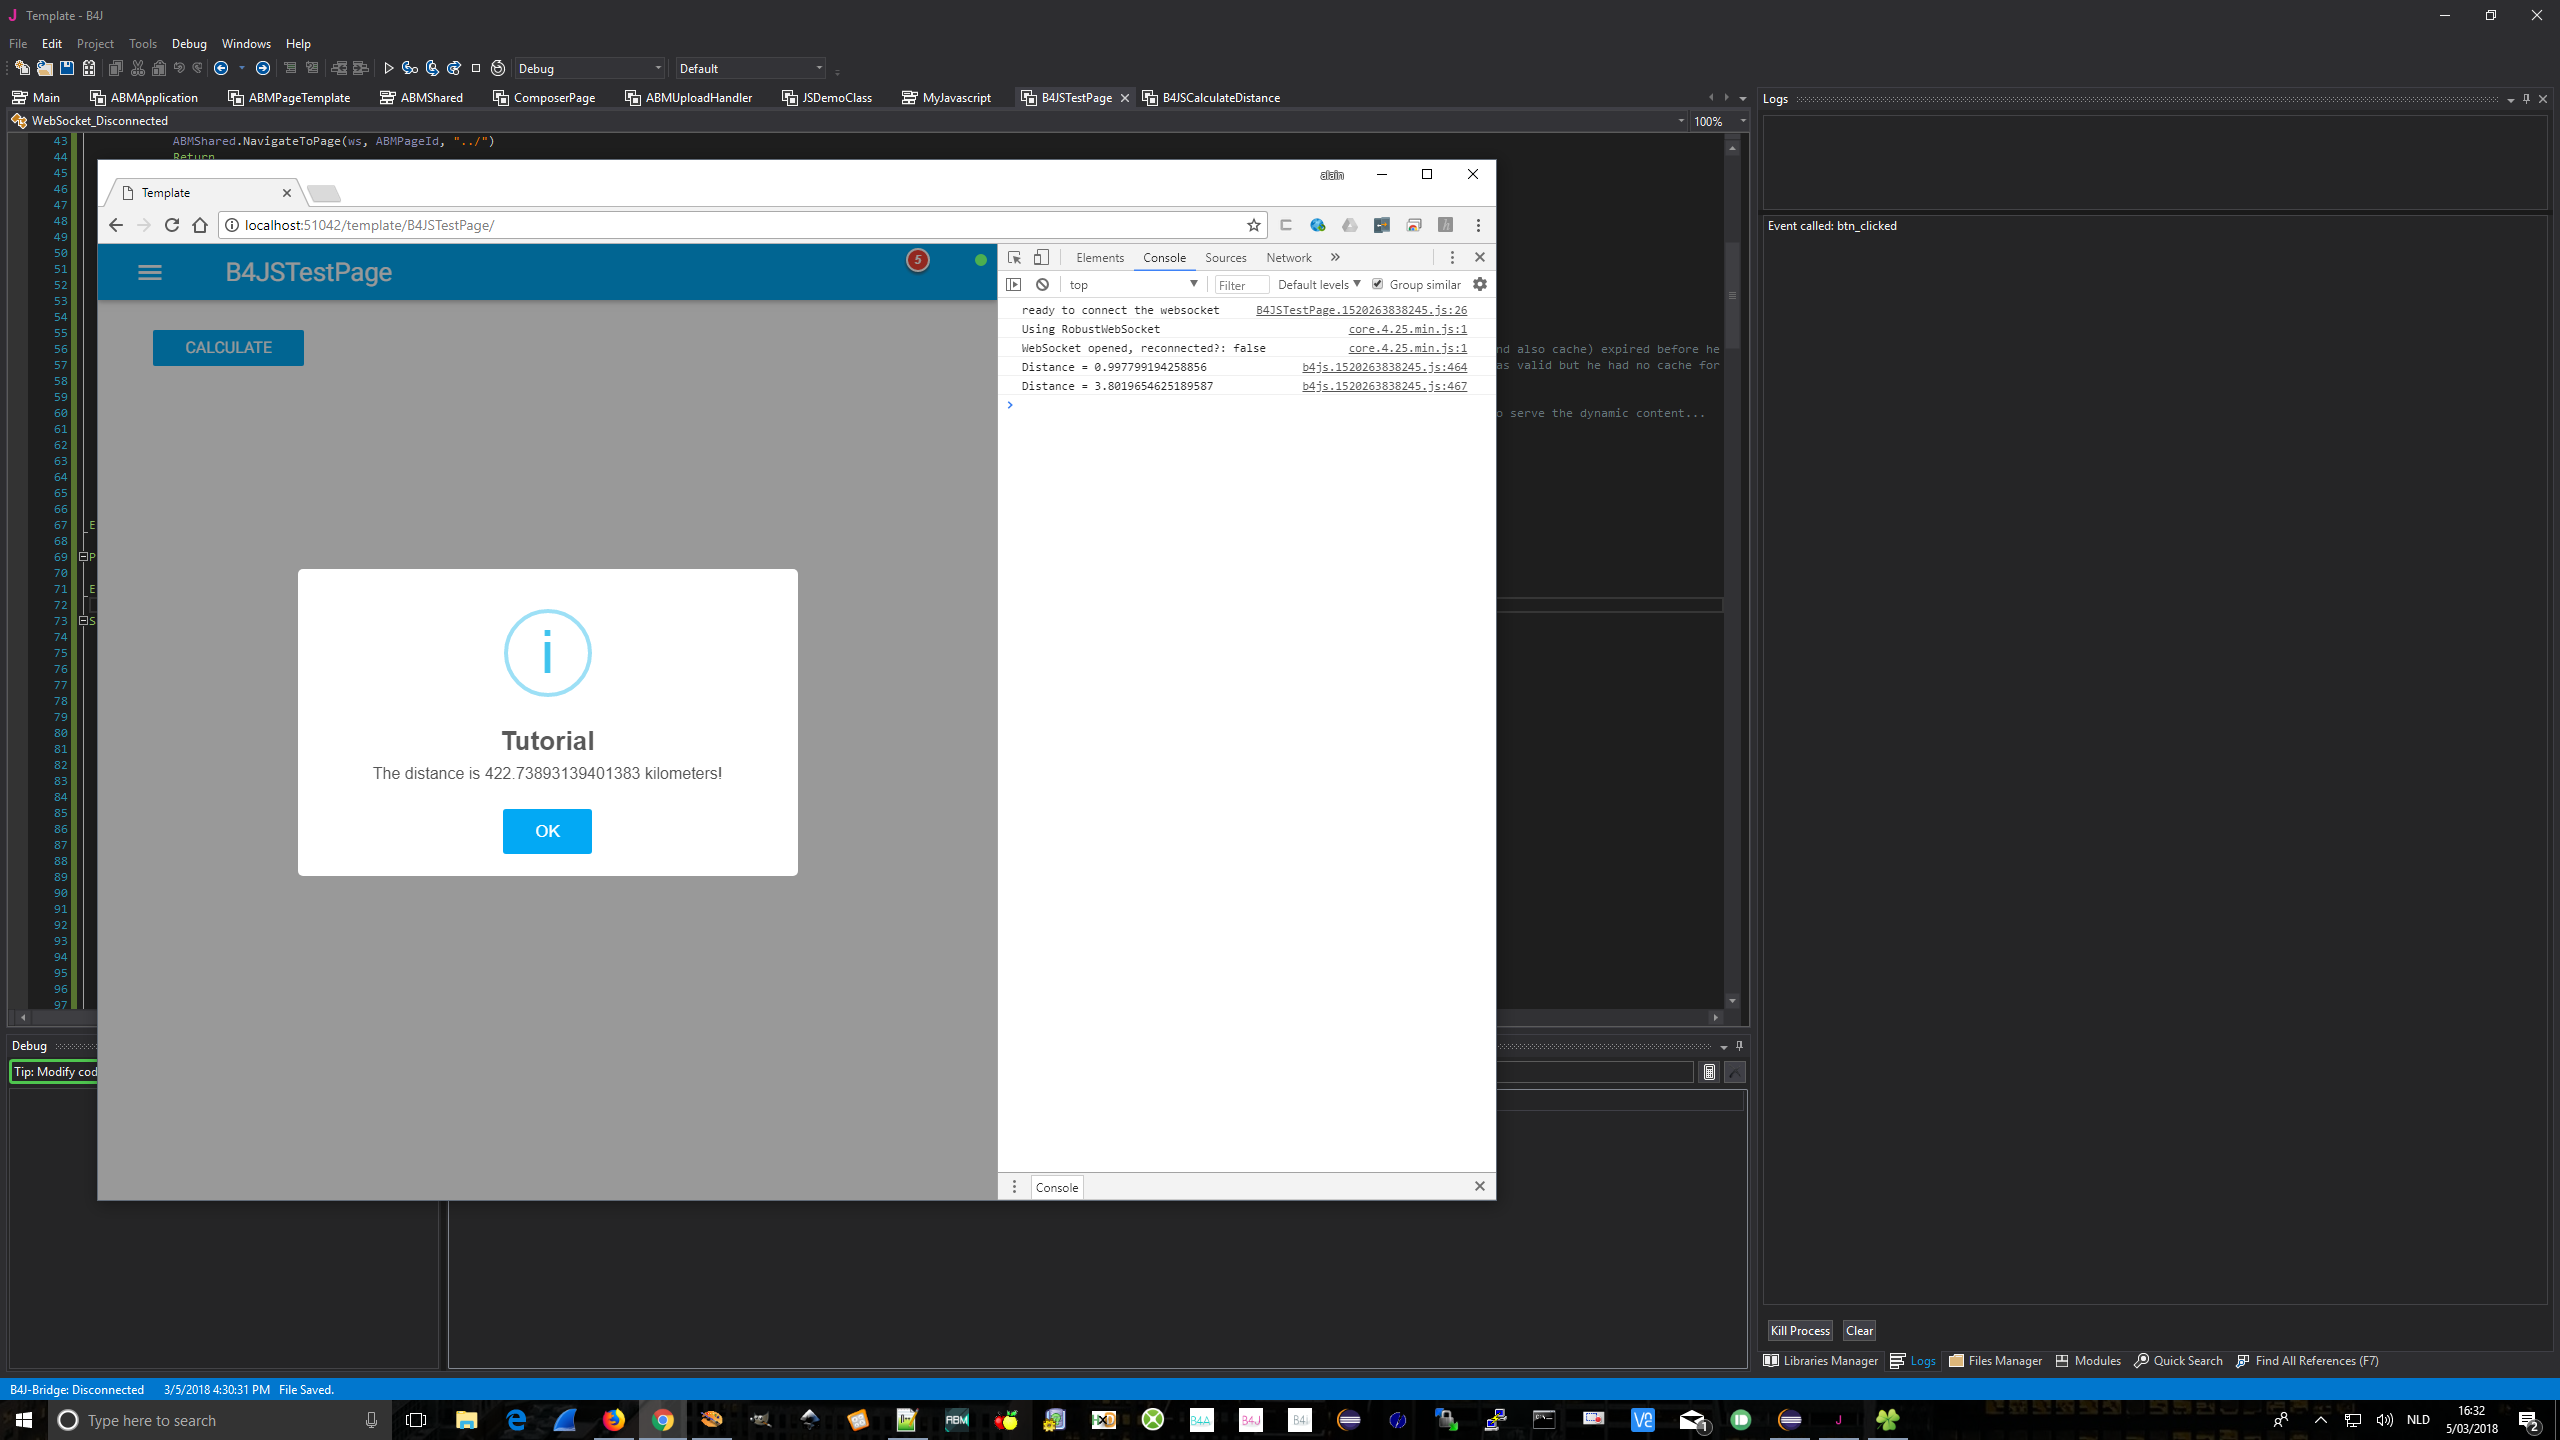
So let’s check our results (click to enlarge):
1. In the browsers log we see our two intermediate log() calls.
2. the solution to our call is shown in a message box.
But in the B4J log we also see that the normal btn_Click event is raised! That is not what we want.
To avoid this, we make a simple change to our CalcDistance method. We return a boolean true: this is saying ‘consume the click on the browser side and don’t go to the server‘.
public Sub CalcDistance(Lat1 As Double, Lon1 As Double, Lat2 As Double, Lon2 As Double, Unit As String) As Boolean
   ...
   ' important, if we do not want to raise the servers btn_click events, we must return true
   Return True
End Sub
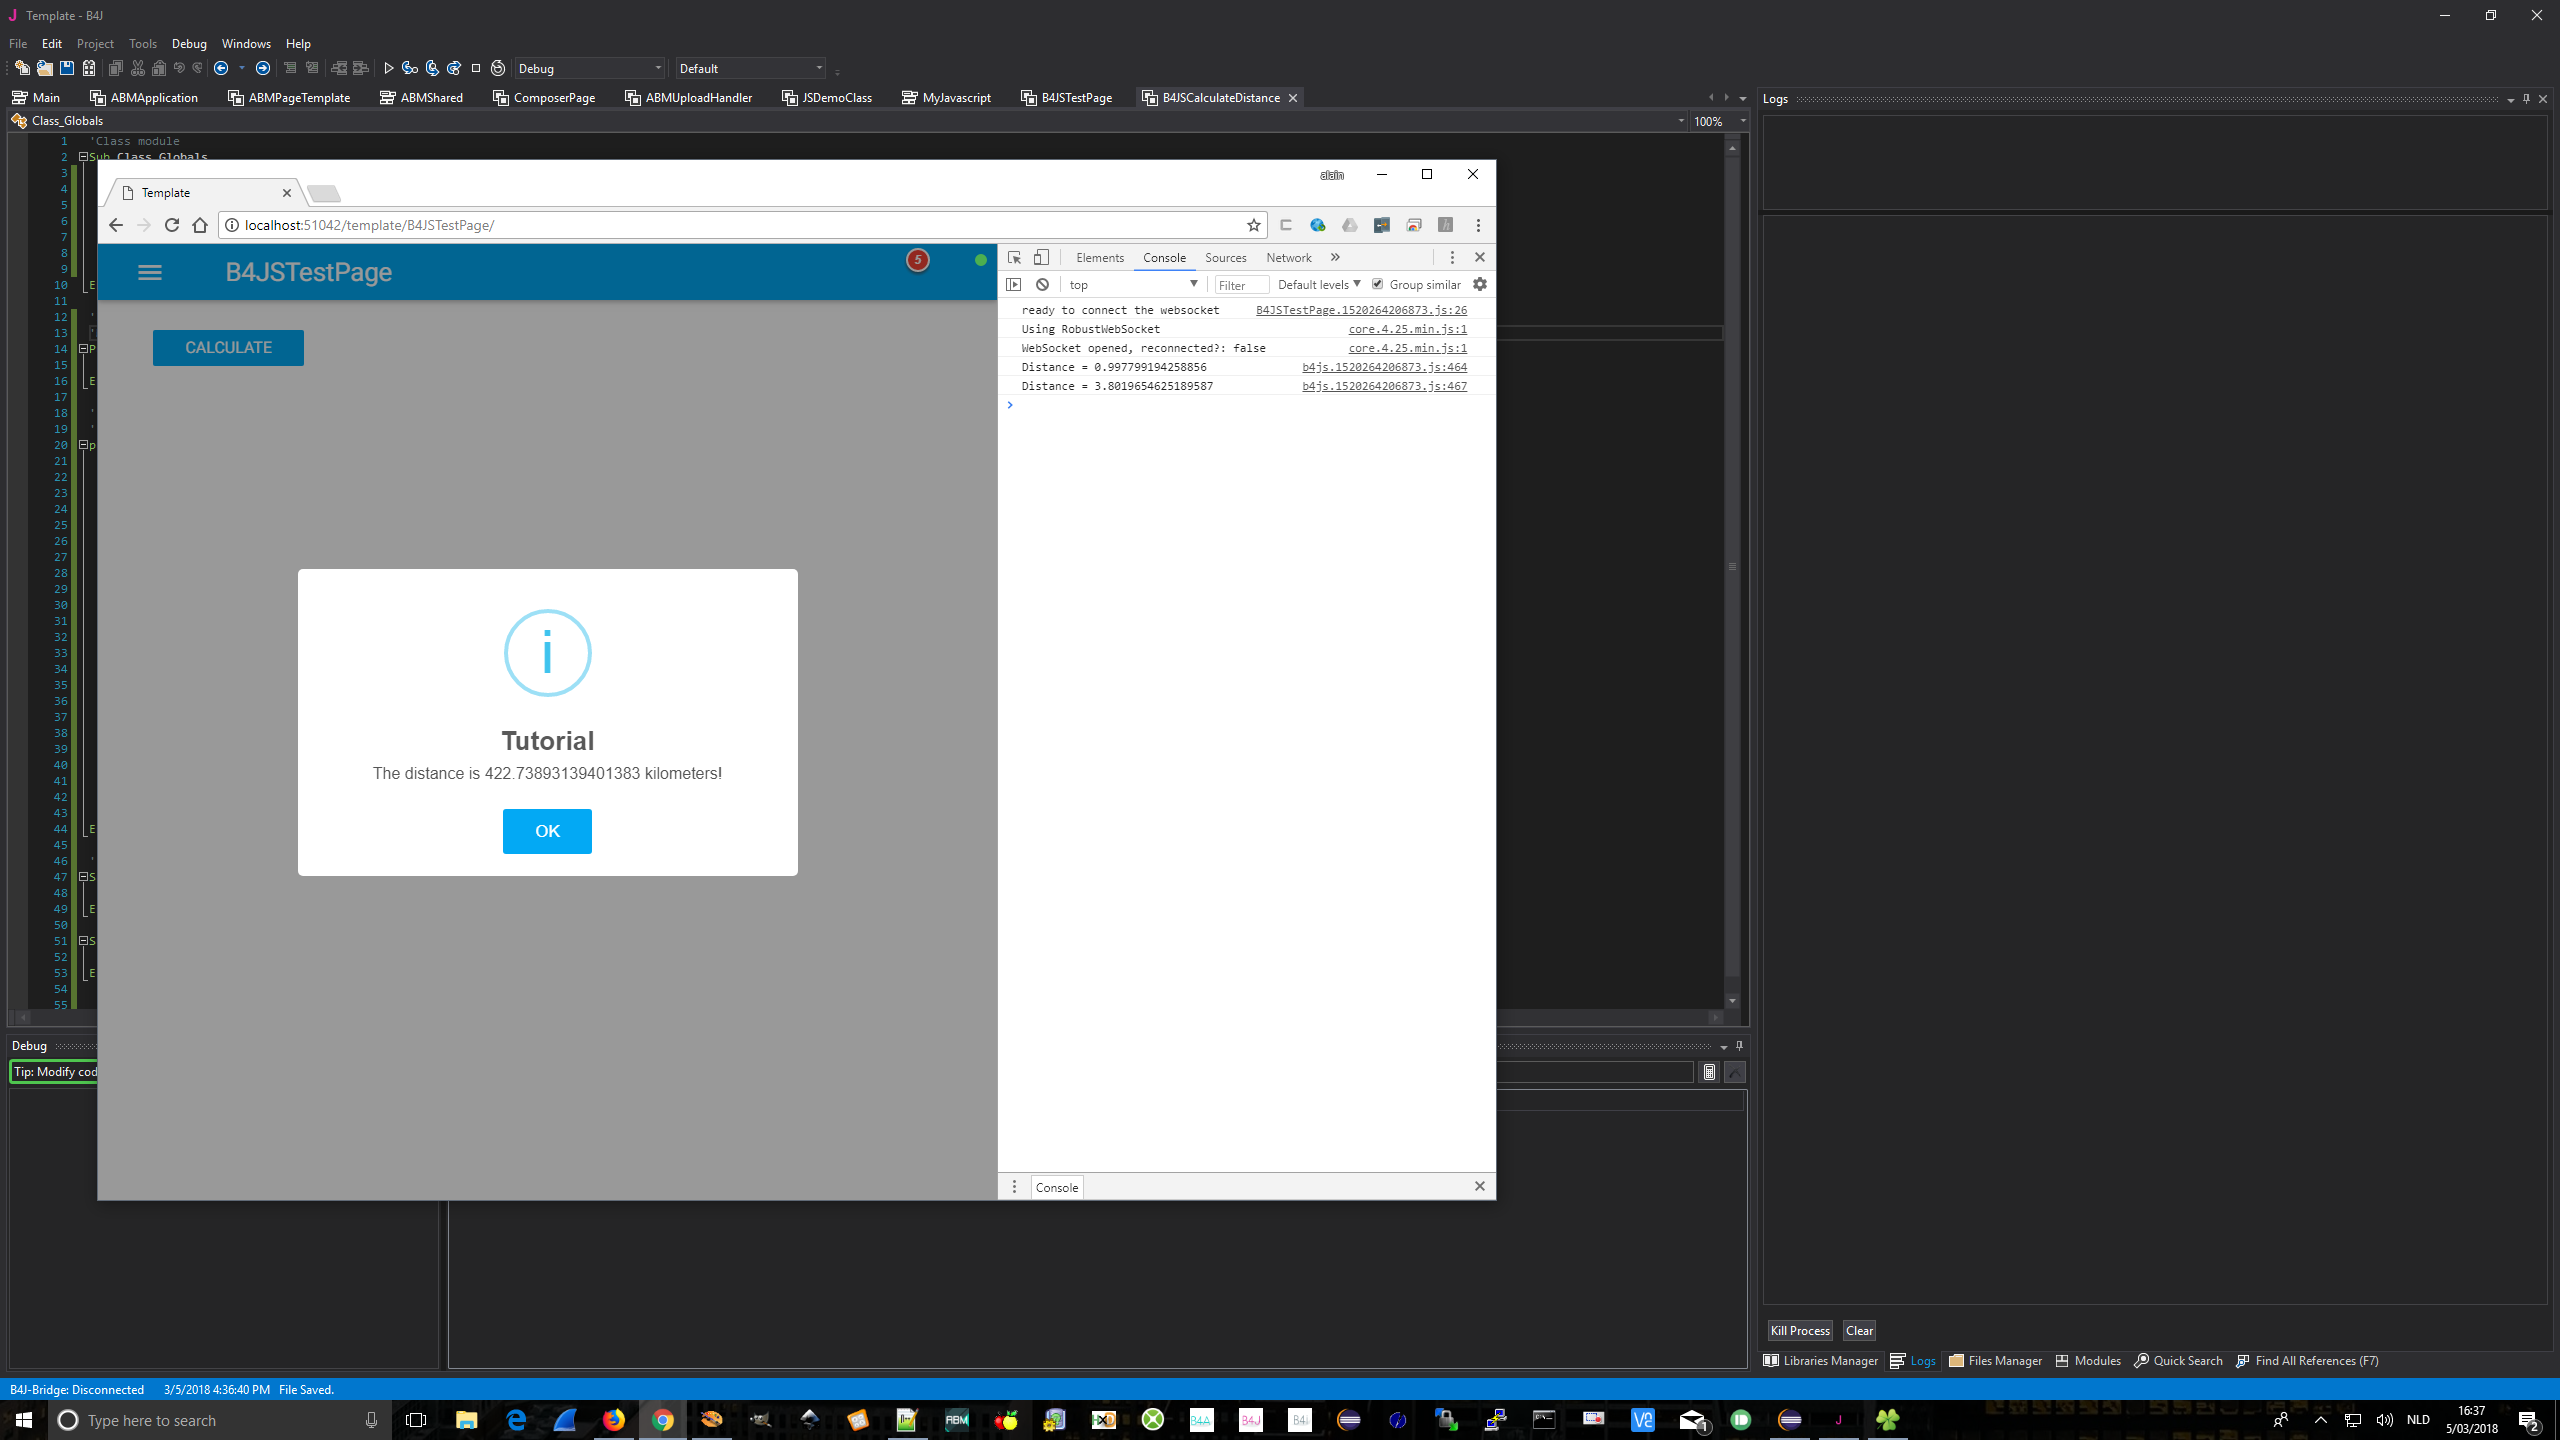
And hooray, our server is not contacted any more!
Ultimate proof we are not contacting the server for this code. I’ve stopped the server app and I can still use the button:
This concludes the first tutorial.
For those interested in the JavaScript generated for our class, here it is:
var_tokm=1.609344;
var _tomiles=0.8684;
var _abm;
var _page;
function b4js_b4jscalculatedistance() {
     var self;
     this.initializeb4js=function(){
          self=this;
          try {
          }
          catch(err) {
               console.log(err.message + ' ' + err.stack);
          }
     };
     this.calcdistance=function(_lat1,_lon1,_lat2,_lon2,_unit){
          try {
               var _theta=0;
               var _distance=0;
               _theta = _lon1-_lon2;
               _distance = (Math.sin(self.deg2rad(_lat1)))*(Math.sin(self.deg2rad(_lat2)))+(Math.cos(self.deg2rad(_lat1)))*(Math.cos(self.deg2rad(_lat2)))*(Math.cos(self.deg2rad(_theta)));
               console.log("Distance = "+_distance);
               _distance = (Math.acos(_distance));
               _distance = self.rad2deg(_distance);
               console.log("Distance = "+_distance);
               _distance = _distance*60*1.1515;
               switch ("" + _unit.toUpperCase()) {
                    case "" + "K":
                         var _b4js_returnname="msgbox";
                         b4js_msgbox("default","Tutorial","The distance is "+(_distance*_tokm)+" kilometers!","OK",'swal2pos-cc', false);;
                         break;
                    case "" + "N":
                         var _b4js_returnname="msgbox";
                         b4js_msgbox("default","Tutorial","The distance is "+(_distance*_tomiles)+" miles!","OK",'swal2pos-cc', false);;
                         break;
                    default:
                         var _b4js_returnname="msgbox";
                         b4js_msgbox("default","Tutorial","No idea what you are doing :-)","OK",'swal2pos-cc', false);;
                         break;
               }
               self.testjson();
               callAjax("https://jsonplaceholder.typicode.com/posts/1","GET","jsonp", "","myJob1", true,"b4jscalculatedistance");
               return true;
          }
          catch(err) {
               console.log(err.message + ' ' + err.stack);
          }
     };

     this.deg2rad=function(_deg){
          try {
               return _deg*Math.PI/180;
          }
          catch(err) {
               console.log(err.message + ' ' + err.stack);
          }
     };
     this.rad2deg=function(_rad){
          try {
               return _rad*180/Math.PI;
          }
          catch(err) {
               console.log(err.message + ' ' + err.stack);
          }
     };
}
In the text tutorial we are going to see how we can use inline JavaScript snippets within our B4JS classes!
Next to the normal responsive page behaviour, in ABMaterial 4.25 for B4J, you will be able to do this with containers too!
Let’s watch it at work first:
This may not sound super special, but it’s a biggie! There are very few frameworks out there that can do this, so I’m very proud of this one.
“Nice but that must ask for a lot of control code, no?“, I hear you ask.
Well, here it is:
gridContainer.IsResponsiveContainer = True
Done! 🙂
Just by setting gridContainer.IsResponsiveContainer = True, you just made the ABMContainer device responsive just like a page. This means you can from now on actually create controls that behave differently depending on the device you are on.
For example, setting this grid on a container, the last 5 cells will wrap differently on a phone, tablet or desktop:
I also added some powerful tools to adjust the layout of your WebApp according to the device you are on:
Page.GetCurrentPageSize:
Returns the current page size (phone, tablet, desktop). You can use this method e.g. in ConnectPage to determine the state of the current page size and act accordingly.
public Sub ConnectPage()
   Log("Current page size: " & page.GetCurrentPageSize)
   ...
End Sub
An event Page_SizeChanged will return the same value in the ‘current’ parameter if the user changes the window size. (It also returns the ‘previous’ state).
Note that this event is NOT raised at load time! Use Page.GetCurrentPageSize to check that.
Sub Page_SizeChanged(previous As String, current As String)
   Log(previous & " -> " & current)
   Select Case current
       Case "phone"
           gridContainer.MarginLeft = "0px"
           gridContainer.SetFixedWidth("100%")
       Case "tablet"
           gridContainer.MarginLeft = "210px"
           gridContainer.SetFixedWidth("calc(100% - 210px)")
       Case "desktop"
           gridContainer.MarginLeft = "210px"
           gridContainer.SetFixedWidth("calc(100% - 610px)")
   End Select
   gridContainer.Refresh
End Sub
Containers on a fixed position:
Next to setting a fixed with and height of an ABMContainer, you can now also set a fixed position. This can be handy to create ‘floating’ sidebars for example.
Set a parameter to empty string when you don not want to set it.
These 3 new features used together give you an immense power over how your WebApp should behave depending on the device it is running on, with very little effort.
B4X has grown to be a very powerful player in develop land. The already productive RAD IDE has received a couple of very innovative features to help you even more with your app development. Anywhere Software is always right on top of all the new stuff Android, iOS and all the other supported platforms throw at us. And being stable and reliable makes this a unique environment. The growth of the forum and the quality of the messages/responses are the real proof of this. Thanks a lot Erel for this beautiful tool. It is without a doubt the best cross-platform tool one can use for the moment!
And ABMaterial is lucky to be able to stand on the shoulders of this giant. ABM has surpassed my biggest expectations this year. It is great to see a lot of you are using it to make amazing webapps and even can make a living out of it. This was definitely the ‘year of speed‘. Very few frameworks can match ABM when it comes to develop and execution time. And there is a lot more in the pipeline for the upcoming months!
Thank you all for following my blog! You inspire me every day to push the limits of the tools and frameworks I make.
Rest me only to wish you all the very best and I hope to see you back in 2018!
A much asked feature has been to integrate custom icons in ABMaterial for B4J. In version 4.25, this will be possible!
Couple of notes first:
1. The already build-in font icons (font awesome, google icons) are a lot faster to load, so consider them first
2. Some basic CSS knowledge will be needed (margins, padding, fill)
3. Custom icons MUST be named starting with abm-
There are three ways to load custom icons in ABM:
1. SVG
These type of icons MUST be loaded in BuildPage. This is because, when used, they link to the SVG tags (contrary to embedded SVG, see further). If used multiple times, it will make your HTML code smaller as the SVG code is only included once in the HTML.
2. Embedded SVG
These type of icons can be loaded at runtime (e.g. in ConnectPage) as the SVG tag code will be included in the html. This also means if you use the same icon multiple times, the full SVG code will be added multiple times too!
Such svg tags are e.g. created when exporting it from Illustrator.
3. Images
These type of icons are just plain png/jpg images. Make sure you use the appropriate size of the image to load. e.g. if your icon is going to be 32×32, do not load a 1024×1024 image!
USAGE
Now you can use your loaded icons like you would load font based icons:
e.g.
Dim lblTest As ABMLabel
lblTest.Initialize(page, "lblTest", "This is some test {IC:#000000}abm-si-maki-basketball-11{/IC} with {IC:#000000}abm-aardbei{/IC} special icons {IC:#000000}abm-gmail{/IC} or {IC:#000000}abm-gmail2{/IC}.", ABM.SIZE_H6, True, "")
page.Cell(9,1).AddComponent(lblTest)
Note that the color in the {IC} tag must be set for compatibility reasons, but is ignored.


 and support BANano & ABMaterial