B4J: BANano 6.57 Released

As some may know, ABMaterial (ABM) has some basic JavaScript functionality build-in called B4JS. It was the predecessor of BANano. However, because of the design of ABM, B4JS could never reach its full potential. But from that came the idea to write a full blown true B4J to JavaScript Transpiler and BANano was born: (Thinking in retrospect, B4JS in ABM may have been a poor choice of words, as BANano covers much more that term)

In my day job at OneTwo, we use ABM in most of our projects. But sometimes we just miss that extra BANano can do on the Browser side. For new projects, we mostly use a BANanoServer instead of an ABMServer, but we still have many ABM apps running and continue to write extra functionalities to those apps. What if we could use BANano generated code IN ABMaterial?

Hence this new idea came up: If BANano could generate .b4xlib libraries, writing the ‘glue’ between ABM and BANano, that would be a great asset to add features to ABM!

Check out point 7 for more info on how it is done!

Changes:

1. [NEW] BANano.SetTabNotification(number As String)

Adds a notification number to the browsers tab. e.g. ‘(2) My Website’

2. [NEW] BANano.DeepClone(Obj as Object)

Deep Clones an object (e.g. a map)

3. [NEW] BANano.CreateElement(Tag as String) As BANanoElement

Creates a BANanoElement, not attached to something

4. [NEW] Use you own favicon.ico

If a favicon.ico is found in the /Files folder, it is used instead of the default BANano one.

5. [NEW] Optimisations saved to file

As the log only shows the first x of optimizations, the full list is now saved in OPTIMISATIONS.txt

6. [FIX] Fixes in how the Service worker handles additional Javascript Files

In some rare cases, the Service worker did not included some needed Javascript files.
This part of the engine has been rewritten.

7. [NEW] BANano.BuildAsB4XLibForABM(LibraryVersion As String)

New transpilation to create ABMBANano b4xlib libraries for ABMaterial.

More info: https://www.b4x.com/android/forum/threads/abmaterial-banano-making-banano-libraries-for-abmaterial.126828/#post-793319

8. [NEW] BANano.RaiseEventToABM(eventName As String, eventParamNames as List, eventParamValues as List, Description as String)

Method to raise an event to a ABM, maximum two params because B4J only supports this maximum. Use a Map is more are needed.
The Description will be added to the generated .bas file for ABM as comment.

See 7 for usage.

9. [NEW] BANano.Spread(variable as Object) as Object

Adds the spread operator (three dots) before the variable.
e.g. BANano.Spread(myVar)

becomes: …myVar

For more info on the Javascript Spread operator: https://developer.mozilla.org/en-US/docs/Web/JavaScript/Reference/Operators/Spread_syntax

10. [CHANGE] BANanoGeoLocation.GetCurrentGeoLocation() renamed to BANanoGeoLocation.GetCurrentPosition()

11. [NEW] BANANO.Header.AddJavaScriptFileSW( AssetFileNameOrUrl As String)

Does the same a AddJavascriptFile() but will write in also in the ImportScripts() method in the Service Worker file.

NOTE:such a javascript file can NOT use window or document or any other reference to the DOM as a Service Worker can not access this!

 If it is a javascript file used in a BANanoLibrary, it MUST be added in the app explicitly!

 These javascript files will NOT be merged!

12. [NEW] BANANO.Header.AddJavascriptES6FileSW( AssetFileNameOrUrl As String)

Does the same a AddJavascriptES6File() but will write in also in the ImportScripts() method in the Service Worker file.

NOTE:such a javascript file can NOT use window or document or any other reference to the DOM as a Service Worker can not access this!

13. [NEW] BANanoSQL.NextInserted( tableName As String, FieldName as String)

Returns the next auto incremented value that will be used

14. [NEW] BANanoEvent.Target() As Object

New property, can contain the Target description on which the event was triggered.

15. [NEW] TranspilerOptions. DoNotDeleteFolderOnCompilation( fullPath as String)

Prevents the Transpiler from deleting this folder. Useful e.g. for assets that are not in the /Files folder.

16. [NEW] BANano_Online() and BANano_OffLine() events

Raises an event when the webApp goes Online of Offline.

Can ONLY be used in Main!

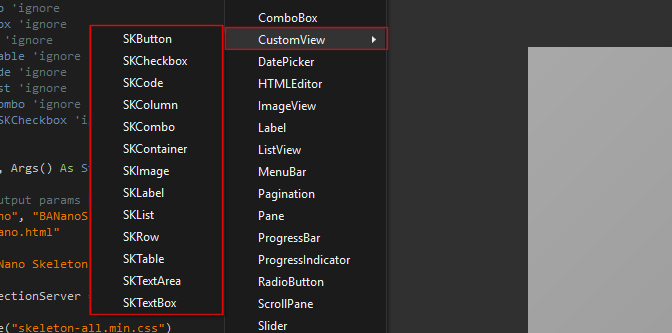
17. [NEW] New components in SKSkeleton

SKTagPicker
SKVideo

18. [FIX] Several smaller transpiler fixes

Alwaysbusy

or

Click here to and support BANano & ABMaterial

BANano 4.50 released and Anywhere Software drops a bomb!

“A very exiting week it is” would Yoda say.

The latest version of BANano introduces the BANanoServer.b4xlib library, which is an easy to use wrapper around jServer, the same B4J lib ABMaterial uses. One can now use BANano to make stand-alone Web sites, but also interfaces for e.g. IoT and Raspberry Pi (when using the BANanoServer lib: as this is a normal B4J app, it can use all B4J libs on the server side) and build complex Web Apps.

NOTE: BANano still works without the BANAnoServer Library as it did before in case you want to use another backend like PHP, but only having to program in one language has huge advantages and is what RAD is al about. :)

When you will look at the code of BANanoServer, ABM users will recognize the powerful Caching system, Root, Websocket support and HTTP/2 filters. In BANano, all that code is removed from your own projects view (but still accessible as it is an open source .b4xlib).

Some ‘easy-to-use’ methods to communicate between the browser and the server are added (to call methods from each other and to exchange files).

More info and download BANano for free here: BANano Download

But the biggest news this week must have been the BOMB Erel from Anywhere Software dropped: B4A, the tool to make native Android apps, is from now on free to use for everyone!

From his announcement a couple of weeks ago:

I’m very proud in the continuing progress of B4X tools. I’m also very proud to be part of this amazing developers community.

In the last couple of years, I have a growing feeling that B4X tools do not realize their potential. While there are all kinds of development tools, B4X offers a unique set of features: simple, powerful, mature, great community, RAD, native, cross platform and more.
B4X tools are an excellent choice for a wide range of real-world use cases.

So, the question is how to make B4X more popular? Obviously, it is not a simple nor a short-term task.
A clear growth barrier is the fact that unlike most development tools today, B4A and B4i are not free. This wasn’t the case 10 years ago.

The big announcement today is that B4A will become free in a few weeks. The framework – set of internal libraries, will be open sourced.

We will accept contributions for B4A like currently done with B4J.
We’ve also secured funds from a US investor who shares my vision of making B4X a popular development tool. These resources will allow us to further expand.

Two huge points were raised here: for one, the tool that started it all (B4A) to make native Android apps, is now 100% free (download it here)! It is clear that nowadays paying for a development platform is so 2009. Some development vendors may exist for 20+ years, but haven’t grown accordingly and seem to be stuck in overprotecting their (outdated?) technology.  Clearly, Erel is not one of them and is thinking on how to expand his tools into the next decade.

But the second part may be even more exciting: a private US investor has shown interest in the potential of B4X and shares Erel view of the future.  This opens a whole new world to the development tool and allows to think a lot bigger. He can expand his team not only with new developers, but even more important, surround himself with professionals to market his brand and let the world know of the big impact his technology can have on any software developer.

Just read up on the forum (100K+ members) and one quickly realizes the brought spectrum of apps that can be written with B4X. It is used by big corporations like NASA, IBM and Bosch to name a few, but also by small companies and citizen developers. I for one use it daily in my day job at OneTwo and we feel so secure with the tools we use it as the foundation of all our software.  Very rarely one comes across a tool where the developers are so close to its users and actually listens to their concerns and wishes.  I remember having found a bug (yeah, you really have to go deep to find one) and after reporting it to the Anywhere Software team, 10 minutes(!) later, an update was released.  This has never been seen and blocked me zero time in my own development.

I am a big fan of the B4X suite. It allowed me to write ABMaterial and BANano, two libraries to make modern Websites and Webapps.  Something I can’t see me do in any other tool, at least not with such ease and speed. And it is fun, really fun to work with too. 🙂

So I think Yoda would concur: ‘The future, bright it is!’

Alwaysbusy

[B4X] BANano 3.09 Released

CHANGES:

1. NEW: BANano .b4xlib libraries

The big change is the introduction of being able to make and use BANano libraries in the B4X .b4xlib format.
This has a couple of profound advantages over normal .jar libraries for BANano:

a. Because the libraries are compiled at the same time as the app, BANano can remove classes that are not used in the app. This works best for libraries that use Custom Views.

E.g. suppose you made a big library with a lot of components like DatePickers, Grids, etc. If you don’t use a certain component, then that code is not included in your final app. This can reduce the size of the generated app considerably.

I think the way BANano generates a build (very modular) is now paying off big time.
But, this really depends on how modular the library builder has written his library.

e.g. if a class is used in a method in a module, but this method is never called in your app, all the classes (and the DependsOnAsset, see 6) will still be included.

b. As all the assets are included in the .b4xlib, you don’t have to worry about adding them in your app anymore: they are copied and included automatically. This means less clutter in your Files tab and no more .AddCSSFile or .AddJavascriptFile that are just needed for a library. You just have to worry about the assets you use in your app.

c. No more need to make a library in two steps (BuildAsLibrary + Compile to Library)

As a Library Builder, there is nothing special you have to do in B4X, except using:

BANano.BuildAsB4Xlib("1.01")

I’ve tried it on all the libs and projects I have and it looks like it works, but maybe there are still some problems in it. I had to make a lot of changes to the core of BANano to make this possible, so the chance exists.

In short: TAKE A BACKUP! :)

2. NEW: The generated .js files are in Build (release) modus a lot smaller (tests showed sometimes 50% smaller)

3. CHANGE: UseServiceWorker is now by default false. You will have to set it to True if you want to use a Service worker.

4. NEW: MinifyOnline now also minifies CSS files

5. NEW: MergeAllCSSFiles and MergeAllJavascript files: will create one CSS and one JS file by mergin them.

6. NEW: DependsOnAsset

When creating e.g. a Custom View, you can set if it Depends on certain CSS, Javascript or other asset files.
For CSS and Javascript, you must still use the AddCSSFile & AddJavascriptFile in AppStart.

7. Because the Transpiler gets more and more options, I created a new object BANano.TranspilerOptions that hosts those options.

The old ones are marked DEPRECIATED (they still work, but will eventually be removed). A warning is shown.

8. NEW options: ShowWarningsDeadCode & RemoveDeadCode

Only works in Build

Shows a warning in the log if the transpiler suspects some code is dead (never used).
This is handy, especially in the final stage of development to remove code (or comment out) that is never used.

Methods with a _ in their name are always considerd to be needed.

You can then use the RemoveDeadCode property to prevent GENERATING dead javascript code.

9. Added the Fetch API: see here

Download here:

Alwaysbusy

or

Click here to Donation and support BANano & ABMaterial

[B4X] BANano 2.19 released


CHANGES:

1. Fix for bug in release mode for #if CSS commenting out all generated Javascript after it.

2. Support for #ExcludeFromLibrary. Modules having this tag set to true will not be compiled into the BANano library.

3. Fix for bug ‘OR’ between two String functions:

e.g. previously failed:

Dim myString As String = "Foo"
If myString.ToLowerCase.Contains("foo") Or myString.ToLowerCase.Contains("bar") Then
   Log("!")
End If

4. Fix for List AddAll(), AddAllTo()

5. BANanoObject.Initialize2() second param can now also be an Array. This makes it possible to do this:

In Javascript:

var myGraph = new Dygraph(div, data);

BANano:

DygraphObject.Initialize2("Dygraph", Array(div, data))

6. Support for BANanoPromise. See this tutorial: https://www.b4x.com/android/forum/threads/banano-working-with-promises.102413/

7. 3 shortcut methods on the BANanoElement:

.GetField
.SetField
.RunMethod

All three are BANanoObject methods, now also available on BANanoElement as shortcuts.

So you can now do:

Dim UploadedFiles() As String = BANano.GetElement("#fu").GetField("files").Result

instead of having to do (both still work):

Dim UploadedFiles() As String = BANano.GetElement("#fu").ToObject.GetField("files").Result

I hope this will help confused users who do not always understand when to switch from BANanoElement to BANanoObject.

Download:

https://www.b4x.com/android/forum/threads/banano-progressive-web-app-library.99740/#post-627764
Alwaysbusy

or

Click here to Donation and support BANano & ABMaterial


[B4X] BANano 2.15 released


CHANGES:

1. Support for B4J Type e.g. Type Person(Name As String, Properties As Map, Scores(10) As Int)

2. Support for NumberFormat and NumberFormat2

3. BANano.Sleep() is now just B4Js normal Sleep(). BANano.Sleep() will be depreciated in the future.

4. BANano.GetType() and BANano.TypeOf are now just B4Js normal GetType(). Both BAnano functions will be depreciated in the future.

5. BANanoSQL new method .ExecuteCallBack(). See for more info: https://www.b4x.com/android/forum/threads/banano-extending-event-driven-bananosql-with-own-callbacks.101920/#post-639714

6. BANanoSkeleton added SKRange, SKRadio, SKSwitch and SKNaviagationBar.
All views now have a Visibility property.

IMPORTANT:
– BANanoSkeleton_Files.zip contains new files. If you use it already in a project, you must copy the new files in your projects Files folder.
– Open all your layouts and save them so the new property Visible will be saved in the layout.

7. Bug fixes in the Transpiler

Download: https://www.b4x.com/android/forum/threads/banano-website-app-wpa-library-with-abstract-designer-support.99740/#post-627764

Alwaysbusy

or

Click here to Donation and support BANano & ABMaterial


[B4X] BANano v2: B4J Abstract Designer (part 2)

DOWNLOAD THE LATEST VERSION OF BANANO:

https://www.b4x.com/android/forum/threads/banano-progressive-web-app-library.99740/#post-627764

Check out part 1 of this tutorial first! https://alwaysbusycorner.com/2019/01/20/b4x-banano-v2-b4j-abstract-designer-part-1/

INTRODUCTION

Now that we have our custom view created, let’s use it. As said in part 1, there are a couple of ways which I will go in to deeper now.

But first, I give you the steps on how to create a library out of part 1. This will allow us to use Sub + TAB in the B4J IDE.

CREATING A LIBRARY

This is a two step process. Make sure you have the following lines in your library AppStart code:

' start the build
#if release
       BANano.BuildAsLibrary()
#else
       BANano.Build(File.DirApp)
#end if

Now for step 1, run your library in release mode. The .js, .dependson (.php if you use it) and _Files.zip (if you have assets in the Files tab) will be created in your Additional Libraries folder. It will transpile everything in each .bas file. The Main class will be skipped.

Step 2 is just compiling the library with the B4J IDE ‘Compile To Library’

Give it the same name as you have used in the BANano.Initialize declaration. The .jar and .xml files will also be generated in your Additional Libraries folder.

So to summerize: you will now have the following files in your Additional Libraries folder:

yourlib.js
yourlib.dependsOn
yourlib.jar
yourlib.xml
yourlib.php (if you have used inline php in your library)
yourlib_Files.zip (if you had assets in your Files tab)

1. USING THE CUSTOM VIEW IN A LAYOUT
Make a new B4J UI project, and the BAnano.jar and yourlib.jar in the libraries. Also, unzip the yourlib_Files.zip file to your projects Files folder (watch out that you do not make a subfolder!).
Again let’s start with adding the default BANano project main code:

#Region Project Attributes
   #MainFormWidth: 600
   #MainFormHeight: 600
   #IgnoreWarnings: 16, 10, 14, 15
#End Region

Sub Process_Globals
   Private BANano As BANano 'ignore
End Sub

Sub AppStart (Form1 As Form, Args() As String)
   ' you can change some output params here
   BANano.Initialize("BANano", "BANanoSkeleton",12)
   BANano.HTML_NAME = "index.html"
 
   BANano.Header.Title="BANano Skeleton"
   BANano.ExternalTestConnectionServer = "http://gorgeousapps.com"
   BANano.Header.AddCSSFile("skeleton-all.min.css")
 
   ' start the build
   BANano.Build(File.DirApp)
 
   ExitApplication
End Sub

' HERE STARTS YOUR APP
Sub BANano_Ready()

End Sub

Save and open the Abstract Designer. In the Views Menu, under custom views you will find your newly created custom views:


Before we start using our views, a quick note: as currently B4J Custom views can only set their parent to main, make sure there is some space between each view to allow BANanos own algorithm to determine who is the parent. The absolute position of a view in the Designer has no relevance in BANano anyway.

Example:

So, now we add our Custom views. You will notice the Custom properties in the Properties Pane. Only the following properties can be used (the rest is ignored):

Once you are satisfied with your design, save it and generate the events you want to use:

IMPORTANT: If you plan to load this layout only ONCE at the time with BANano.LoadLayout(), you can select the view itself (e.g. Txt1 in this example) to generate the Private Txt1 As SKTextBox line. If you plan to use BANano.LoadLayoutArray(), then you can NOT use this.

This makes sense, as a single layout matches up with one single view. In case of an array of such layouts, the is no One-to-One relation. But we go into this deeper in just a second.

The code will be generated for you:

Sub Process_Globals
   Private BANano As BANano
   ...
   Private Txt1 As SKTextBox
End Sub

...

Sub Txt1_Focus (event As BANanoEvent)

End Sub

Sub Txt1_Blur (event As BANanoEvent)

End Sub

Sub Txt1_Keydown (event As BANanoEvent)

End Sub

Sub Txt1_KeyUp (event As BANanoEvent)

End Sub

Sub Txt1_Change (event As BANanoEvent)

End Sub

Sub Button1_Click (event As BANanoEvent)

End Sub

Sub SKTable1_Click (event As BANanoEvent)
 
End Sub

All you have to do now is load your newly created layout:

' HERE STARTS YOUR APP
Sub BANano_Ready()
   ...
   BANano.LoadLayout("#body", "layout1")
   ...
End Sub

This is just normal B4J stuff! :) Now you can code as you are used to.

2. ADDING CUSTOM VIEWS BY CODE
This is equally similar to normal B4J behaviour. First add a declaration of a View in globals:

Private btn As SKButton

Now initialize and add the button:

' create a dynamic button, not located in the Layout
btn.Initialize(Me, "Button2", "Button2")
btn.Text = "Dynamic Button"
btn.AddToParent("R2")

IMPORTANT NOTE: The first param in Initialize() MUST be Me. Only the class where the View is added to will be able to handle the events.


3. LOADING A LAYOUT MULTIPLE TIMES
Sometimes, you are going to want to re-use a certain layout multiple times. This can for example be because you made a layout for a list item, and now want to re-use it for each item in your list.
This can be done using the BANano.LoadLayoutArray method:

' loading layouts as array (multiple times loading the same layout)
For i = 0 To 4
       Dim Ret As Long
       Dim AllViews As Map
 
       Ret = BANano.LoadLayoutArray("#r3", "MultiLayout", (i=0)) ' only clear the parent if it is the first layout that is loaded
 
       ' ret returns a unique number you can use to get all views
       AllViews = BANano.GetAllViewsFromLayoutArray("MultiLayout", Ret)
 
       Dim mLabel As SKLabel = AllViews.Get("multilabel") ' always lowercase
       mLabel.Text = "I'm {C:#FF0000}{U}row " & (i+1) & "{/U}{/C} of a multi layout!"
 
       Dim mButton As SKButton = AllViews.Get("multibutton") ' always lowercase
       mButton.Text = "Multi Button " & Ret
Next

Nothing difficult here. The final parameter in LoadLayoutArray() can be used to clear the parent on which you are loading the layout (in this case #r3).
The method does return a ‘unique’ number. This is very useful to get all the views from your layout. We do this with the BANano.GetAllViewsFromLayoutArray() method.
The GetAllViewsFromLayoutArray() method returns a map with all the Views in it, for that layout, with instance ‘unique number’.
So you can just grab Views and start manipulating them.

NOTE: you may think you should ‘buffer’ this AllViews in a map yourself but this is not needed! In the generated Javascript, this will already be done for you so you would do it twice.

There is also a ‘helper’ method BANano.GetSuffixFromID() to know what this ‘unique’ number is, in case for example you want to make changes further in your code in a certain event.

Sub MultiButton_Click (event As BANanoEvent)
   Log(event.ID)
   Dim Ret As Long = BANano.GetSuffixFromID(event.ID)
 
   Dim Allviews As Map = BANano.GetAllViewsFromLayoutArray("MultiLayout", Ret)
   If Allviews <> Null Then
       Dim mButton As SKButton = Allviews.Get("multibutton") ' always lowercase
       mButton.Text = "Multi Button " & Ret & " changed!"
   End If
End Sub

This concludes the 2 part tutorial of the new UI system in BAnano v2. Possibilities are endless and so much closer to standard B4J than the UI system v1.
Alwaysbusy

or

Click here to Donation and support BANano & ABMaterial


[B4X] BANano v2: B4J Abstract Designer (part 1)

DOWNLOAD THE LATEST VERSION OF BANANO:

https://www.b4x.com/android/forum/threads/banano-progressive-web-app-library.99740/#post-627764

INTRODUCTION

BANano v2 has a completely new (better) way of using the B4J Abstract Designer. Now, you can make Custom Views very easy that can be dragged and dropped in the Designer, with its own properties and events. Kudos to @Kiffi for helping me testing and evaluating v2!

There are a couple of ways to use these Custom Views:

1. by putting them on a layout and loading BANAno.LoadLayout
2. by creating them in code
3. NEW: by putting them on a layout and loading them with BANano.Layout

In part 2 of this tutorial, I will cover all three of them. But for now we concentrate on building a Custom View.

The best way to make a bunch of custom views (e.g. for wrapping a CSS library) is by creating a BANanoLibrary: it will keep your code cleaner.

Unlike v1, BANano v2 needs to be a UI B4J project (we do want to use the Abstract Designer after all).

The BANano download contains a wrapper library for the Skeleton CSS library. @tchart has written a wrapper for B4J already, but as this is a very small library with just some basic components, I asked him if he would mind me wrapping it again for learning purposes. Asking was the polite thing to do and he gave me the go-ahead. 🙂

A demo using this BANanoLibrary can be seen here: http://gorgeousapps.com/BANano

For this tutorial, we are going to recreate the SKTextbox component.

GETTING STARTED

Create a new B4J UI project if you haven’t done that yet. Replace the Main source code with the BANano default project code:

#Region Project Attributes
   #MainFormWidth: 600
   #MainFormHeight: 600
   #IgnoreWarnings: 16, 10, 14, 15
#End Region

Sub Process_Globals
   Private BANano As BANano 'ignore
End Sub

Sub AppStart (Form1 As Form, Args() As String)
   ' you can change some output params here
   BANano.Initialize("BANano", "BANanoSkeleton",12)
   BANano.HTML_NAME = "index.html"
 
   BANano.Header.Title="BANano Skeleton"
   BANano.ExternalTestConnectionServer = "http://gorgeousapps.com"
   BANano.Header.AddCSSFile("skeleton-all.min.css")
 
   ' start the build
   #if release
       BANano.BuildAsLibrary()
   #else
       BANano.Build(File.DirApp)
   #end if
 
   ExitApplication
End Sub

' HERE STARTS YOUR APP
Sub BANano_Ready()

End Sub

CREATING A CUSTOM VIEW

1. Adding a new BANano Custom View

NOTE: due to a current limitation of B4J, if you use Uppercase letters in the class name, the events will not show up in the IDE when typing Sub + TAB until you compile it as a library. When you use the library in a project, they will show.

You will see quite some code is prepared for you. On top, the most common events in Javascript have been pre-defined. These are the events you want to expose in the Abstract Designer to the user.

Next are some common properties like ‘Classes’, ‘Style’, ‘Margins’ and ‘Padding’.

Some basic code is also inserted. The initialize and DesignerCreateView method definitions can NOT be changed: you can not add or remove parameters to/from it! This is nothing new, as you can’t do this for a normal B4J Custom component either.

The DesignerCreateView method is where the magic happens, but I get back to this when we need to.

2. Activating events

You can just active an event by uncommenting them. If can also add events that are not in this list. They always have to be in format:

javascripteventname (event As BANanoEvent)

For our textbox, let’s activate the following events:

#Event: Focus (event As BANanoEvent)
#Event: Blur (event As BANanoEvent)
...
#Event: Keydown (event As BANanoEvent)
#Event: KeyUp (event As BANanoEvent)
...
#Event: Change (event As BANanoEvent)

In DesignerCreateView, we have to attach those events:

mElement.HandleEvents("change", mCallBack, mEventName & "_change") ' eventname must be lowercased!
mElement.On("keydown", mCallBack, mEventName & "_keydown") ' must be On because be do not want the default to be cancelled at the point of keydown
mElement.HandleEvents("keyup", mCallBack, mEventName & "_keyup")
mElement.HandleEvents("blur", mCallBack, mEventName & "_blur")
mElement.HandleEvents("focus", mCallBack, mEventName & "_focus")

Note we do use mCallBack here. This is because we want the class that initializes this component to be the one to handle our events.

In some cases, you want to handle events that are not exposed to the user (like a hover). In this case use Me as the callback parameter.

For example from the SKTable custom view:

Elems(0).HandleEvents("mouseenter", Me, "rowmouseenter") ' eventname must be lowercased!
Elems(0).HandleEvents("mouseleave", Me, "rowmouseleave")
...
#Region Internal Events
public Sub RowMouseEnter(event As BANanoEvent)
   Dim row As BANanoElement
   row.Initialize("#" & event.ID)
   row.AddClass("tablehover")
End Sub

public Sub RowMouseLeave(event As BANanoEvent)
   Dim row As BANanoElement
   row.Initialize("#" & event.ID)
   row.RemoveClass("tablehover")
End Sub
#End Region

3. Adding properties

We do want some custom properties on our TextBox:

#DesignerProperty: Key: Label, DisplayName: Label, FieldType: String, DefaultValue: , Description: Label of the TextBox.
#DesignerProperty: Key: Width, DisplayName: Full Width, FieldType: Boolean, DefaultValue: True, Description: Set the width 100%
#DesignerProperty: Key: Text, DisplayName: Text, FieldType: String, DefaultValue: , Description: Text of the TextBox
#DesignerProperty: Key: Placeholder, DisplayName: Placeholder, FieldType: String, DefaultValue: , Description: Placeholder text
#DesignerProperty: Key: Type, DisplayName: Type, FieldType: String, DefaultValue: text, List: text|email|password, Description: Type TextBox

All B4J supported FieldTypes can be used: Int, Float, String, Color, Boolean…

Add some variables to hold the properties:

Private mLabel As String = ""
Private mWidth As Boolean = False
Private mText As String = ""
Private mPlaceHolder As String = ""
Private mType As String = "text"

Now, when we use this component in the Abstract Designer, we want the view to use the ones we have set in the desinger. This is done by getting them from the Props map (Case does matter!).

If Props <> Null Then
       ...
       mLabel = Props.Get("Label")
       mWidth = Props.Get("Width")
       mText = Props.Get("Text")
       mPlaceHolder = Props.Get("Placeholder")
       mType = Props.Get("Type")
End If

In case you want to be able to set these properties in code too e.g. to change the labels text, we create getters and setters. The method name must start with get/set (Lowercased!).

public Sub setLabel(label As String)
   If mElementLabel <> Null Then
       mElementLabel.SetHTML(BANano.SF(label))
   End If
   mLabel = label
End Sub

public Sub getLabel() As String
   Return mLabel
End Sub

4. Building the view with HTML.

In Skeleton CSS, a textbox with a label needs to have a certain structure:

<label for="txt1">Text box</label>
<input placeholder="Enter some text" type="text">

This is simple to do in BANano thanks to B4Js smartstrings:

' preparing some variables
Dim exStyle As String = BuildExStyle
 
Dim extraWidth As String
If mWidth Then
   extraWidth = "u-full-width"
End If

' building the html
mElementLabel = mTarget.Append($"<label id="${mName}label" for="${mName}">${BANano.SF(mLabel)}</label>"$).Get("#" & mName & "label")

mElement = mTarget.Append($"<input id="${mName}" class="${extraWidth} ${mClasses}" style="${exStyle}${mStyle}" placeholder="${mPlaceHolder}" type=${mType}>"$).Children("#" & mName)
mElement.SetValue(mText)

One can keep a reference of the created parts (mElementLabel and mElement), but in some cases you can just grab it when needed. So this could also be written as:

mTarget.Append($"<label id="${mName}label" for="${mName}">${BANano.SF(mLabel)}</label>
               <input id="${mName}" class="${extraWidth} ${mClasses}" style="${exStyle}${mStyle}" placeholder="${mPlaceHolder}" type=${mType}>"$)
mElementLabel.Initialize("#" & mName & "label")
mElement.Initialize("#" & mName)
mElement.SetValue(mText)

It is a personal preference I guess.

Et voila, our View is finished: yes that is it! 🙂
Check out the source code of the Skeleton library in the download to see the whole class.

In part 2 of this tutorial, I’ll show you how to use such a view and make a BANano library out of it.

Alwaysbusy

or

Click here to Donation and support BANano & ABMaterial

B4X: ABMaterials B4JS – 01 Getting Started

In this first tutorial, we are going to create a killer method to calculate the distance between two GEO locations. There are better ways to do so, but for demos sake…

Creating a B4JS class is very simple. Just use the menu in B4J and add a Standard Class.

'Class module
Sub Class_Globals

End Sub

Public Sub Initialize

End Sub

First thing we MUST do is renaming the Initialize method to InitializeB4JS. This is because the transpiler uses this method name to determine it has to translate this class to JavaScript.

This InitializeB4JS method can NOT have parameters!

Now we can start adding our code, just as usual in B4J. As almost the whole Core library of B4J is available, this is pretty forward. Except from the ABM methods, this could easily be seen as B4J.

'Class module
Sub Class_Globals
   ' use public or dim if you want to share this variable over ALL B4JS classes
   ' use private if only within this class
   Dim ToKM As Double = 1.609344
   Dim ToMiles As Double = 0.8684

   ' to access the constants
   Public ABM As ABMaterial 'ignore
   ' so we can use an msgbox
   Public Page As ABMPage 'ignore, just to be able to run ABMPage functions
End Sub

'Initializes the object. You can NOT add parameters to this method.
'MUST be called InitializeB4JS is automatically called when using this class
Public Sub InitializeB4JS

End Sub

public Sub CalcDistance(Lat1 As Double, Lon1 As Double, Lat2 As Double, Lon2 As Double, Unit As String)
   Dim theta As Double
   Dim Distance As Double
   theta = Lon1 - Lon2
   Distance = Sin(deg2rad(Lat1)) * Sin(deg2rad(Lat2)) + Cos(deg2rad(Lat1)) * Cos(deg2rad(Lat2)) * Cos(deg2rad(theta))
   ' logging some intermediate value
   Log("Distance = " & Distance)
   Distance = ACos(Distance)
   Distance = rad2deg(Distance)
   ' logging some intermediate value
   Log("Distance = " & Distance)
   Distance = Distance * 60 * 1.1515
   ' if we would use Page.Msgbox here, we would see in the logs an error: msgbox is NOT supported in B4JS!
   ' we must use the B4JS equivalent method Page.B4JSMsgbox
   Select Case Unit.ToUpperCase
       Case "K"
           Page.B4JSMsgbox("msgbox", "The distance is " & (Distance * ToKM) & " kilometers!", "Tutorial", "OK", False, ABM.MSGBOX_POS_CENTER_CENTER, "")
       Case "N"
           Page.B4JSMsgbox("msgbox", "The distance is " & (Distance * ToMiles) & " miles!", "Tutorial", "OK", False, ABM.MSGBOX_POS_CENTER_CENTER, "")
       Case Else
           Page.B4JSMsgbox("msgbox", "No idea what you are doing :-)", "Tutorial", "OK", False, ABM.MSGBOX_POS_CENTER_CENTER, "")
   End Select
End Sub

' some helper methods
Sub deg2rad(Deg As Double) As Double
   Return Deg * cPI / 180
End Sub

Sub rad2deg(Rad As Double) As Double
   Return Rad * 180 / cPI
End Sub

VERY IMPORTANT!!!
Depending on how you declare the variable in Class_Globals, a variable is shared between class instances or not:

This concept becomes very important when we start using ABMComponents because when you attach a B4JSOn… event to an ABMComponent, it gets its own instance of your class. The Public/Dim variables will be shared among all the components using this B4JS Class

To use our new method, I’ll make a button in ConnectPage() on the ABM page (this will be explained in a future tutorial) and when we click, we do a calculation:

Dim btn As ABMButton
btn.InitializeFlat(page, "btn", "", "", "Calculate", "")
' B4JSUniqueKey is explained in a later turorial
btn.B4JSUniqueKey = "btn001"
' define the B4JS OnClickedEvent
btn.B4JSOnClick("B4JSCalculateDistance", "CalcDistance", Array As Object(32.9697, -96.80322, 29.46786, -98.53506, "K"))
page.Cell(2,1).AddComponent(btn)

Alternative, not using an ABMButton but calling our method directly:

page.B4JSRunMethod("B4JSCalculateDistance", "CalcDistance", Array As Object(32.9697, -96.80322, 29.46786, -98.53506, "K"))

So let’s check our results (click to enlarge):

B4JSTut1a

1. In the browsers log we see our two intermediate log() calls.
2. the solution to our call is shown in a message box.

But in the B4J log we also see that the normal btn_Click event is raised! That is not what we want.

To avoid this, we make a simple change to our CalcDistance method. We return a boolean true: this is saying ‘consume the click on the browser side and don’t go to the server‘.

public Sub CalcDistance(Lat1 As Double, Lon1 As Double, Lat2 As Double, Lon2 As Double, Unit As String) As Boolean
   ...
   ' important, if we do not want to raise the servers btn_click events, we must return true
   Return True
End Sub

And hooray, our server is not contacted any more! :)

B4JSTut1b

Ultimate proof we are not contacting the server for this code. I’ve stopped the server app and I can still use the button:

B4JSTut1c

This concludes the first tutorial.

For those interested in the JavaScript generated for our class, here it is:

var_tokm=1.609344;
var _tomiles=0.8684;
var _abm;
var _page;
function b4js_b4jscalculatedistance() {
     var self;
     this.initializeb4js=function(){
          self=this;
          try {
          }
          catch(err) {
               console.log(err.message + ' ' + err.stack);
          }
     };
     this.calcdistance=function(_lat1,_lon1,_lat2,_lon2,_unit){
          try {
               var _theta=0;
               var _distance=0;
               _theta = _lon1-_lon2;
               _distance = (Math.sin(self.deg2rad(_lat1)))*(Math.sin(self.deg2rad(_lat2)))+(Math.cos(self.deg2rad(_lat1)))*(Math.cos(self.deg2rad(_lat2)))*(Math.cos(self.deg2rad(_theta)));
               console.log("Distance = "+_distance);
               _distance = (Math.acos(_distance));
               _distance = self.rad2deg(_distance);
               console.log("Distance = "+_distance);
               _distance = _distance*60*1.1515;
               switch ("" + _unit.toUpperCase()) {
                    case "" + "K":
                         var _b4js_returnname="msgbox";
                         b4js_msgbox("default","Tutorial","The distance is "+(_distance*_tokm)+" kilometers!","OK",'swal2pos-cc', false);;
                         break;
                    case "" + "N":
                         var _b4js_returnname="msgbox";
                         b4js_msgbox("default","Tutorial","The distance is "+(_distance*_tomiles)+" miles!","OK",'swal2pos-cc', false);;
                         break;
                    default:
                         var _b4js_returnname="msgbox";
                         b4js_msgbox("default","Tutorial","No idea what you are doing :-)","OK",'swal2pos-cc', false);;
                         break;
               }
               self.testjson();
               callAjax("https://jsonplaceholder.typicode.com/posts/1","GET","jsonp", "","myJob1", true,"b4jscalculatedistance");
               return true;
          }
          catch(err) {
               console.log(err.message + ' ' + err.stack);
          }
     };

     this.deg2rad=function(_deg){
          try {
               return _deg*Math.PI/180;
          }
          catch(err) {
               console.log(err.message + ' ' + err.stack);
          }
     };
     this.rad2deg=function(_rad){
          try {
               return _rad*180/Math.PI;
          }
          catch(err) {
               console.log(err.message + ' ' + err.stack);
          }
     };
}

In the text tutorial we are going to see how we can use inline JavaScript snippets within our B4JS classes!

Alwaysbusy

Click here to Donation and support ABMaterial

B4X: ABMaterial 3.75 Public/4.00 Donators released

ABMDragonfly4.00

ABMaterial Dragonfly (4.00) for B4X is available. Yes, it has a new name! What started as version 3.81 got upgraded to a new major version, especially since it uses a new cache control system.

ABMaterial has always been one of the fastest RADs from its start, now over 2 years ago.  But with 4.00, we’ll take it to a whole new level!

Mindful and I have spend 5 days (and nights) checking out how we could cache ABMaterial to the extreme without losing any of its functionality.  The results are just ridiculous…

Finish times are less than 10% of the time on the second and next loads. So on 3G, on the users next visit(s), the WebApp is almost just as fast as on high speed cable!

And this system not only works with the same page. Once one page has been loaded, all the other pages can take gain of this system. Even when the user revisits your app much later.

Furthermore there is the new debug feature to check how your apps work on different device sizes.  See it at work here:

Add this snippet to you main module, AFTER starting the server:

#If DEBUG
' in debug mode, start the browser and open the app on all devices (DOES NOT WORK IF EDGE IS YOUR DEFAULT BROWSER!)
ABM.ViewerOpenAllDevices("http://localhost:" & port & "/" & ABMShared.AppName & "/", 100)

' or open a specific device as default (DOES NOT WORK IF EDGE IS YOUR DEFAULT BROWSER!)
'ABM.ViewerOpenDevice("http://localhost:" & port & "/" & ABMShared.AppName & "/", 300, ABM.VIEWER_TABLET)

' or just open de browser, no multiple devices (should work in Edge)
'ABM.ViewerOpen("http://localhost:" & port & "/" & ABMShared.AppName & "/")
#End If

Lots of new theme properties! Check out the demo on how to use  them in the new Dragonfly theme.  As winter is coming and days are getting shorter (at least here in the northern hemisphere), I went for a ‘Night’ theme this time.

ABMaterial DragonFly is now available on 750+ locations worldwide on CDN!  If you use the CDN, you do not need to upload the css/js/fonts folders to your own server anymore!

This means only your own assets (images etc) from the www folder have to be available on your server. De demo running on abmaterial.com for example is working like this.

Usage:

ABM.ActivateUseCDN("DONATORKEY", "https://cdn.jsdelivr.net/gh/RealAlwaysbusy/ABMaterial@v4.03/")

The over 20 new fixes and fulfilled wishes make ABMaterial 4.00 very stable, just like its ‘parent’ programming language: B4X.  It is a real joy knowing one can depend on a strong, bug free environment.  Erel from Anywhere Software rulez!

Happy programming!

Alwaysbusy

Click here to Donation and support ABMaterial

B4J: Using Google Analytics with ABMaterial

ABMaterial and Google Analytics

As ABMaterial is a hybrid website/webapp framework, you can use SEO (see previous article), and now even Google Analytics in the upcoming version 1.07. This article shows how you can use Google Analytics by adding just one extra line of B4J code on your page!

Note: This post is an ABMaterial adaptation of an excellent article for beginners on Google Analytics by Kristi Hines. Just to make it easier for you, I used and changed it just up to where ABMaterial comes in.  At the end of this post you can then continue reading the original one for more tips and tricks.

Why every website/webapp needs Google Analytics

Here are just a few of the many questions about your ABMaterial website/webapp that you can answer using Google Analytics.

  • How many people visit my website/webapp?
  • Where do my visitors live?
  • What websites send traffic to my website/webapp?
  • What marketing tactics drive the most traffic to my website/webapp?
  • Which pages on my website/webapp are the most popular?
  • How many visitors have I converted into leads or customers?
  • Where did my converting visitors come from and go on my website/webapp?
  • What content do my visitors like the most?

There are many, many additional questions that Google Analytics can answer, but these are the ones that are most important for most website/webapp owners. Now let’s look at how you can get Google Analytics on your ABMaterial website/webapp.

How to install Google Analytics

First, you need a Google Analytics account. If you have a primary Google account that you use for other services like Gmail, Google Drive, Google Calendar, Google+, or YouTube, then you should set up your Google Analytics using that Google account. Or you will need to create a new one.

This should be a Google account you plan to keep forever and that only you have access to. You can always grant access to your Google Analytics to other people down the road, but you don’t want someone else to have full control over it.

Big tip:

don’t let anyone (your web designer, web developer, web host, SEO person, etc.) create your website’s Google Analytics account under their own Google account so they can “manage” it for you. If you and this person part ways, they will take your Google Analytics data with them, and you will have to start all over.

Set up your account and property

Once you have a Google account, you can go to Google Analytics and click the Sign into Google Analytics button. You will then be greeted with the three steps you must take to set up Google Analytics.

google analytics setup

After you click the Sign Up button, you will fill out information for your website.

For the absolute beginner’s guide, we’re going to assume you have one website and only need one view (the default, all data view. The setup would look something like this.

new account information google analytics

Beneath this, you will have the option to configure where your Google Analytics data can be shared.

configuring shared info for google analytics

Our google account is setup and all we need now is get our Tracking ID and add it in ABMaterial.

Click the Get Tracking ID button. You will get a popup of the Google Analytics terms and conditions, which you have to agree to. Then you will get your Google Analytics Tracking ID.

Tracking ID in the Google Analytics Console

In our ABMaterial app, all we have to do is add this single line to each of our pages in the BuildPage() method:

page.Initialize(Name, “/ws/appName/Name, False)
page.UseGoogleAnalytics(“UA-64248213-1”, Null)

I guess it can’t get much easier, no?

If you want to go deeper into Google Analytics, I suggest reading the original article The Absolute Beginner’s Guide to Google Analytics.

ABMaterial 1.07 will be realeased in a couple of weeks for the donators. Addidtional to Google Analytics support, two new components ABMEditor and ABMSocialShare will be included, but more on this in a next article.

Happy programming!

Alwaysbusy


B4J: ABMaterial Public 1.05/Donators 1.06 now released

The public version 1.05 of ABMaterial is now available from the B4J website!  Three new controls:

ABMSlider: Add a slider for values with a wide range.

Range

ABMRange: Add a range slider for values with two handlers.

Slider

ABMCustomControl: add your own components to the ABMaterial framework.

CustomComponent

Some more highlights on this release:

  • Complete rewrite of the Refresh system
  • Material Icon Fonts are now loaded locally
  • Disable the back button in the browser
  • ABMModalSheet FULL size option
  • LocalStorage support
  • ABMPlatform object containing basic info on the users browser and device
  • Integrate variables for SEO-optimization
  • Responsive tables

Read the README1.05.TXT for the full release notes.

Download ABMaterial Public version 1.05

Donators will receive an email with the download link to ABMaterial 1.06 containing two new controls, ABMDataTimeScroller and ABMDateTimePicker.

Happy programming!

Alwaysbusy

Click here to Donation if you like my work

B4J: ABMaterial WebApps and SEO (Search Engine Optimization)

SEO

A feedback case I got from one of the users of ABMaterial, Herbert, was the question how ABMaterial for B4X coped with SEO-optimization. To be perfectly honest, I hadn’t really though about it. I  had a couple of things already, like headers, bold text, a page title and description.

As any good programmer,  if it looks nice, is user friendly and works as expected, my work is done and users will find and like it. No?

And it kept me thinking.  So this morning, lying awake at 4  o’clock (sleeping is highly overrated IMHO and an invention of the Bed Consortium, but I’m sidetracking), I decided to learn more about SEO and how it could be implemented in ABMaterial for B4X.

Herbert gave me some links, so I started reading up.

Looked like I had some things right already, but ABMaterial could use some polishing.

For starters, I added some extra properties to the ABMaterial page object that will be saved in the generated html file:

pageTitle: very important, pick good keywords
pageDescription: keep it around 140 to 160 chars
pageKeywords: a comma delimited string containing your page keywords
pageHTMLName: it is always index.html in ABMaterial, but it’s better to give it some name using keywords, like ‘abmaterial-custom-component.html’, use hyphens (-) between words to improve readability
pageSiteMapPriority: a value between 0.00 and 1.00, see further
pageSiteMapFrequency: how frequently the page is updated (never, none, always, hourly, weekly, yearly, …), see further

Headers:

Covered!  ABMaterials labels can have headers like <h1>, <h2> so we’re ok.  Tip: create only one <h1>!

<h1>Most Important</h1>
<h2>Second Most Important</h2>
<h3>Third Most Important</h3>

Bold:

Got it: You can use markers like {B}{/B} in labels to set text in bold/strong.

Use tag in a image:

Ah, needed some changes.  I misused it.  Thinking ‘who the #?@! can’t show images anymore these days‘, I used it as an image toggle property.  Changed it now so it can be used properly.

Hyperlinks:

Added some extra markers {AS}{/AS} in the ABMLabel Component so you can add a title.

{AL}http://www.website.com/page.html{AS}keyword{/AS}{AT}my visible text{/A}

will result in:

<a rel=”nofollow” target=”_black” href=”http://www.website.com/page.html” title=”keyword”>my visible text</a>

sitemap.xml and robots.txt:

The Sitemaps protocol allows a webmaster to inform search engines about URLs on a website that are available for crawling. ABMaterial has the possibility to generate a sitemap.xml file and a robots.txt file (for sites like Ask.com).

What does it look like Alwaysbusy, I hear you ask. Well, something like this:

<?xml version=”1.0″ encoding=”UTF-8″?>
</pre>
<urlset
xmlns=”http://www.sitemaps.org/schemas/sitemap/0.9”
xmlns:xsi=”http://www.w3.org/2001/XMLSchema-instance”
xsi:schemaLocation=”http://www.sitemaps.org/schemas/sitemap/0.9
http://www.sitemaps.org/schemas/sitemap/0.9/sitemap.xsd”&gt;
<!– created with ABMaterial and B4J –>
<url>
<loc>https://alwaysbusycorner.com/index.html</loc&gt;
<lastmod>2016-01-16T11:11:16+00:00</lastmod>
<changefreq>monthly</changefreq>
<priority>1.00</priority>
</url>
<url>
<loc>https://alwaysbusycorner.com/alwaysbusy-abmaterial-introduction.html</loc&gt;
<lastmod>2016-01-16T11:11:16+00:00</lastmod>
<changefreq>monthly</changefreq>
<priority>0.50</priority>
</url>
<url>
<loc>https://alwaysbusycorner.com/alwaysbusy-abmaterial-customcomponent.html</loc&gt;
<lastmod>2016-01-16T11:11:16+00:00</lastmod>
<changefreq>yearly</changefreq>
<priority>0.50</priority>
</url>
</urlset>

To generate this is easy in ABMaterial, and needs just a couple of things:

  1. In ABMShared, add a property  public AppPublishedStartUrl as String = “http://yoururl.com”.

  2. In the initalize() method of ABMApplication, add ‘ABM.AppPublishedStartUrl=ABMShared.AppPublishedStartUrl.

  3. In the BuildPage() method of each page, set page.PageHTMLName=”your-good-keywords.html”

  4. Also in BuildPage(), add page.PageSiteMapPriority = “0.50” (number between 0.00 and 1.00, and don’t set them all to 1.00, that makes them equally important)

  5. Also add page.PageSiteMapFrequency = ABM.SITEMAP_FREQ_MONTHLY (use one of the contstants)

  6. If you use a ABMNavigationBar, update the url of each sidebar item in ABMShared, e.g. page.NavigationBar.AddSideBarItem(“Contacten”, “Contacten”, “mdi-action-dashboard”, “../StartPage/your-good-keywords.html”)

  7. In ABMApplication, also change your InitialPage=”your-good-keywords.html”

  8. In ABMApplication, change ‘index.html’ in the AddPage() method to Page.PageHTMLName

When you start your app, the sitemap.xml and robots.txt files will be generated next to your apps html file. After publishing it to your final site, you let the search engines know you want to submit your site.

You should be able to use these sitemap-submission URLS. Put the full URL to your sitemap, including http://, after the = sign:

http://www.google.com/ping?sitemap=

http://www.google.com/webmasters/sitemaps/ping?sitemap=

http://www.bing.com/webmaster/ping.aspx?sitemap=

http://submissions.ask.com/ping?sitemap=

http://www.didikle.com/ping?sitemap=

So, you’re already one step ahead of many other tools when you use B4J and ABMaterial!

Of course, your content will be the most important part to atract users and get high rankings in the search engines, but it never hurts giving them some help.

If any SEO expert reading this article has some other ideas, please post them.

ABMaterial 1.05, supporting all this, will be send to the donators early next week. Quite some goodies included in this release!

Head to the B4X website, download your free copy of B4J and go to the forum to download the ABMaterial framework.

Alwaysbusy

Some good rerading on SEO:

https://moz.com/beginners-guide-to-seo

http://webdesign.about.com/od/seo/tp/seo_tips_and_tricks.htm

https://www.eebew.com/seo-tutorial/on-page-seo/basic-elements/seo-heading-tags/

https://www.eebew.com/seo-tutorial/on-page-seo/basic-elements/what-are-meta-descriptions/

Click here to Donation if you like my work