[B4X] BANano 2.15 released


CHANGES:

1. Support for B4J Type e.g. Type Person(Name As String, Properties As Map, Scores(10) As Int)

2. Support for NumberFormat and NumberFormat2

3. BANano.Sleep() is now just B4Js normal Sleep(). BANano.Sleep() will be depreciated in the future.

4. BANano.GetType() and BANano.TypeOf are now just B4Js normal GetType(). Both BAnano functions will be depreciated in the future.

5. BANanoSQL new method .ExecuteCallBack(). See for more info: https://www.b4x.com/android/forum/threads/banano-extending-event-driven-bananosql-with-own-callbacks.101920/#post-639714

6. BANanoSkeleton added SKRange, SKRadio, SKSwitch and SKNaviagationBar.
All views now have a Visibility property.

IMPORTANT:
– BANanoSkeleton_Files.zip contains new files. If you use it already in a project, you must copy the new files in your projects Files folder.
– Open all your layouts and save them so the new property Visible will be saved in the layout.

7. Bug fixes in the Transpiler

Download: https://www.b4x.com/android/forum/threads/banano-website-app-wpa-library-with-abstract-designer-support.99740/#post-627764

Alwaysbusy

or

Click here to Donation and support BANano & ABMaterial


Advertisement

[B4X] BANano v2: B4J Abstract Designer (part 2)

DOWNLOAD THE LATEST VERSION OF BANANO:

https://www.b4x.com/android/forum/threads/banano-progressive-web-app-library.99740/#post-627764

Check out part 1 of this tutorial first! https://alwaysbusycorner.com/2019/01/20/b4x-banano-v2-b4j-abstract-designer-part-1/

INTRODUCTION

Now that we have our custom view created, let’s use it. As said in part 1, there are a couple of ways which I will go in to deeper now.

But first, I give you the steps on how to create a library out of part 1. This will allow us to use Sub + TAB in the B4J IDE.

CREATING A LIBRARY

This is a two step process. Make sure you have the following lines in your library AppStart code:

' start the build
#if release
       BANano.BuildAsLibrary()
#else
       BANano.Build(File.DirApp)
#end if

Now for step 1, run your library in release mode. The .js, .dependson (.php if you use it) and _Files.zip (if you have assets in the Files tab) will be created in your Additional Libraries folder. It will transpile everything in each .bas file. The Main class will be skipped.

Step 2 is just compiling the library with the B4J IDE ‘Compile To Library’

Give it the same name as you have used in the BANano.Initialize declaration. The .jar and .xml files will also be generated in your Additional Libraries folder.

So to summerize: you will now have the following files in your Additional Libraries folder:

yourlib.js
yourlib.dependsOn
yourlib.jar
yourlib.xml
yourlib.php (if you have used inline php in your library)
yourlib_Files.zip (if you had assets in your Files tab)

1. USING THE CUSTOM VIEW IN A LAYOUT
Make a new B4J UI project, and the BAnano.jar and yourlib.jar in the libraries. Also, unzip the yourlib_Files.zip file to your projects Files folder (watch out that you do not make a subfolder!).
Again let’s start with adding the default BANano project main code:

#Region Project Attributes
   #MainFormWidth: 600
   #MainFormHeight: 600
   #IgnoreWarnings: 16, 10, 14, 15
#End Region

Sub Process_Globals
   Private BANano As BANano 'ignore
End Sub

Sub AppStart (Form1 As Form, Args() As String)
   ' you can change some output params here
   BANano.Initialize("BANano", "BANanoSkeleton",12)
   BANano.HTML_NAME = "index.html"
 
   BANano.Header.Title="BANano Skeleton"
   BANano.ExternalTestConnectionServer = "http://gorgeousapps.com"
   BANano.Header.AddCSSFile("skeleton-all.min.css")
 
   ' start the build
   BANano.Build(File.DirApp)
 
   ExitApplication
End Sub

' HERE STARTS YOUR APP
Sub BANano_Ready()

End Sub

Save and open the Abstract Designer. In the Views Menu, under custom views you will find your newly created custom views:


Before we start using our views, a quick note: as currently B4J Custom views can only set their parent to main, make sure there is some space between each view to allow BANanos own algorithm to determine who is the parent. The absolute position of a view in the Designer has no relevance in BANano anyway.

Example:

So, now we add our Custom views. You will notice the Custom properties in the Properties Pane. Only the following properties can be used (the rest is ignored):

Once you are satisfied with your design, save it and generate the events you want to use:

IMPORTANT: If you plan to load this layout only ONCE at the time with BANano.LoadLayout(), you can select the view itself (e.g. Txt1 in this example) to generate the Private Txt1 As SKTextBox line. If you plan to use BANano.LoadLayoutArray(), then you can NOT use this.

This makes sense, as a single layout matches up with one single view. In case of an array of such layouts, the is no One-to-One relation. But we go into this deeper in just a second.

The code will be generated for you:

Sub Process_Globals
   Private BANano As BANano
   ...
   Private Txt1 As SKTextBox
End Sub

...

Sub Txt1_Focus (event As BANanoEvent)

End Sub

Sub Txt1_Blur (event As BANanoEvent)

End Sub

Sub Txt1_Keydown (event As BANanoEvent)

End Sub

Sub Txt1_KeyUp (event As BANanoEvent)

End Sub

Sub Txt1_Change (event As BANanoEvent)

End Sub

Sub Button1_Click (event As BANanoEvent)

End Sub

Sub SKTable1_Click (event As BANanoEvent)
 
End Sub

All you have to do now is load your newly created layout:

' HERE STARTS YOUR APP
Sub BANano_Ready()
   ...
   BANano.LoadLayout("#body", "layout1")
   ...
End Sub

This is just normal B4J stuff! :) Now you can code as you are used to.

2. ADDING CUSTOM VIEWS BY CODE
This is equally similar to normal B4J behaviour. First add a declaration of a View in globals:

Private btn As SKButton

Now initialize and add the button:

' create a dynamic button, not located in the Layout
btn.Initialize(Me, "Button2", "Button2")
btn.Text = "Dynamic Button"
btn.AddToParent("R2")

IMPORTANT NOTE: The first param in Initialize() MUST be Me. Only the class where the View is added to will be able to handle the events.


3. LOADING A LAYOUT MULTIPLE TIMES
Sometimes, you are going to want to re-use a certain layout multiple times. This can for example be because you made a layout for a list item, and now want to re-use it for each item in your list.
This can be done using the BANano.LoadLayoutArray method:

' loading layouts as array (multiple times loading the same layout)
For i = 0 To 4
       Dim Ret As Long
       Dim AllViews As Map
 
       Ret = BANano.LoadLayoutArray("#r3", "MultiLayout", (i=0)) ' only clear the parent if it is the first layout that is loaded
 
       ' ret returns a unique number you can use to get all views
       AllViews = BANano.GetAllViewsFromLayoutArray("MultiLayout", Ret)
 
       Dim mLabel As SKLabel = AllViews.Get("multilabel") ' always lowercase
       mLabel.Text = "I'm {C:#FF0000}{U}row " & (i+1) & "{/U}{/C} of a multi layout!"
 
       Dim mButton As SKButton = AllViews.Get("multibutton") ' always lowercase
       mButton.Text = "Multi Button " & Ret
Next

Nothing difficult here. The final parameter in LoadLayoutArray() can be used to clear the parent on which you are loading the layout (in this case #r3).
The method does return a ‘unique’ number. This is very useful to get all the views from your layout. We do this with the BANano.GetAllViewsFromLayoutArray() method.
The GetAllViewsFromLayoutArray() method returns a map with all the Views in it, for that layout, with instance ‘unique number’.
So you can just grab Views and start manipulating them.

NOTE: you may think you should ‘buffer’ this AllViews in a map yourself but this is not needed! In the generated Javascript, this will already be done for you so you would do it twice.

There is also a ‘helper’ method BANano.GetSuffixFromID() to know what this ‘unique’ number is, in case for example you want to make changes further in your code in a certain event.

Sub MultiButton_Click (event As BANanoEvent)
   Log(event.ID)
   Dim Ret As Long = BANano.GetSuffixFromID(event.ID)
 
   Dim Allviews As Map = BANano.GetAllViewsFromLayoutArray("MultiLayout", Ret)
   If Allviews <> Null Then
       Dim mButton As SKButton = Allviews.Get("multibutton") ' always lowercase
       mButton.Text = "Multi Button " & Ret & " changed!"
   End If
End Sub

This concludes the 2 part tutorial of the new UI system in BAnano v2. Possibilities are endless and so much closer to standard B4J than the UI system v1.
Alwaysbusy

or

Click here to Donation and support BANano & ABMaterial


[B4X] BANano v2: B4J Abstract Designer (part 1)

DOWNLOAD THE LATEST VERSION OF BANANO:

https://www.b4x.com/android/forum/threads/banano-progressive-web-app-library.99740/#post-627764

INTRODUCTION

BANano v2 has a completely new (better) way of using the B4J Abstract Designer. Now, you can make Custom Views very easy that can be dragged and dropped in the Designer, with its own properties and events. Kudos to @Kiffi for helping me testing and evaluating v2!

There are a couple of ways to use these Custom Views:

1. by putting them on a layout and loading BANAno.LoadLayout
2. by creating them in code
3. NEW: by putting them on a layout and loading them with BANano.Layout

In part 2 of this tutorial, I will cover all three of them. But for now we concentrate on building a Custom View.

The best way to make a bunch of custom views (e.g. for wrapping a CSS library) is by creating a BANanoLibrary: it will keep your code cleaner.

Unlike v1, BANano v2 needs to be a UI B4J project (we do want to use the Abstract Designer after all).

The BANano download contains a wrapper library for the Skeleton CSS library. @tchart has written a wrapper for B4J already, but as this is a very small library with just some basic components, I asked him if he would mind me wrapping it again for learning purposes. Asking was the polite thing to do and he gave me the go-ahead. 🙂

A demo using this BANanoLibrary can be seen here: http://gorgeousapps.com/BANano

For this tutorial, we are going to recreate the SKTextbox component.

GETTING STARTED

Create a new B4J UI project if you haven’t done that yet. Replace the Main source code with the BANano default project code:

#Region Project Attributes
   #MainFormWidth: 600
   #MainFormHeight: 600
   #IgnoreWarnings: 16, 10, 14, 15
#End Region

Sub Process_Globals
   Private BANano As BANano 'ignore
End Sub

Sub AppStart (Form1 As Form, Args() As String)
   ' you can change some output params here
   BANano.Initialize("BANano", "BANanoSkeleton",12)
   BANano.HTML_NAME = "index.html"
 
   BANano.Header.Title="BANano Skeleton"
   BANano.ExternalTestConnectionServer = "http://gorgeousapps.com"
   BANano.Header.AddCSSFile("skeleton-all.min.css")
 
   ' start the build
   #if release
       BANano.BuildAsLibrary()
   #else
       BANano.Build(File.DirApp)
   #end if
 
   ExitApplication
End Sub

' HERE STARTS YOUR APP
Sub BANano_Ready()

End Sub

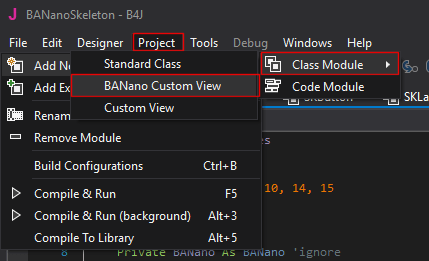
CREATING A CUSTOM VIEW

1. Adding a new BANano Custom View

NOTE: due to a current limitation of B4J, if you use Uppercase letters in the class name, the events will not show up in the IDE when typing Sub + TAB until you compile it as a library. When you use the library in a project, they will show.

You will see quite some code is prepared for you. On top, the most common events in Javascript have been pre-defined. These are the events you want to expose in the Abstract Designer to the user.

Next are some common properties like ‘Classes’, ‘Style’, ‘Margins’ and ‘Padding’.

Some basic code is also inserted. The initialize and DesignerCreateView method definitions can NOT be changed: you can not add or remove parameters to/from it! This is nothing new, as you can’t do this for a normal B4J Custom component either.

The DesignerCreateView method is where the magic happens, but I get back to this when we need to.

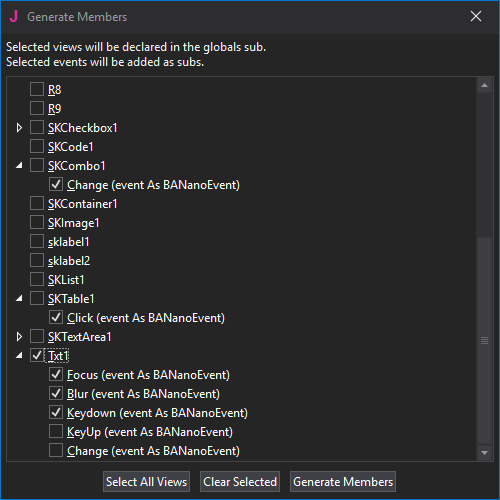
2. Activating events

You can just active an event by uncommenting them. If can also add events that are not in this list. They always have to be in format:

javascripteventname (event As BANanoEvent)

For our textbox, let’s activate the following events:

#Event: Focus (event As BANanoEvent)
#Event: Blur (event As BANanoEvent)
...
#Event: Keydown (event As BANanoEvent)
#Event: KeyUp (event As BANanoEvent)
...
#Event: Change (event As BANanoEvent)

In DesignerCreateView, we have to attach those events:

mElement.HandleEvents("change", mCallBack, mEventName & "_change") ' eventname must be lowercased!
mElement.On("keydown", mCallBack, mEventName & "_keydown") ' must be On because be do not want the default to be cancelled at the point of keydown
mElement.HandleEvents("keyup", mCallBack, mEventName & "_keyup")
mElement.HandleEvents("blur", mCallBack, mEventName & "_blur")
mElement.HandleEvents("focus", mCallBack, mEventName & "_focus")

Note we do use mCallBack here. This is because we want the class that initializes this component to be the one to handle our events.

In some cases, you want to handle events that are not exposed to the user (like a hover). In this case use Me as the callback parameter.

For example from the SKTable custom view:

Elems(0).HandleEvents("mouseenter", Me, "rowmouseenter") ' eventname must be lowercased!
Elems(0).HandleEvents("mouseleave", Me, "rowmouseleave")
...
#Region Internal Events
public Sub RowMouseEnter(event As BANanoEvent)
   Dim row As BANanoElement
   row.Initialize("#" & event.ID)
   row.AddClass("tablehover")
End Sub

public Sub RowMouseLeave(event As BANanoEvent)
   Dim row As BANanoElement
   row.Initialize("#" & event.ID)
   row.RemoveClass("tablehover")
End Sub
#End Region

3. Adding properties

We do want some custom properties on our TextBox:

#DesignerProperty: Key: Label, DisplayName: Label, FieldType: String, DefaultValue: , Description: Label of the TextBox.
#DesignerProperty: Key: Width, DisplayName: Full Width, FieldType: Boolean, DefaultValue: True, Description: Set the width 100%
#DesignerProperty: Key: Text, DisplayName: Text, FieldType: String, DefaultValue: , Description: Text of the TextBox
#DesignerProperty: Key: Placeholder, DisplayName: Placeholder, FieldType: String, DefaultValue: , Description: Placeholder text
#DesignerProperty: Key: Type, DisplayName: Type, FieldType: String, DefaultValue: text, List: text|email|password, Description: Type TextBox

All B4J supported FieldTypes can be used: Int, Float, String, Color, Boolean…

Add some variables to hold the properties:

Private mLabel As String = ""
Private mWidth As Boolean = False
Private mText As String = ""
Private mPlaceHolder As String = ""
Private mType As String = "text"

Now, when we use this component in the Abstract Designer, we want the view to use the ones we have set in the desinger. This is done by getting them from the Props map (Case does matter!).

If Props <> Null Then
       ...
       mLabel = Props.Get("Label")
       mWidth = Props.Get("Width")
       mText = Props.Get("Text")
       mPlaceHolder = Props.Get("Placeholder")
       mType = Props.Get("Type")
End If

In case you want to be able to set these properties in code too e.g. to change the labels text, we create getters and setters. The method name must start with get/set (Lowercased!).

public Sub setLabel(label As String)
   If mElementLabel <> Null Then
       mElementLabel.SetHTML(BANano.SF(label))
   End If
   mLabel = label
End Sub

public Sub getLabel() As String
   Return mLabel
End Sub

4. Building the view with HTML.

In Skeleton CSS, a textbox with a label needs to have a certain structure:

<label for="txt1">Text box</label>
<input placeholder="Enter some text" type="text">

This is simple to do in BANano thanks to B4Js smartstrings:

' preparing some variables
Dim exStyle As String = BuildExStyle
 
Dim extraWidth As String
If mWidth Then
   extraWidth = "u-full-width"
End If

' building the html
mElementLabel = mTarget.Append($"<label id="${mName}label" for="${mName}">${BANano.SF(mLabel)}</label>"$).Get("#" & mName & "label")

mElement = mTarget.Append($"<input id="${mName}" class="${extraWidth} ${mClasses}" style="${exStyle}${mStyle}" placeholder="${mPlaceHolder}" type=${mType}>"$).Children("#" & mName)
mElement.SetValue(mText)

One can keep a reference of the created parts (mElementLabel and mElement), but in some cases you can just grab it when needed. So this could also be written as:

mTarget.Append($"<label id="${mName}label" for="${mName}">${BANano.SF(mLabel)}</label>
               <input id="${mName}" class="${extraWidth} ${mClasses}" style="${exStyle}${mStyle}" placeholder="${mPlaceHolder}" type=${mType}>"$)
mElementLabel.Initialize("#" & mName & "label")
mElement.Initialize("#" & mName)
mElement.SetValue(mText)

It is a personal preference I guess.

Et voila, our View is finished: yes that is it! 🙂
Check out the source code of the Skeleton library in the download to see the whole class.

In part 2 of this tutorial, I’ll show you how to use such a view and make a BANano library out of it.

Alwaysbusy

or

Click here to Donation and support BANano & ABMaterial