B4J: New section and page navigation feature in ABMaterial (3.02)

PageNav2

ABMaterial 3.02 Maintenance Release will have a new feature, especially useful for ‘one page’ apps/websites to navigate. It intruduces ‘sections‘ within a page. A section is a logical grouping of rows, which can have its own background and a new extra navigation method/menu.

Sections must be declared at the BuildPage() stage, and are typically created right after the page.BuildGrid() method.

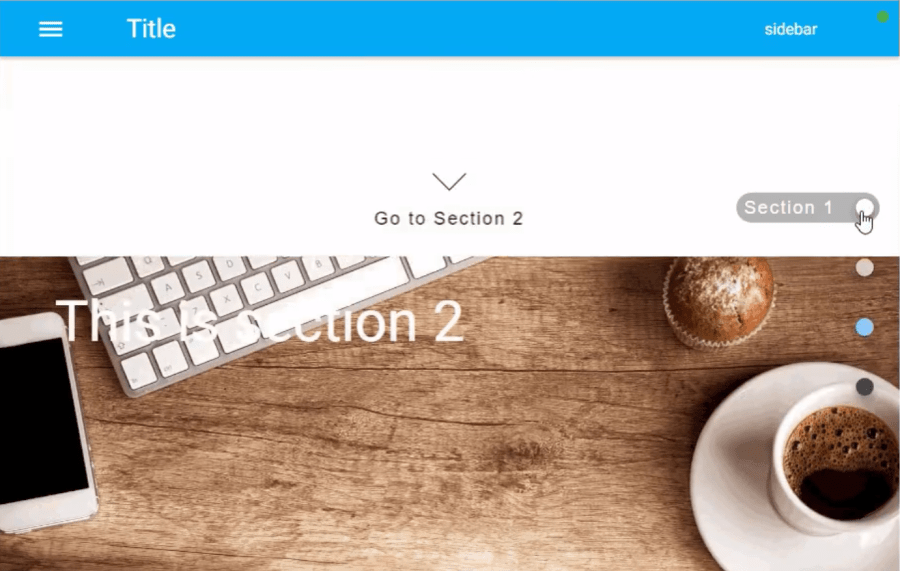
First, let me show you how it works and then I’ll explain how this is archieved with just 12 lines of B4J code!

Video:

Code (creating the Theme):

theme.Page.AddSection("section1", ABM.COLOR_BLACK, "", ABM.COLOR_WHITE, "")
theme.Page.AddSection("section2", ABM.COLOR_BLACK, "", ABM.COLOR_BROWN, ABM.INTENSITY_LIGHTEN4)
theme.Page.AddSection("section3", ABM.COLOR_WHITE, "", ABM.COLOR_BLUE, ABM.INTENSITY_LIGHTEN3)
theme.Page.AddSection("section4", ABM.COLOR_WHITE, "", ABM.COLOR_GREY, ABM.INTENSITY_DARKEN3)

Code (Adding the sections & the navigation)

page.CreateSection("section1", 1,1,ABM.COLOR_WHITE, "", "", "", "","calc(100vh - 56px)", 56, 500, ABM.VISIBILITY_ALL,"Section1")
page.SetSectionNavigation("section1", "section2", "Go to Section 2", ABM.SECTION_BUTTONTYPE_DOWN, "section1", "Section 1" )
page.CreateSection("section2", 2,2,ABM.COLOR_GREEN, "", "../images/bg-1.jpg", ABM.CONTAINERIMAGE_REPEAT_NOREPEAT, ABM.CONTAINERIMAGE_POSITION_COVER, "calc(100vh - 56px)", 56, 500, ABM.VISIBILITY_ALL, "Section2")
page.SetSectionNavigation("section2", "section3", "Go to Section 3", ABM.SECTION_BUTTONTYPE_DOWN, "section2", "Section 2")
page.CreateSection("section3", 3,3,ABM.COLOR_BLUE, "", "", "", "", "calc(100vh - 56px)", 56, 500, ABM.VISIBILITY_ALL,"Section3")
page.SetSectionNavigation("section3", "section4", "Go to Section 4", ABM.SECTION_BUTTONTYPE_DOWN, "section3", "Section 3")
page.CreateSection("section4", 4,4,ABM.COLOR_BLACK, "", "", "", "", "calc(100vh - 56px)", 56, 500, ABM.VISIBILITY_ALL, "Section4")
page.SetSectionNavigation("section4", "section1", "Back to Section 1", ABM.SECTION_BUTTONTYPE_UP, "section4", "Section 4")

In this example each section has only a height of 1 row (hence the from row 1 to row 1, from row 2 to row 2,…)

But, this can be any size, e.g. from row 5 to row 25. Something like:

page.CreateSection("section5", 5,25,ABM.COLOR_BLACK, "", "", "", "", "calc(100vh - 56px)", 56, 500, ABM.VISIBILITY_ALL, "Section4")

NOTE: Sections cannot be nested or overlapping!

The tricky part are the minHeight and scrollTop params. In the above examples, I’ve set the minHeight to the browsers height, minus the height of the TopBar: “calc(100vh – 56px)”.
For scrollTop, I’ve set it the the height of the TopBar so the top of the section is right under the navigation bar: 56

ABMaterial 3.02 Maintenance Release will go out in acouple of days to the donators with 25 bug fixes and implemented wishes!

Alwaysbusy

Click here to Donation and get the latest ABMaterial first!

B4J: ABMaterial Facebook-like timeline in less than 200 lines!

ABMFacebook50

I recently had a question if it was possible to create a Facebook-like WebApp with ABMaterial for B4J. I had some time to spare tonight (yeah right):rolleyes: and decided to give it a go…

All I needed were a couple of ABMContainers and the new CloseContent/OpenContent feature introduced in 3.02. The existing NextContent system would provide the infinite page.

It also uses a ABMCustomComponent for the ‘Like’ feature (I based it on this project), and you can find the source code of the class under the video:

About an hour, and 200 lines of B4J code later, I had a working timeline!  A real project would of course need some way to add an article, save them in the database, user management, etc but this is out of scope of this article.

Note: This example will be included in the upcoming 3.02 Maintenance Update, but I would like to share the source source code for the ‘Like’ functionality beforehand.

Source code for the ‘Like’ custom component.
You’ll need this zip file for the images and js/css files. Put the images and css in the /www/css/custom folder, the js file in the /www/js/custom/ folder.

The class LikeComponent:

'Class module
Sub Class_Globals
   Public ABMComp As ABMCustomComponent
   Public Counter As Int
End Sub

'Initializes the object. Countries and data are Json Strings
Public Sub Initialize(InternalPage As ABMPage, ID As String, AlreadyLiked As Int)
   ABMComp.Initialize("ABMComp", Me, InternalPage, ID)
   Counter = AlreadyLiked
End Sub

Sub ABMComp_Build(internalID As String) As String
   Return $"
<div id="${internalID} class="facebook-reaction"><!-- container div for reaction system -->
        <span class="like-btn"> <!-- Default like button -->
          <span class="like-btn-emo like-btn-default"></span> <!-- Default like button emotion-->
           <span class="like-btn-text">Like</span> <!-- Default like button text,(Like, wow, sad..) default:Like  -->
<ul class="reactions-box"> <!-- Reaction buttons container-->
	<li class="reaction reaction-like" data-reaction="Like"></li>
	<li class="reaction reaction-love" data-reaction="Love"></li>
	<li class="reaction reaction-haha" data-reaction="HaHa"></li>
	<li class="reaction reaction-wow" data-reaction="Wow"></li>
	<li class="reaction reaction-sad" data-reaction="Sad"></li>
	<li class="reaction reaction-angry" data-reaction="Angry"></li>
</ul>
</span>
<div class="like-stat"> <!-- Like statistic container-->
           <span class="like-emo"> <!-- like emotions container -->
             <span class="like-btn-like"></span> <!-- given emotions like, wow, sad (default:Like) -->
           </span>
           <span class="like-details">${Counter} others</span></div>
</div>
"$
End Sub

Sub ABMComp_FirstRun(InternalPage As ABMPage, internalID As String)
   Dim script As String = $"$("#${internalID} .reaction").on("click",function(){  // like click
     var data_reaction = $(this).attr("data-reaction");
     $("#${internalID} .like-details").html("You and ${Counter} others");
     $("#${internalID} .like-btn-emo").removeClass().addClass('like-btn-emo').addClass('like-btn-'+data_reaction.toLowerCase());
     $("#${internalID} .like-btn-text").text(data_reaction).removeClass().addClass('like-btn-text').addClass('like-btn-text-'+data_reaction.toLowerCase()).addClass("active");;

     if(data_reaction == "Like") {
         $("#${internalID} .like-emo").html('<span class="like-btn-like"></span>');
     } else {
         $("#${internalID} .like-emo").html('<span class="like-btn-like"></span><span class="like-btn-'+data_reaction.toLowerCase()+'"></span>');
     }
     var json = {'target': '${internalID}', 'like': data_reaction};
     b4j_raiseEvent('likecomponent_liked', json);
     });    

     $("#${internalID} .like-btn-text").on("click",function(){ // undo like click
     if($(this).hasClass("active")){
       $("#${internalID} .like-btn-text").text("Like").removeClass().addClass('like-btn-text');
       $("#${internalID} .like-btn-emo").removeClass().addClass('like-btn-emo').addClass("like-btn-default");
       $("#${internalID} .like-emo").html('<span class="like-btn-like"></span>');
       $("#${internalID} .like-details").html("${Counter} others");
       var json = {'target':'${internalID}'};
         b4j_raiseEvent('likecomponent_unliked', json);
       }
     })"$

   InternalPage.ws.Eval(script, Array As Object(ABMComp.ID))
   ' flush not needed, it's done in the refresh method in the lib
End Sub

Sub ABMComp_Refresh(InternalPage As ABMPage, internalID As String)

End Sub

' do the stuff needed when the object is removed
Sub ABMComp_CleanUp(InternalPage As ABMPage, internalID As String)

End Sub

Usage:

Sub Class_Globals
   ...
   Dim myLike As LikeComponent
   ...
End Sub

' adding the component
myLike.initialize(page, ID & "Like", Rnd(20, 500))
myContainer.Cell(4,1).AddComponent(myLike.ABMComp)

Events (the name LikeComponent is set in the FirstRun() method of the class:

public Sub LikeComponent_Liked(value As Map)
   Log(value.Get("like") & " ----> " & value.Get("target"))
End Sub

public Sub LikeComponent_UnLiked(value As Map)
   Log("Unliked ----> " & value.Get("target"))
End Sub

Et voila,  a nice little demonstration of what you can make using B4J and ABMaterial.

I’ll end with a little word of advice:

If you only plan to learn one programming language this year, B4X is definitely the one you should pick!  With ABMaterial, I give you the power to write responsive, professional WebApps, and with the other B4X tools you write native Android, iOS, Desktop (Mac, Windows, Linux), Raspberry Pi and Arduino apps.  All with the same language!  You’ll wonder why you ever bothered looking at all those other pricy programming tools out there…

Happy programming!

Alwaysbusy

Click here to Donation and get the latest ABMaterial first!

B4J: ABMaterial 2.51 Public/3.00 ‘Chipmunk’ for Donators Released!

ABMaterial300Chipmunk

I’m very happy to release ABMaterial 3.00 “Chipmunk” for B4J with over 35 new features and bugfixes!  The most easy-to-use framework for developing professional responsive WebApps for all platforms is now at its third major release.

‘Chipmunk?’, I hear you think… Yes, from now on, every major version of ABMaterial will have a codename. Those names were already used internally and are animal names, matching the versions position in the alphabet. (FYI, version 1.x was “Albatros“, 2.x was “Butterfly“). For version 4.0, I’ll let you decide what it is called… :)

For the occasion, I also gave the demo app a new Theme. Make sure to check it out.

Please express your thanks to Mindful, who has done a remarkable effort to join me for a 3 day program-jam session to solve the reconnecting issues. The solution looks very clean and is easy to understand. A big thanks Mihai!

Chipmunk now also has the possibility to generate template projects for both B4J and B4A using a WebView wich makes it possible to use the Native functionalities (like accessing a camera, contacts, folders and much more) on your Android and Desktop/Raspberry Pi devices. An extra ABMController library makes it easy to communicate bidirectional between the WebView and the B4X code. The ABMController library for B4i is in the making.

The public version 2.51 with the Google Analytics bugfix is available to download here.

Donators will receive their download link for Chipmunk shortly.

Alwaysbusy

Click here to Donation and get the latest ABMaterial first!


B4A: ABFlicB4A library for Flic buttons

cute-as-a-button-1

You probably have seen these nifty little IoT Flic buttons around. They are a fun and relative cheap BLE button that allows you to do something when the button is clicked, doubleclicked or hold.

I decided to write a wrapper for the Android SDK to use with B4A.

How to use:
1. Install the Flic app from the Google Play.
2. On their developer page, create a new app: you get a key and a secret.
3. Copy the ABFlicB4A library jar and xml to your library folder and select it in B4A

Here is a small video demonstrating the library.  You can the use the full power of B4A to do about, well, everything…

Example usage code:

Sub Process_Globals

End Sub

Sub Globals
   Private flic As ABFlic
   Private Button2 As Button
   Private Button3 As Button
   Private Button4 As Button
   Private Label1 As Label
   Private Button1 As Button

   Private MyFlicID As String

   Private FlicResults As List
End Sub

Sub Activity_Create(FirstTime As Boolean)
   Activity.LoadLayout("1")
   FlicResults.Initialize
   FlicResults.Add("RESULTACTION_HOLD")
   FlicResults.Add("RESULTACTION_SINGLECLICK")
   FlicResults.Add("RESULTACTION_DOUBLECLICK")
End Sub

Sub Activity_Resume
   ' your key and secret
   flic.Initialize("Flic", "d60d36a0-XXXXXXXXXXXXXXXXXXXXXXXXXXXXXXXXX", "db5c2b3d-XXXXXXXXXXXXXXXXXXXXXXXXXXXXXXXXX", "ABFlicTest")
End Sub

Sub Button1_Click
   flic.ForgetButton(MyFlicID)
End Sub

Sub Button2_Click
   flic.GrabButton
End Sub

Sub Button3_Click
   flic.StartListening
End Sub

Sub Button4_Click
   flic.StopListening
End Sub

Sub flic_Added(buttonID As String, Name As String)
   MyFlicID = buttonID
   Log("Added: " & buttonID)
   Label1.Text = "Added: " & buttonID & CRLF & Label1.Text
End Sub

Sub flic_Clicked(buttonID As String, wasQueued As Boolean, timeDiff As Int)
   MyFlicID = buttonID
   Log("Clicked: " & buttonID)
   Label1.Text = "Clicked: " & buttonID & CRLF & Label1.Text
End Sub

Sub flic_DoubleClicked(buttonID As String, wasQueued As Boolean, timeDiff As Int)
   MyFlicID = buttonID
   Log("DoubleClicked: " & buttonID)
   Label1.Text = "DoubleClicked: " & buttonID & CRLF & Label1.Text
End Sub

Sub flic_Holded(buttonID As String, wasQueued As Boolean, timeDiff As Int)
   MyFlicID = buttonID
   Log("Holded: " & buttonID)
   Label1.Text = "Holded: " & buttonID & CRLF & Label1.Text
End Sub

Sub flic_Removed(buttonID As String)
   MyFlicID = ""
   Log("Removed: " & buttonID)
   Label1.Text = "Removed: " & buttonID & CRLF & Label1.Text
End Sub

Sub flic_Error(err As Int)
   Log("Error: " & err)
   Label1.Text = "Error: " & err & CRLF & Label1.Text
End Sub

I’m currently working on a Desktop/Raspberry Pi version of this library, which I will share in the B4J forum later.

The library can be found at the B4A forum.

Happy programming!

Alwaysbusy

Warning: Malicious link to Google Analytics cached page!

swearing-300x217_6

As an alert user of ABMaterial pointed out some malicious site is abusing a much used cache of the Google Analytics script.  A lot of web developers used the cache on (do not click!) http://www.schedule-analytics.com/analytics.js, and up to ABMaterial 2.20, so did I as it was a lot faster than the default Google one.

Fix:

Make sure your script points to Googles secure site:

(function(i,s,o,g,r,a,m){i['GoogleAnalyticsObject']=r;i[r]=i[r]||function(){
(i[r].q=i[r].q||[]).push(arguments)},i[r].l=1*new Date();a=s.createElement(o),
m=s.getElementsByTagName(o)[0];a.async=1;a.src=g;m.parentNode.insertBefore(a,m)
})(window,document,'script','https://www.google-analytics.com/analytics.js','ga');

For users working with ABMaterial 2.20 or less, disable Google Analytics by commenting out the following lines:

' page.UseGoogleAnalytics("YourTrackingID", "")

In later versions (2.50+), this is not an issue, as it already points to Googles secure site.

I’ll release a new public version with the fix as soon as possible, but for now, just disable this feature.

Alwaysbusy

Click here to Donation and get the latest ABMaterial first!


B4J:Programming LEGO Mindstorms EV3

b4lego

I was wondering if it would be possible to use B4J to program the Lego Mindstorms EV3 Brick for some time. So, some weeks ago, I finally spend a couple of evenings looking into it. And yes, B4J goes Robotics! It uses a modified LeJOS Firmware.

I upgraded LeJOS to support Java 1.8, which is probably the most technical part of the project.  I cannot provide it here, as it depends on your Java version but if you follow the next steps, you can build your own.  This is done on a Windows PC:


Upgrading the LeJOS Firmware to use Java 1.8

The following procedure will install the java 8 environment compatible with leJOS 9.0 from windows 7. The only extra tool needed is 7ZIP (a free tool) which can generate tar and gz format.  In the following I use a temporary directoyr as F:\temp. Replace it with your own temp directory wherever it appears.

  1. Go to java site http://www.oracle.com/technetwork/java/ … 82511.html
  2. Create an account if you dont have one then Accept Licensee agreement and download ejdk-8-xxxxxxx-linux-arm-sflt-xxxxxxxx.tar.gz or the latest java8 jre for EV3.
  3. Unzip this file in your F:\temp directory. For simpler process you may rename the extracted directory  as ejdk8. Run 7zip as administrator!
  4. Go to directory ejdk8\ejdk1.8.0\bin. Save the file jrecreate.bat. Now right click on jrecreate.bat and select “modify”.  Add one first line to the bat file as SET JAVA_HOME=C:\Progra~2\Java\jdk1.8.xxxx.  this is where java8 is installed on my system. Program~2 stand for Program Files (x86) but is easier to type.
  5. Start a command window: Start->All prog->Accessory->commands.
  6. In this window type in the following commands
    F:
    cd temp
    cd ejdk8\ejdk1.8.0\bin
    jrecreate.bat –dest newjre –profile compact2 –vm clientIt should start creating the new jre files in the directory “newjre” under ejdk8\ejdk1.8.0\bin
    Wait for the final message.
    Close the command window.
  7. With file explorer go to F:\temp\ejdk8\ejdk1.8.0\bin. Copy “newjre” directory back to F:\temp
  8. Rename the “newjre” directory as something expected by LeJOS such as
    ejre-8-b132-linux-arm-sflt
  9. Right click on it. Open with 7ZIP and add to archive. Select tar format. It will create ejre-8-b132-linux-arm-sflt.tar file.
  10. Right click on tar copy then add archive with gzip format. It will create ejre-8-b132-linux-arm-sflt.tar.gz. You have created the JRE file for java8 expected by EV3.
  11. Insert your SD card and format it.
  12. Copy the ejre-8-b132-linux-arm-sflt.tar.gz under the sd card top directory.
  13. Go to C:\Program Files\leJOS EV3
  14. Now remove the SD from PV and insert the card into the EV3 brick then power it. Wait for the end of the install (about 10mn).

If anything goes wrong, format again the SD, empty the F:\temp directory and restart at step 3.  if it persist try another SD card.

Your brick is ready!


Next I wrote a B4J wrapper for the basics like motors, sensors etc. This project is just a hobby and may grow in the future. But I just wanted to share this first video (badly directed so no Oscars here, unless…)

Obviously, I wanted to test out my code, but I had to build a bot first.  Well, I was in for a surprise! It took me over 3 hours to build EV3D4 and I can tell you, I’m not a very patient person so I may have taken some shortcuts in the construction.

What happens in the video:
1. I uploaded the B4J created .jar file to the brick via ssh and I’m ready to start it.
2. After some time, it runs (on the brick shows a disclamer and waits for a key).
3. I disconnect the brick, put it on the ground and press a button on the brick.
4. I programmed the IR sensor so if it sees a wall, it turns away, else it keeps going.

Fun fact is you can use B4J-Bridge.jar on the brick!

This is handy as debugging a Brick is a b*tch. You must have a lot of patience and prepared to restart your brick A LOT. This is not a B4J limitation, just to say how unstable programming a Brick is in general.

Coding is straightforward in B4J (this is all the code I wrote, including turning if it is about to hit a wall):

Sub Process_Globals
   Private StartTimer As Timer
   Public EV3 As ABLegoEV3
   Public LeftMotor As ABLLargeRegulatedMotor
   Public RightMotor As ABLLargeRegulatedMotor
   Public Sensor As ABLIRSensor
   Public sp As ABLSensorMode

   Public control As Int = 0
   Public distance As Int = 255
End Sub

Sub AppStart (Args() As String)
   LeftMotor.Initialize("B")
   RightMotor.Initialize("C")

   LeftMotor.ResetTachoCount
   RightMotor.resetTachoCount
   LeftMotor.rotateTo(0)
   RightMotor.rotateTo(0)
   LeftMotor.Speed = 400
   RightMotor.Speed = 400
   LeftMotor.Acceleration = 800
   RightMotor.Acceleration = 800

   Log("starting sensor")
   Sensor.Initialize("S4")
   sp = Sensor.DistanceMode 

   IntroMessage

   StartTimer.Initialize("StartTimer", 100)
   StartTimer.Enabled = True
   StartMessageLoop
End Sub

Sub StartTimer_Tick
   ' read the sensor
   Dim sample(sp.sampleSize) As Float
   control = Sensor.getRemoteCommand(0)
   sp.fetchSample(sample, 0)
   distance = sample(0)
   Log("Control: " & control & " Distance: " & distance) 

   If distance < 70 Then
     Log("A wall!")
     EV3.Button.LEDPattern(2)

     LeftMotor.rotate2(-180, True) ' start Motor.B rotating backward
     RightMotor.rotate(-180)  ' rotate C farther To make the turn
     If Bit.And(DateTime.Now, 1) <> 0 Then
         LeftMotor.rotate2(-180, True) ' start Motor.B rotating backward
         RightMotor.rotate(180)  ' rotate C farther To make the turn
     Else
         RightMotor.rotate2(-180, True) ' start Motor.B rotating backward
         LeftMotor.rotate(180) ' rotate C farther To make the turn
     End If
  Else
     Log("Let's walk")
     EV3.Button.LEDPattern(1)

     LeftMotor.Speed = 400
     RightMotor.Speed = 400
     LeftMotor.Backward ' my motors are installed inverted on this robot
     RightMotor.Backward
  End If
End Sub

Sub IntroMessage()
   Dim g As ABLGraphicsLCD = EV3.GraphicsLCD
   g.clear
   g.drawString("Bumper Car Demo", 5, 0, 0)
   g.Font = g.Font.SmallFont
   g.drawString("Demonstration of the Behavior", 2, 20, 0)
   g.drawString("subsumption classes. Requires", 2, 30, 0)
   g.drawString("a wheeled vehicle with two", 2, 40, 0)
   g.drawString("independently controlled", 2, 50, 0)
   g.drawString("motors connected to motor", 2, 60, 0)
   g.drawString("ports B and C, and an", 2, 70, 0)
   g.drawString("infrared sensor connected", 2, 80, 0)
   g.drawString("to port 4.", 2, 90, 0)

   ' Quit GUI button:
   g.Font = g.Font.SmallFont
   Dim y_quit As Int = 100
   Dim width_quit As Int = 45
   Dim height_quit As Int = width_quit/2
   Dim arc_diam As Int = 6
   g.drawString("QUIT", 9, y_quit+7, 0)
   g.drawLine(0, y_quit,  45, y_quit) ' top line
   g.drawLine(0, y_quit,  0, y_quit+height_quit-arc_diam/2) ' left line
   g.drawLine(width_quit, y_quit,  width_quit, y_quit+height_quit/2) ' right line
   g.drawLine(0+arc_diam/2, y_quit+height_quit,  width_quit-10, y_quit+height_quit) ' bottom line
   g.drawLine(width_quit-10, y_quit+height_quit, width_quit, y_quit+height_quit/2) ' diagonal
   g.drawArc(0, y_quit+height_quit-arc_diam, arc_diam, arc_diam, 180, 90)

   ' Enter GUI button:
   g.fillRect(width_quit+10, y_quit, height_quit, height_quit)
   g.drawString2("GO", width_quit+15, y_quit+7, 0,True)

   EV3.Button.WaitForAnyPress
   If (EV3.Button.ESCAPE.isDown()) Then
     ExitApplication2(0)
   End If
   g.clear
End Sub

As I said, this is just for fun. No idea how far this will go.  You can download the source code for the B4J library from my Github.

Cheers,

Alwaysbusy