The latest version of BANano introduces the BANanoServer.b4xlib library, which is an easy to use wrapper around jServer, the same B4J lib ABMaterial uses. One can now use BANano to make stand-alone Web sites, but also interfaces for e.g. IoT and Raspberry Pi (when using the BANanoServer lib: as this is a normal B4J app, it can use all B4J libs on the server side) and build complex Web Apps.
NOTE: BANano still works without the BANAnoServer Library as it did before in case you want to use another backend like PHP, but only having to program in one language has huge advantages and is what RAD is al about.
When you will look at the code of BANanoServer, ABM users will recognize the powerful Caching system, Root, Websocket support and HTTP/2 filters. In BANano, all that code is removed from your own projects view (but still accessible as it is an open source .b4xlib).
Some ‘easy-to-use’ methods to communicate between the browser and the server are added (to call methods from each other and to exchange files).
More info and download BANano for free here: BANano Download
But the biggest news this week must have been the BOMB Erel from Anywhere Software dropped: B4A, the tool to make native Android apps, is from now on free to use for everyone!
From his announcement a couple of weeks ago:
I’m very proud in the continuing progress of B4X tools. I’m also very proud to be part of this amazing developers community.
In the last couple of years, I have a growing feeling that B4X tools do not realize their potential. While there are all kinds of development tools, B4X offers a unique set of features: simple, powerful, mature, great community, RAD, native, cross platform and more.
B4X tools are an excellent choice for a wide range of real-world use cases.
So, the question is how to make B4X more popular? Obviously, it is not a simple nor a short-term task.
A clear growth barrier is the fact that unlike most development tools today, B4A and B4i are not free. This wasn’t the case 10 years ago.
The big announcement today is that B4A will become free in a few weeks. The framework – set of internal libraries, will be open sourced.
We will accept contributions for B4A like currently done with B4J.
We’ve also secured funds from a US investor who shares my vision of making B4X a popular development tool. These resources will allow us to further expand.
Two huge points were raised here: for one, the tool that started it all (B4A) to make native Android apps, is now 100% free (download it here)! It is clear that nowadays paying for a development platform is so 2009. Some development vendors may exist for 20+ years, but haven’t grown accordingly and seem to be stuck in overprotecting their (outdated?) technology. Clearly, Erel is not one of them and is thinking on how to expand his tools into the next decade.
But the second part may be even more exciting: a private US investor has shown interest in the potential of B4X and shares Erel view of the future. This opens a whole new world to the development tool and allows to think a lot bigger. He can expand his team not only with new developers, but even more important, surround himself with professionals to market his brand and let the world know of the big impact his technology can have on any software developer.
Just read up on the forum (100K+ members) and one quickly realizes the brought spectrum of apps that can be written with B4X. It is used by big corporations like NASA, IBM and Bosch to name a few, but also by small companies and citizen developers. I for one use it daily in my day job at OneTwo and we feel so secure with the tools we use it as the foundation of all our software. Very rarely one comes across a tool where the developers are so close to its users and actually listens to their concerns and wishes. I remember having found a bug (yeah, you really have to go deep to find one) and after reporting it to the Anywhere Software team, 10 minutes(!) later, an update was released. This has never been seen and blocked me zero time in my own development.
I am a big fan of the B4X suite. It allowed me to write ABMaterial and BANano, two libraries to make modern Websites and Webapps. Something I can’t see me do in any other tool, at least not with such ease and speed. And it is fun, really fun to work with too. 🙂
So I think Yoda would concur: ‘The future, bright it is!’
It has been some time since I could give my donators a new goodie, and this time it is a library/tool to profile and monitor your B4J + B4A (7.01+) apps (not limited to ABMaterial WebApps!) I’ve been needing something like this for some time for my own projects, but couldn’t find one that suited me. This can be a very good asset to find Memory Leaks or to track which method takes up to much time.
Using a very simple API, you can track how long the code execution time is, the times hit, average time, memory usage etc for any block of code you want to investigate. I deliberately gave you this API freedom, as profiling ALL your code (as most programming languages do) is just drowning you in to much information so you don’t see the wood for the trees anymore.
QUICK NOTE: Do not forget to set your DONATORKEY and the port in the Viewer params.txt . The same port and the IP of your Viewer have to be used in the apps you are monitoring!
How it works:
ABMonitor uses the Jamon library, which has a extremely low overhead on your code. Just by disabling it (using the SetActive method), you can actually leave it in your production apps if you want (or use B4Js conditional compiling if you want to get rid of it all together in a production app).
ABMonitor consists of two main parts:
1. The ‘live’ ABMonitor Viewer.
Instructions: Simply start the Viewer in a command prompt using: java -jar ABMonitor.jar
This Viewer shows all the stuff you are monitoring with the API. It shows e.g. how many times some part of your code was hit, how long it took, what the average time was, when it was last accessed, memory consumption etc… It is presented in a TreeView Table, so you can check every detail (depending on how deep you’ve coded your profiling). At the bottom, the last 50 runs are presented in some line charts.
Because the IDE of B4X is ‘live’, so is the Viewer! Thanks to this unique feature of the B4X products, you can update your code and see the results in the Viewer immediately.
Little side note: This ‘live’ IDE part is a little-known/promoted feature (except within the B4X community of course, as for us this is normal), but it has a HUGE advantage over any other tool out there. In similar market aimed tools, like Xojo for example, you have to compile and re-compile every single time you make the smallest of changes to your code (on bigger projects it takes up to 20 minutes, some users reported). In B4X, just change the code, and continue running. Not happy with it? Change it again and see what gives. BIG production time-saver! Some of you who used to program in VB6 know what I mean…
2. The ABMonitorB4X libraries (ABMonitorB4A.jar/ABMonitorB4J.jar).
Install instructions: Copy the xml and jars (dont’t forget jamon-2.81.jar), to your B4A or B4J libraries folder. In the IDE select the ABMonitorB4X library, the RandomAccessFile library and the Network library.
This API connects your own apps with the monitor. It basically consists of a Start and a Stop method.
First, we have to make the connection with the Viewer. Thanks to Erels new Resumable Subs, doing this is a breeze:
In Main make some declarations:
Sub Process_Globals
   Public Monitor As ABMonitor

   Private port As Int = 10090 ' <-- Set your Viewers Port!
   Private ip As String = "127.0.0.1" ' <-- Set your Viewers IP!
   Private abmonitor As AsyncStreams
   Private client As Socket

   ' Useful to quickly activate/deactivate the monitoring
   Public TRACKMONITOR As Boolean = True
End Sub
Next add the following resumable sub:
Sub ConnectMonitor()
   Dim c As Socket
   c.Initialize("client")
   c.Connect(ip, port, 5000)
   Wait For Client_Connected (Successful As Boolean)
   If Successful Then
     client = c
     abmonitor.InitializePrefix(client.InputStream, False, client.OutputStream, "abmonitor")
     Log("ABMonitor connected")
     Monitor.SetActive("Template", True,abmonitor, 5)
   Else
     Log("ABMonitor disconnected")
   End If
End Sub

Sub abmonitor_Error
   Monitor.SetActive("Template", False,Null, 0)
   Log("ABMonitor disconnected")
End Sub
You can set the interval the data should be send to the Viewer, in seconds, with the last parameter in ‘Monitor.SetActive(“Template”, True,abmonitor, 5)’. In this example, it is every 5 seconds. Note: This does not mean it is tracked every 5 seconds! The library will continue tracking everything, but it will only send all the info over to the Viewer every 5 seconds.
Finally, Initialize the monitor and call the resumable sub when your app starts (a good place is e.g. before StartMessageLoop in a Server app):
As I said, there are basically only two commands: Start and Stop.
There are two ways to monitor/profile your code (you can mix the use of them):
a. Monitor some code:
You want to monitor a query, or a whole sub, … In general this is a complete block of code.
Good practice is using the class/module name as the Group parameter, and the method name as the Label, but you can put whatever you want. This will later be used in the Viewer to group stuff. (Group and Label are the first and second parameters in the calls).
Example:
Private Sub WebSocket_Connected (WebSocket1 As WebSocket)
   If Main.TRACKMONITOR Then Main.Monitor.Start("ABMPageTemplate", "WebSocket_Connected", "")

   '   ... the code you want to monitor

   If Main.TRACKMONITOR Then Main.Monitor.Stop("ABMPageTemplate", "WebSocket_Connected", "")
End Sub
Or tracking a query:
..
If Main.TRACKMONITOR Then Main.Monitor.Start("ABMPageTemplate", "MySlowQuery", "")

Dim SQL_str As String
SQL_str = "SELECT cases.CaseID, cases.CaseUserID, cases.CaseType, cases.CaseSummary FROM tCases WHERE cases.CaseStatus=1;"
Dim cases As List = DBM.SQLSelect(SQL, SQL_str, Null)

If Main.TRACKMONITOR Then Main.Monitor.Stop("ABMPageTemplate", "MySlowQuery", "")
...
b. Monitor methods which are used in multiple places, and you want to know where it was called.
You have for example a page.Refresh method, which is called in multiple places. You can use the third parameter to set the ‘caller’. In general there will only be one line of code between the start() and stop().
This caller will later be used in the Viewer to build a call tree (or stack trace)
Example:
Private Sub WebSocket_Connected (WebSocket1 As WebSocket)
     ...
     If Main.TRACKMONITOR Then Main.Monitor.Start("ABMPageTemplate", "page.Refresh", "WebSocket_Connected")
     page.Refresh
     If Main.TRACKMONITOR Then Main.Monitor.Stop("ABMPageTemplate", "page.Refresh", "WebSocket_Connected")
     ...
End Sub

public Sub ConnectPage()
   ...
   ' refresh the page
   If Main.TRACKMONITOR Then Main.Monitor.Start("ABMPageTemplate", "page.Refresh", "ConnectPage")
   page.Refresh
   If Main.TRACKMONITOR Then Main.Monitor.Stop("ABMPageTemplate", "page.Refresh", "ConnectPage")
   ...
End Sub
As you can see, you are totally free to monitor anything you want.
Call for action: if anyone out there is a guru in making B4i libraries, please PM me! The java library code is quite simple and it shouldn’t be to hard for an experienced B4i library coder to write one which can connect to the same Viewer. If we got this one too, then we’ve covered all major platforms in B4X!
ABMonitor is part of a multi-pack on libraries, frameworks and tools all Donators to this blog receive.
Included are currently:
ABMaterial (B4J) A very powerful framework combining a tuned Materialize CSS with the free programming tool B4J. It allows creating Web Apps that not only look great thanks to Googles Material Design, but can be programmed with the powerful free tool from Anywhere Software without having to write a single line of HTML, CSS or Javascript code!
ABExchange (B4J) It can be used to sync the ABMCalendar control with your exchange server and outlook. It can also send a mail.
ABJasperReports (B4J) his is a little library that allows you to export reports created in Jasper Reports in your B4J applications. They can be exported to pdf, html and xls. You can use parameters defined in JasperReports.
ABPDFBox (B4J) With this library you can print PDF files (either by showing a dialogbox or directly to a specified printer). Works in UI and NON-UI apps.
ABMonitor (B4J + B4A) Tool to monitor/profile your B4A (7.01+) and B4J code! Includes the libraries for both platform + the ABMonitor Viewer. See the tutorial for more info.
ABCron (B4J + B4A) A more advanced timer library that can schedule more intelligently tasks using Cron expressions. You can also set a start and end datetime. I’ve added a method RestartApplicationNONUI() that should restart you .jar file when the Cron expression is met.
ABEvaluator (B4J + B4A) Evaluate mathematical expressions. You can also write your own functions in B4J/B4A.
ABPlugin (B4J) Create Live plugins for you own apps. This means you can create plugins that can be added/removed while your app is running. Note it is a little experiment that shows the power of B4J. The ‘compile to library’ feature of B4J is very handy to create plugins.
You probably have seen these nifty little IoT Flic buttons around. They are a fun and relative cheap BLE button that allows you to do something when the button is clicked, doubleclicked or hold.
I decided to write a wrapper for the Android SDK to use with B4A.
How to use:
1. Install the Flic app from the Google Play.
2. On their developer page, create a new app: you get a key and a secret.
3. Copy the ABFlicB4A library jar and xml to your library folder and select it in B4A
Here is a small video demonstrating the library. You can the use the full power of B4A to do about, well, everything…
Example usage code:
Sub Process_Globals

End Sub

Sub Globals
   Private flic As ABFlic
   Private Button2 As Button
   Private Button3 As Button
   Private Button4 As Button
   Private Label1 As Label
   Private Button1 As Button

   Private MyFlicID As String

   Private FlicResults As List
End Sub

Sub Activity_Create(FirstTime As Boolean)
   Activity.LoadLayout("1")
   FlicResults.Initialize
   FlicResults.Add("RESULTACTION_HOLD")
   FlicResults.Add("RESULTACTION_SINGLECLICK")
   FlicResults.Add("RESULTACTION_DOUBLECLICK")
End Sub

Sub Activity_Resume
   ' your key and secret
   flic.Initialize("Flic", "d60d36a0-XXXXXXXXXXXXXXXXXXXXXXXXXXXXXXXXX", "db5c2b3d-XXXXXXXXXXXXXXXXXXXXXXXXXXXXXXXXX", "ABFlicTest")
End Sub

Sub Button1_Click
   flic.ForgetButton(MyFlicID)
End Sub

Sub Button2_Click
   flic.GrabButton
End Sub

Sub Button3_Click
   flic.StartListening
End Sub

Sub Button4_Click
   flic.StopListening
End Sub

Sub flic_Added(buttonID As String, Name As String)
   MyFlicID = buttonID
   Log("Added: " & buttonID)
   Label1.Text = "Added: " & buttonID & CRLF & Label1.Text
End Sub

Sub flic_Clicked(buttonID As String, wasQueued As Boolean, timeDiff As Int)
   MyFlicID = buttonID
   Log("Clicked: " & buttonID)
   Label1.Text = "Clicked: " & buttonID & CRLF & Label1.Text
End Sub

Sub flic_DoubleClicked(buttonID As String, wasQueued As Boolean, timeDiff As Int)
   MyFlicID = buttonID
   Log("DoubleClicked: " & buttonID)
   Label1.Text = "DoubleClicked: " & buttonID & CRLF & Label1.Text
End Sub

Sub flic_Holded(buttonID As String, wasQueued As Boolean, timeDiff As Int)
   MyFlicID = buttonID
   Log("Holded: " & buttonID)
   Label1.Text = "Holded: " & buttonID & CRLF & Label1.Text
End Sub

Sub flic_Removed(buttonID As String)
   MyFlicID = ""
   Log("Removed: " & buttonID)
   Label1.Text = "Removed: " & buttonID & CRLF & Label1.Text
End Sub

Sub flic_Error(err As Int)
   Log("Error: " & err)
   Label1.Text = "Error: " & err & CRLF & Label1.Text
End Sub
I’m currently working on a Desktop/Raspberry Pi version of this library, which I will share in the B4J forum later.
This weekend I’ve found some time to setup my testing environment for B4i, the latest brainchild of Anywhere Software. I must say, being a novice Mac user, setting everything up went very smooth.
The only parts I got into some trouble was my own fault, as I went though the setup tutorials, videos and Beginners Guide just a little bit to fast. Eager to get started, I skimmed through them and forgot some important steps.
First I paid my obligatory taxes to Apple: $99/year. (Programming for Android only sets you back with a one time fee of $25). Only a couple of minutes later, my account was activated.
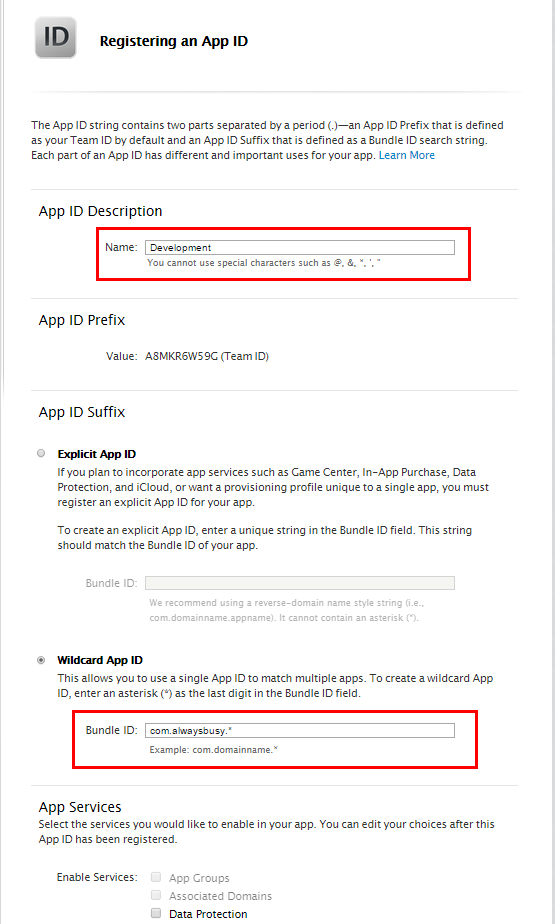
One part that may have gone a bit to fast for a first time Apple developer was the creation of an App ID. As Erel had his system already setup when he made the video and could just pick an App ID, he did not show us how to create it in the first place. It is mentioned further in the post you can create a single wildcard App ID if you put a .* at the end, but this was not very clear from the tutorial. So, this is how I did it:
Click to enlarge
Another RTFM moment was when I wanted to install the B4i-Bridge app on the device. I started watching the video and forgot to read the bold sentence above it:
Before you install B4i-Bridge you must install the B4I certificate. This step is not shown in the video. Open Safari (device browser) and navigate to: www.b4x.com/ca.pem
Clearly stated, but hey, I was in a hurry…
I first tried the Hosted Builder option to compile the app. Very smooth and a excellent alternative for Windows developers who do not own a Mac. And for $26 a year, a bargain.
But, as I want to experiment with creating libraries myself in Objective-C, I wanted to install the local MacBuildServer. Again, following the tutorial, everything went very well. Downloading XCode took most of the time.
One note: Make sure your Mac is in the same IP range as the rest of your development environment. At first, the Mac had IP 192.168.40.116 while the rest was in the 192.168.1.x range. So it didn’t work.
The rest was pure cosmetic. I added an shortcut on the Mac to start the MacBuildServer, and one on the PC side to shut it down.
Creating the shortcut on the Mac side went like this:
Open up a terminal
go to the folder where you unzipped the macserver-aa (in my case, it’s on the desktop, so it looked like this:
$ cd desktop
$ cd macbuilder-aa
create a text file
$ shout start.command
add the following lines (adjust the cd to the path where your MacBuildServer is)
#!/bin/sh
cd /Users/Alwaysbusy/Desktop/macserver-aa
java -jar B4iBuildServer.jar
save and in the terminal type:
$ chmod -x start.command
Right click on start.command, pic ‘Get Info’ in the menu and rename it to something like ‘B4i Build Server Start.command’.
Click ‘Hide extension’
And change the icon to a nice B4i one. I’ve ripped the B4i icon from the exe (sorry Erel) and saved it as a .png. In case you need it, here it is:
Open the png on the Mac in preview and copy it (Edit – Copy). In the ‘Info Panel’ of the command file, click on the icon until it gets a blue rectangle. Then you can do ‘Edit – Past’.
In my case, it looked like this:
Coming from Windows and being used to creating .bat files, this is all rather complicated on a Mac I must say.
On the PC side I created also the icon to shut the MacBuildServer down. Enter http://:51041/kill in your favorite browser. Create a bookmark and drag it to your desktop. Rename it to something like ‘B4i Build Server Kill’. You can also change the icon:
Right click on the shortcut and pick ‘Properties’
Press ‘change icon’
Browse to where you have installed B4i
Pick B4i.exe and select the icon
So (besides my shortcut creation problems on a Mac), setting up B4i is a breeze! I’m ready to add some serious iOS programming experience to my portfolio.
Barcelona Skin
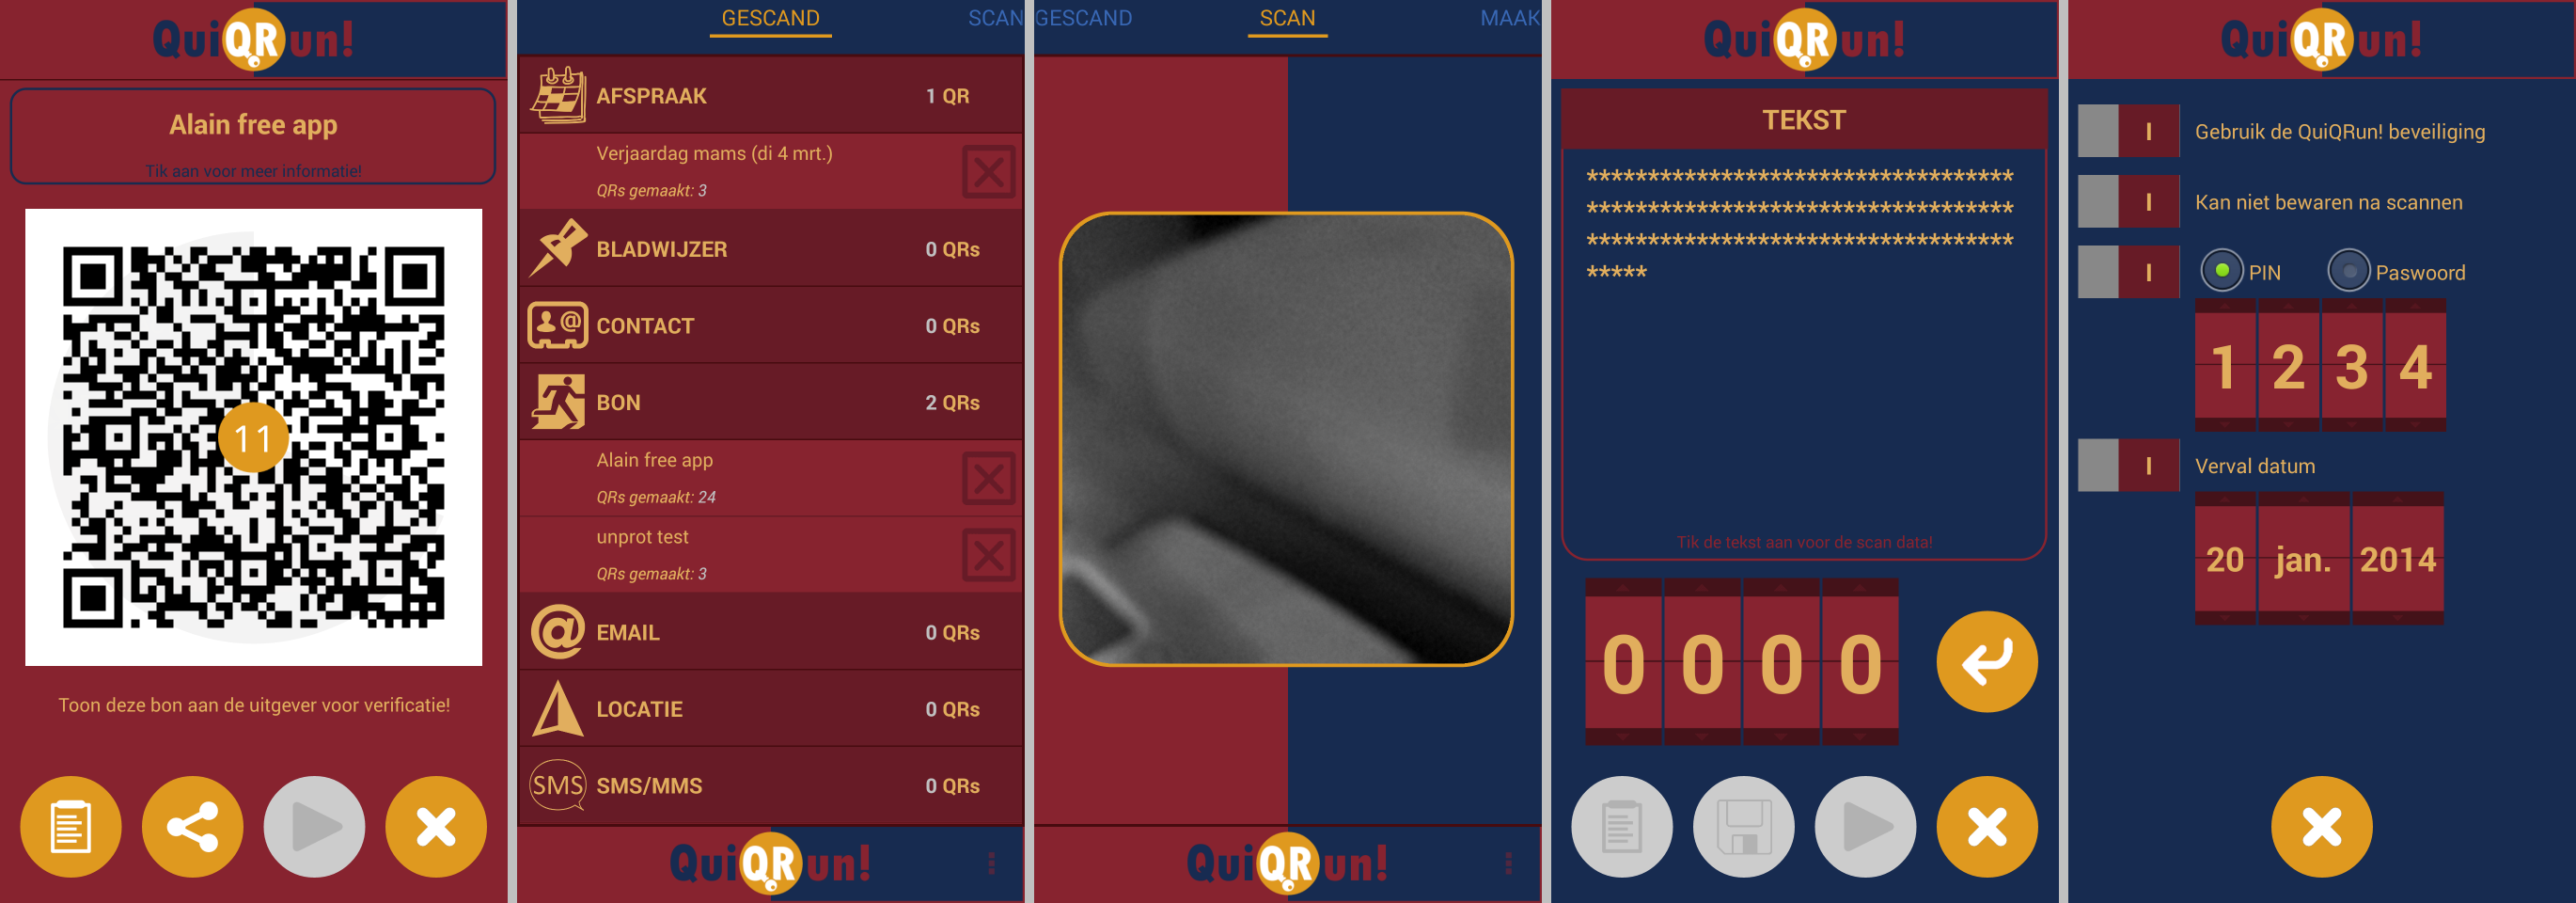
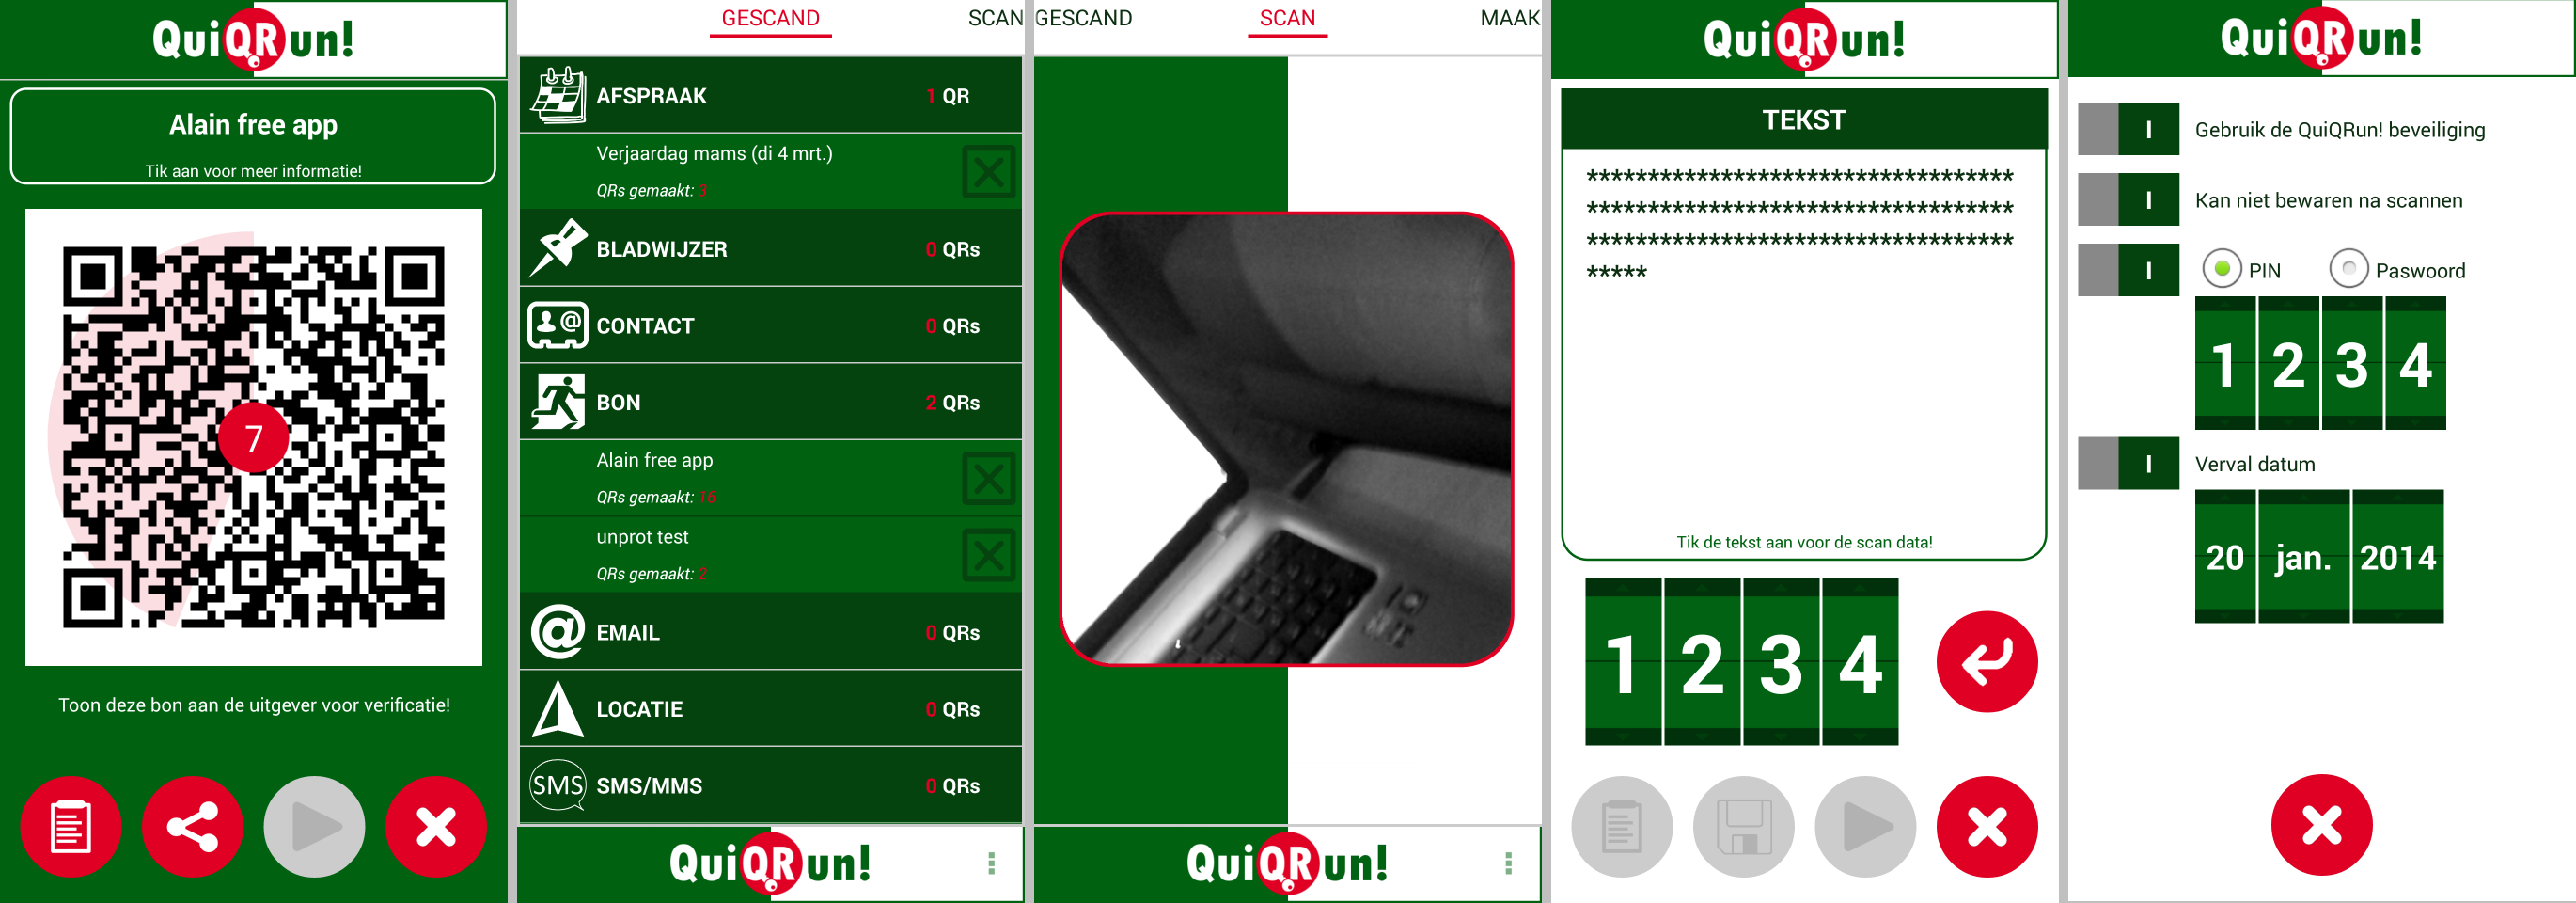
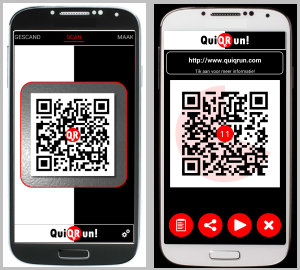
QuiQRun!, the social, fast barcode scanner and creator!
I’m very happy to release the first version of QuiQRun! for Android! In the next weeks I may do a couple of articles on the blog on how some things are done. (Basic4Android and Java).
I want to thank everyone that did test and translate the app!
I’m looking for people who can translate about 150 terms and some short sentences for my new app QuiQRun! If you can help me, send me a mail to alain.bailleul@pandora.be.
I already have English, Dutch, Italian, French, German, Spanish and Portuguese.
What can I offer?
1. The full version of QuiQRun!
2. A skin in QuiQRun! with your favorite colors
3. Full credit in the apps credits screen
4. Eternal gratitude!
How do I use it in B4A?
The translations are stored in a language file, eg. en-us.lng.
They are stored in a predefined format:
{0000};Scanned

{0001};Scan

{0002};Create

{0003};Setting new skin, one moment...

{0004};Tap to get more info!

{0005};This QRCode is expired!

...
In Basic4Android, It checks if it has a translation, if not it uses the default you put in the GetString function. Here is the snippet I use:
Sub Process_Globals
    Public LangStrings As Map
    Public BOM As Int = 65279 ' Byte Order Mark for Windows UTF-8 files
End Sub

Sub Activity_Create(FirstTime As Boolean)
    Dim R As Reflector
    R.Target = R.RunStaticMethod("java.util.Locale", "getDefault", Null, Null)
    Dim tmpLang As String = R.RunMethod("getLanguage")
    Select Case tmpLang
        Case "nl"
            LoadLanguageFile("nl-be.LNG")
        Case "fr"
            LoadLanguageFile("fr-fr.LNG")
        Case "it"
            LoadLanguageFile("it-it.LNG")
        Case "es"
            LoadLanguageFile("es-es.LNG")
        Case "de"
            LoadLanguageFile("de-de.LNG")
        Case Else
            LoadLanguageFile("en-us.LNG")
    End Select

    ' using it:
    ToastMessageShow(GetString("{0003}","Setting new skin, one moment..."), true)
End Sub

Public Sub LoadLanguageFile(setLanguageFile as String)
    LangStrings.Initialize

    If File.Exists(File.DirAssets, setLanguageFile) Then
        Dim txtR As TextReader
        txtR.Initialize(File.OpenInput(File.DirAssets, setLanguageFile))
        Dim line As String
        line = txtR.ReadLine
        Do While line  Null
            line = line.Replace(Chr(BOM), "")
            LangStrings.Put(line.SubString2(0,6), line.SubString(7))
            line = txtR.ReadLine
        Loop
        txtR.Close
    End If

End Sub

Public Sub GetString(iCode As String, iDefault As String) As String
    If LangStrings.ContainsKey(iCode) Then
        Return LangStrings.Get(iCode)
    Else
        Return iDefault
    End If
End Sub
I’m currently working on my new Android app called QuiQRun and this is the first time it is presented to the public. It is currently in the testing phase so it won’t be long until I will release it to Google Play.
What is QuiQRun?
QuiQRun consists of two main parts:
1. The White side: Save – Share – Scan QR Codes
• Scan QR Codes and barcodes with our fast build in scanner
• Decrypt codes created with QuiQRun Security and read codes generated by other apps
• A human readable summary and the raw QR data
• Save codes for later use. All codes are organized in a nice list for easy retrieval.
• Share your QR Code on Facebook, Twitter, Email, Dropbox and many more…
• Use the QR Code immediately on your smartphone
2. The Black side: Make – Share – Protect QR Codes
• Make QR Codes for Websites, Wifi, Contacts, locations, coupons and many more…
• Protect your QR Code with QuiQRun Security
– Encryption
– Prevent saving the QR Code
– Password or PIN protect
– Set an expiration date
• Share your QR code on Facebook, Twitter, Email, Dropbox and many more…
• Use the QR Code immediately on your smartphone
And here are the first screenshots! QuiQrun on Android
QuiQRun is written in Basic4Android. If you are a licensed user of B4A you can download an exclusieve preview version from the B4A ‘Test my App!’ forum! I would definitely appreciate the feedback 🙂
More information and screenshots can be found at QuiQRun
The coming weeks I’ll keep you up to date. Follow me on Twitter: QuiQRun
B4A Anchors
Again, another great update of B4A! Erel has continued to improve the visual designer, this time with a great new feature you may know from typical PC languages: Anchors. (Xojo/Realbasic users may recognize them as the LockLeft, LockTop, LockRight and LockBottom properties)
Anchors allow you to define a constant distance between the view and one or more of the parent bounds. By using anchors, you can design screens and B4A will ‘stretch’ them according to the device size. This is different than scalling because it takes more relative positions into account.
Here is a short video demonstrating the anchore feature:
Important designer improvements:
* Copy & paste – work both inside the layout or between different layouts.
* Undo / redo feature.
* The views are organized in a tree for easier navigation.
* AutoScaleAll keyword now works with all variants, not just the “standard” variant.
* Colors fields can be copied and the colors values can be pasted or directly typed.
* Designer script find / replace dialog.
* The grid is saved in the layout file.
* Landscape / Portrait designer keywords to test the current orientation.
* UI Cloud threshold reduced to 10 seconds.
Other great new features and improvements:
* #AdditionalRes attribute
* Sync button in the Files tab – Syncs the project files with the Files folder.
* Modules added to the Find Sub / Module tool (Ctrl + E).
* Tabs order in the IDE is preserved.
* Modules files that were not modified will not be saved thus preserving the correct time stamp.
* DateTime.SetTimeZone now accepts a Double instead of Int.
* Shortcuts: F11 – Restart (rapid debugger), F2 in the designer connects to the device.
* JavaObject v1.00 – new RunMethodJO / GetFieldJO methods.
* Bug fixes and other minor improvements.
So head to the B4A website to check it out and if you don’t have a license yet (hard to believe because it is worth every penny), now is a great time to get one!
It has been a while since I’ve written a new article on this blog because it have been busy months both at work and in my personal life. One of the things I wanted to do was writing an easy to use Game Engine for B4A. I have written the ABPhysics engine in the past and recently Informatix pointed out I had started another engine (ABGameEngine) before that. Development on ABGameEngine was stopped early for several reasons: time was one of them, but also because several other developers were working on an engine themselves. It seemed a little bit pointless to continue.
However, the other engines were not further developed either. Until recently Erel came up with the GameView. This is an excellent View that will cover the needs of a lot of beginning programmers. I definitely would like to urge starting game developers to take a look at this. Registered users of B4A can download the GameView lib from here.
But still, I wanted something more. I looked at ABgameEngine again, as it had some great ideas like layers, animated sprites, gamepads etc. But it was also very old code and not written very well. And it crashed all the time 🙂
I decided to restart from scratch a couple of weeks ago. Some weekends and evenings later ABPlay was born! And with a lot of goodies!
Here is a small demo video of what I got so far. it demonstrates the following:
1. Layers
     (Layer 1) the moving background with the Odies as animated sprites
     (Layer 2) the black foreground layer with a weird dancing creature that passes now and then
2. Animated sprites, not bound to a layer
     (our hero Garfield is back!)
3. A sprite can have different animations.
     (like one for standing, one for walking, one for fighting, etc)
4. A sprite can have different predefined 'Walks'
     (A walk can be build like you would build a path. It's a sequence of lines, bezier curves, wait periods etc. It's like a simple flash movie)
5. Gamepad controls
     (the 'joystick' pad on the left)
     (the 'action' pad on the right)
     (the 'direction' pad as an alternative to the joystick, not shown in this video)
6. In the demo I cannot demonstrate it with a mouse, but it is completely multi touch
     (You can control Garfield AND press the Action button X AND do a swipe anywhere at the same time)
But let’s have a look (beware this is running on the Emulator. On a real device it is much smoother):
I’m actually very pleased with the result. The graphics and handling is very smooth.
Above all, it’s still very easy to program. Here is the whole code for the demo app:
#Region  Project Attributes
	#ApplicationLabel: ABPlayTest
	#VersionCode: 1
	#VersionName:
	'SupportedOrientations possible values: unspecified, landscape or portrait.
	#SupportedOrientations: landscape
	#CanInstallToExternalStorage: False
#End Region

#Region  Activity Attributes
	#FullScreen: true
	#IncludeTitle: false
#End Region

Sub Process_Globals

End Sub

Sub Globals
	Dim myPlay As ABPlay
	' the panel that will hold the ABPlay
	Dim myPanel As Panel

	' a background and foregroud layer
	Dim bgLayer As ABLayer
	Dim fgLayer As ABLayer

	' some colors to show the multi touch points in the demo
	Dim myColors() As Int = Array As Int(Colors.Red, Colors.Green, Colors.Blue, Colors.Cyan, Colors.Yellow, Colors.Gray, Colors.White, Colors.Magenta, Colors.LightGray, Colors.DarkGray)

	' our hero
	Dim Hero As ABSprite
	' our enemies
	Dim Enemies As List

	' param to set the set the speed
	Dim Speed As Float = 0.2

	' some variables to hold the current state of the hero
	Dim currentAction As String
	Dim currentDirection As String
	Dim currentIsStanding As Boolean
End Sub

Sub Activity_Create(FirstTime As Boolean)
	' initialize ABPlay with myPanel
	myPanel.Initialize("")
	Activity.AddView(myPanel, 0,0,100%x,100%y)
	myPlay.Initialize(myPanel, "myPlay")

	'////////////// BEGIN loading sprite sequences
	' Load Sprite Sequences
	myPlay.LoadSpriteSequence("GarStandingLeft",LoadBitmap(File.DirAssets, "garleftstill.png"),6, 1, 1000)
	myPlay.LoadSpriteSequence("GarStandingLeft",LoadBitmap(File.DirAssets, "garleftstill.png"),6, 1, 1000)
	myPlay.LoadSpriteSequence("GarStandingRight",LoadBitmap(File.DirAssets, "garrightstill.png"),6, 1, 1000)
	myPlay.LoadSpriteSequence("GarWalkingLeft",LoadBitmap(File.DirAssets, "garleft.png"),8, 1, 1000)
	myPlay.LoadSpriteSequence("GarWalkingRight",LoadBitmap(File.DirAssets, "garright.png"),8, 1, 1000)
	myPlay.LoadSpriteSequence("GarStandingLeftFight",LoadBitmap(File.DirAssets, "garleftstillfight.png"),2, 1, 250)
	myPlay.LoadSpriteSequence("GarStandingRightFight",LoadBitmap(File.DirAssets, "garrightstillfight.png"),2, 1, 250)
	myPlay.LoadSpriteSequence("GarWalkingLeftFight",LoadBitmap(File.DirAssets, "garleftfight.png"),7, 1, 1000)
	myPlay.LoadSpriteSequence("GarWalkingRightFight",LoadBitmap(File.DirAssets, "garrightfight.png"),7, 1, 1000)
	' and the ones for Odie
	myPlay.LoadSpriteSequence("OdieStandingLeft", LoadBitmap(File.DirAssets, "odieleftstill.png"),7,1,Rnd(800,1200))
	myPlay.LoadSpriteSequence("OdieStandingRight", LoadBitmap(File.DirAssets, "odierightstill.png"),7,1,Rnd(800,1200))
	myPlay.LoadSpriteSequence("OdieWalkingLeft", LoadBitmap(File.DirAssets, "odieleft.png"),5,1,Rnd(800,1200))
	myPlay.LoadSpriteSequence("OdieWalkingRight", LoadBitmap(File.DirAssets, "odieright.png"),5,1,Rnd(800,1200))
	' and the one for the creature
	myPlay.LoadSpriteSequence("CreaturePassToRight", LoadBitmap(File.DirAssets, "creature.png"), 3, 4, 1200)
	'////////////// END loading sprite sequences

	'////////////// BEGIN building the Hero Garfield
	' initialize the hero
	Hero.Initialize("Hero", 50%x, 50%y)
	' add sprite sequences
	Hero.AddSpriteSequence("GarStandingLeft")
	Hero.AddSpriteSequence("GarStandingRight")
	Hero.AddSpriteSequence("GarWalkingLeft")
	Hero.AddSpriteSequence("GarWalkingRight")
	Hero.AddSpriteSequence("GarStandingLeftFight")
	Hero.AddSpriteSequence("GarStandingRightFight")
	Hero.AddSpriteSequence("GarWalkingLeftFight")
	Hero.AddSpriteSequence("GarWalkingRightFight")
	Hero.StartSpriteSequence("GarStandingLeft", True)
	currentDirection="LEFT"
	'//////////////  END building the Hero Garfield

	'////////////// BEGIN building the background layer with Odies
	' initalize a background layer
	bgLayer.Initialize("background", 0,0)
	bgLayer.SetBackground(LoadBitmap(File.DirAssets, "bga.jpg"), 1.0)
	myPlay.AddLayer(bgLayer)

	' initialize some enemies
	Enemies.Initialize
	Dim a As Int
	For a = 1 To 10
		Dim Odie As ABSprite

		' initialize an Odie with some animation sequences
		Odie.Initialize("Odie" & a, Rnd(10%x,90%x), Rnd(10%y, 90%y))
		' add multiple sprite sequences
		Odie.AddSpriteSequences(Array As String("OdieStandingLeft","OdieStandingRight","OdieWalkingLeft","OdieWalkingRight"))

		' create a random walk to the right
		Dim WalkRight As ABSpriteWalk
		WalkRight.Initialize("ToTheRight", True)
		Dim newX As Int = Odie.x+Rnd(20%x, 80%x)
		WalkRight.AddLine("OdieWalkingRight",Odie.x, Odie.y, newX, Odie.y, Rnd(90,100))
		WalkRight.AddWait("OdieStandingRight",newX, Odie.y, Rnd(10,50))
		WalkRight.AddLine("OdieWalkingLeft",newX, Odie.y, Odie.x, Odie.y, Rnd(90,100))
		WalkRight.AddWait("OdieStandingLeft",Odie.x, Odie.y, Rnd(10,50))
		Odie.AddWalk(WalkRight)

		' create a random walk to the left
		Dim WalkLeft As ABSpriteWalk
		WalkLeft.Initialize("ToTheLeft", True)
		Dim newX As Int = Odie.x-Rnd(20%x, 80%x)
		WalkLeft.AddLine("OdieWalkingLeft",Odie.x, Odie.y, newX, Odie.y , Rnd(90,100))
		WalkLeft.AddWait("OdieStandingLeft",newX, Odie.y, Rnd(10,50))
		WalkLeft.AddLine("OdieWalkingRight",newX, Odie.y, Odie.x, Odie.y, Rnd(90,100))
		WalkLeft.AddWait("OdieStandingRight",Odie.x, Odie.y, Rnd(10,50))
		Odie.AddWalk(WalkLeft)

		' pick random a walk, left or right
		Dim GoLeft As Int = Rnd(0,2)
		If GoLeft = 0 Then
			Odie.StartWalk("ToTheRight")
		Else
			Odie.StartWalk("ToTheLeft")
		End If
		bgLayer.AddSprite(Odie)
	Next
	'////////////// END building the background layer with Odies

	'////////////// BEGIN building the foreground layer with creature
	' initalize a foreground layer
	Dim fgLayer As ABLayer
	fgLayer.Initialize("foreground", 0,0)
	fgLayer.SetBackground(LoadBitmap(File.DirAssets, "fga.png"), 100%y/400)
	myPlay.AddLayer(fgLayer)

	' and a weird creature...
	Dim creature As ABSprite
	creature.Initialize("creature", -100%x, 100%y-240)
	creature.AddSpriteSequence("CreaturePassToRight")
	' with a walk
	Dim pass As ABSpriteWalk
	pass.Initialize("DanseToTheRight", True)
	pass.AddLine("DansingRight",creature.x, creature.y, 200%x, creature.y, 300)
	creature.AddWalk(pass)
	' and start the walk
	creature.StartWalk("DanseToTheRight")
	' add the creature to the foreground layer
	fgLayer.AddSprite(creature)
	'////////////// END building the foreground layer with creature

	'////////////// BEGIN Add game pads
	' initialize and start a Joystick Gamepad
	myPlay.InitializeJoystickPad(18, 100%y-210, 192, 192 , LoadBitmap(File.DirAssets, "joystick_bg.png"),LoadBitmap(File.DirAssets, "joystick.png"))
	myPlay.ShowJoystickPad(True)

	' initialize and start a Action Gamepad
	myPlay.InitializeActionPad(100%x-210, 100%y-210, 192, 192 , LoadBitmap(File.DirAssets, "action_active.png"),LoadBitmap(File.DirAssets, "action_inactive.png"),LoadBitmap(File.DirAssets, "action_mask.png"),True, False, True, False)
	myPlay.ShowActionPad(True)
	'////////////// END Add game pads
End Sub

Sub Activity_Resume

End Sub

Sub Activity_Pause (UserClosed As Boolean)
	' NEEDED FOR THE MOMENT TO CATCH THE HOME KEY, RESUME/PAUSE NOT YET SUPPORTED!
	myPlay.StopAndRecycle
	Activity.Finish
End Sub

Sub Activity_KeyPress (KeyCode As Int) As Boolean 'Return True to consume the event
	Select Case KeyCode
		Case KeyCodes.KEYCODE_BACK
			' NEEDED: stop the drawing thread and recycle stuff
			myPlay.StopAndRecycle
			Activity.Finish
			Return True
		Case KeyCodes.KEYCODE_HOME
			Return True
	End Select
End Sub

Sub myPlay_Draw(c As Canvas, State As ABState)
	' the actual drawing, do NOT set a debug stop in here!

	'////////////// BEGIN Calculation stuff
	' calculate hero stuff depending on what buttons we pressed on the gamepad
	currentAction = ""
	If State.UsingActionPad Then
		' go into fight state
		If State.ACTION_X Then
			currentAction = "X"
		End If
		' go back to center
		If State.ACTION_Y Then
			Hero.SetPostition(50%x,50%y)
		End If
	End If

	Dim XMovement As Int
	Dim YMovement As Int
	If State.UsingJoystickPad Then
		XMovement = State.JOYSTICK_X*Speed
		YMovement = State.JOYSTICK_Y*Speed
		' update the hero's position and direction
		If XMovement<0 Then
			currentDirection = "LEFT"
		Else
			currentDirection = "RIGHT"
		End If
		Hero.SetPostition(Hero.x+XMovement, Hero.y+YMovement)
		currentIsStanding = False
	Else
		currentIsStanding = True
	End If

	' set the animation type
	Select Case currentDirection
		Case "LEFT"
			Select Case currentAction
				Case "X"
					If currentIsStanding Then
						Hero.StartSpriteSequence("GarStandingLeftFight", False)
					Else
						Hero.StartSpriteSequence("GarWalkingLeftFight", False)
					End If
				Case Else
					If currentIsStanding Then
						Hero.StartSpriteSequence("GarStandingLeft", False)
					Else
						Hero.StartSpriteSequence("GarWalkingLeft", False)
					End If
			End Select
		Case "RIGHT"
			Select Case currentAction
				Case "X"
					If currentIsStanding Then
						Hero.StartSpriteSequence("GarStandingRightFight", False)
					Else
						Hero.StartSpriteSequence("GarWalkingRightFight", False)
					End If
				Case Else
					If currentIsStanding Then
						Hero.StartSpriteSequence("GarStandingRight", False)
					Else
						Hero.StartSpriteSequence("GarWalkingRight", False)
					End If
			End Select
	End Select

	' update the hero animation
	Hero.Update

	' move our backgrounds, does not make sense but shows the possibilities
	Dim newX, newY As Int
	Dim newMovementX, newMovementY As Int
	newMovementX=Min(Abs(XMovement),1)
	newMovementY=Min(Abs(YMovement),1)
	If currentIsStanding = False Then
		If currentDirection = "LEFT" Then
			newX = bgLayer.ViewX
			newY = bgLayer.ViewY
			If newX-newMovementX >= 0 Then
				newX = newX-newMovementX
			End If
			If newY-newMovementY >= 0 Then
				newY = newY-newMovementY
			End If
			bgLayer.SetLayerPostion(newX, newY)
		Else
			newX = bgLayer.ViewX
			newY = bgLayer.ViewY
			If newX+newMovementX <= bgLayer.OuterWidth - myPlay.Width Then
				newX = newX+newMovementX
			End If
			If newY+newMovementY <= bgLayer.OuterHeight - myPlay.Height Then
				newY = newY+newMovementY
			End If
			bgLayer.SetLayerPostion(newX, newY)
		End If
	End If

	'////////////// END Calculation stuff

	'////////////// BEGIN Drawing stuff
	'ok, all the calulations are done, let's draw!

	' draw the background layer with all its sprites on it and advance all sprite animations and walks
	myPlay.DrawLayer("background", c)

	Dim a As Int
	' draw the multitouch points that are not on the gamepad, no action here but just to show the possibilities
	For a = 0 To State.touchPoints.Size - 1
		Dim tmpP As ABTouchPoint
		tmpP = State.touchPoints.GetValueAt(a)
		c.DrawCircle(tmpP.X, tmpP.Y, 50dip, myColors(tmpP.id), True, 1dip)
	Next

	' draw the hero
	Hero.Draw(c)

	' draw the foreground layer with all its sprites on it and advance all sprite animations and walks
	myPlay.DrawLayer("foreground", c)
	'////////////// END Drawing stuff

	' NEEDED: very last line of the Draw event. Let ABPlay know it may process touches again!
	myPlay.DrawDone()
End Sub
I’m not there yet, but it’s a good start. It needs a lot more testing and a lot of new features.
ABSYNCMenu.bas is a code module for an Actionbar with submenus completely written in Basic4Android. It’s an easy to use module you can drop into any project and with a couple of lines of code you have your own action bar with submenus!
Note: I’m aware there is an excellent actionbar library from corwin42 called AHActionBar at the B4A website, but as this ABSYNCMenu module is part of the upcoming ABSYNC Genesis tool (more on this tool in a later article!), I wanted to share this module with you.
Let’s get started!
Start a new project and import the attached module ABSYNCMenu.bas.
In the Main Activity we will add all the code needed to create and handle the action bar and menu. I’ll only cover the code needed for the actionbar in this tutorial, not the other ‘normal’ B4A code. There are some excellent tutorials in the B4A forum, check them out.
We define tree panels that are needed to build the ABSYNC Menu in the Sub Globals.
– ABS_MainMenuPanel: for the transparent background over the whole activity that makes all the rest of the program darker and unclickable.
– ABS_ActionBarPanel: for the the actionbar
– ABS_DropdownMenuPanel: for the dropdown menu
Sub Globals
    Dim ABS_MainMenuPanel As Panel
    Dim ABS_ActionBarPanel As Panel
    Dim ABS_DropdownMenuPanel As Panel
End Sub
In the Activity_Create sub we load our initial layout file (.bal) we created in the designer. This may just be an empty form. See the project at the end of the article for more info. Then we call our BuildMenu() function where we define our action bar and menus.
Sub Activity_Create(FirstTime As Boolean)
    ' load the initial layout
    Activity.LoadLayout("1")

    ' call the function to initialize our menu
    BuildMenu
End Sub
Suppose we want to create the following actionbar with submenus:
Notice some menu items need to have an icon and some of them need to be disabled.
I’ll go over every major part in the code of the BuildMenu() function to explain how it works.
Important! When you add an actionbar item you can have them left our right aligned. Depending on the alignment the icons are shown in a different order.
If the alignment is LEFT then the order of the shown icons is:
first added, second added, third added, …
If the alignment is RIGHT then the order of the shown icons is:
…, third added, second added, first added
Let’s add a simple item to the taskbar. Every actionbar item has to start with ABSYNCMenu.AddActionBarItemBegin and has to end with ABSYNCMenu.AddActionBarItemEnd. The syntax for the AddActionBarItem is as follows:
Sub AddActionBarItem(ReturnValue As String, bmpEnabled As String, bmpDisabled As String, ItemWidth As Int, LeftAligned As Boolean, Visible As Boolean, Enabled As Boolean, MenuWidth As Int)
ReturnValue: the value that will be returned to the ABSYNCMenuEvent() function. This is also the text that will be shown if no icon is provided. bmpEnabled: the file name of the bmp for the Enabled icon. bmpDisabled: the file name of the bmp for the Disabled icon. ItemWidth: the width of this item. Can be bigger than the icon width. The icon will then be centered withion this width. LeftAligned: is this icon aligned to the left of your screen or the right. See note above about alignment. Visible: is this item visible. Enabled: is this item enabled. MenuWidth: the total with of the sub menu, if any.
Another example is an actionbar item with an icon and a submenu. right after you added the actionbar item, you can add the submenu with the AddMenuItem() function.
the syntax of AddMenuItem() is:
Sub AddMenuItem(ReturnValue As String, bmpEnabled As String, bmpDisabled As String, ItemHeight As Int, IconWidth As Int, Enabled As Boolean)
ReturnValue: the value that will be returned to the ABSYNCMenuEvent() function. This is also the text that will be shown next to the icon bmpEnabled: the file name of the bmp for the Enabled icon. bmpDisabled: the file name of the bmp for the Disabled icon. ItemHeight: the height of this item. IconWidth: the width of the iconspace. Enabled: is this item enabled.
Now we can write our function that will handle the menu click event. This function will be automatically called by the ABSYNCMenu module.
This function is straightforward. The comments will explain what happens:
' function that returns if someone clicked on an action bar item or on a sub menu item
' Here is where you do your stuff
Sub ABSYNCMenuEvent(ReturnValue As String, HasMenu As Boolean)
	If HasMenu Then
		' is an action bar item with a menu, open it and return
		ABS_MainMenuPanel.SetLayout(0,0, Activity.Width, Activity.Height)
	Else
		' is an action bar item without a menu OR an actual menu item so we have to handle it
		ABS_MainMenuPanel.SetLayout(0,0, Activity.Width, ABSYNCMenu.ActionBarHeight)
		Select Case ReturnValue
			Case "Home"
				LoadLayoutIntoActivity("1")
			Case "Register"
				LoadLayoutIntoActivity("2")
			Case "Connections"
				LoadLayoutIntoActivity("3")
			Case "Tables"
				LoadLayoutIntoActivity("4")
			Case "All tables"
				ToastMessageShow(ReturnValue, False)
			Case "Register tables"
				ToastMessageShow(ReturnValue, False)
		End Select
	End If
        ' and redraw the action bar and menu
	ABSYNCMenu.Draw(ABS_ActionBarPanel, ABS_DropdownMenuPanel)
End Sub
Finally we’ll have to cover the touch events on the tree panels. We’ll send the event to the ABSYNCMenu module an it will handle all the rest for you.
Sub ABS_ActionBarPanel_Touch (Action As Int, X As Float, Y As Float) As Boolean 'Return True to consume the event
	' in the touch event, let the ABSYNCMenu module handle the touch
	Return ABSYNCMenu.DoActionBarTouch(Action, X, Y)
End Sub

Sub ABS_DropdownMenuPanel_Touch (Action As Int, X As Float, Y As Float) As Boolean 'Return True to consume the event
	' in the touch event, let the ABSYNCMenu module handle the touch
	Return ABSYNCMenu.DoMenuTouch(Action, X, Y)
End Sub

Sub ABS_MainMenuPanel_Touch (Action As Int, X As Float, Y As Float) As Boolean 'Return True to consume the event
	' did not touch a menu or action bar item. Close it up!
	ABS_MainMenuPanel.SetLayout(0,0, Activity.Width, ABSYNCMenu.ActionBarHeight)
	Return True
End Sub
Finished! As you can see with some very easy coding we’ll have a fully working actionbar with dropdown menu’s!
I’ve added the Camera object to the ABExtDrawing library for Basic4Android. This object must not be confused with the hardware camera. There are other libraries available for that. The new version 1.1 of the library can be downloaded from the B4X website.
The camera I’m talking about is a nice feature you can use to do 3D effects on the canvas without using OpenGL. The picture above is just a noral B4A canvas where we did some rotations and translations on. It simulates a scrolling list where the listitems rotate around their axe.
Additional, I shows other features of the ABExtDrawing library to do some lighting effects.
We create a new type item3D. This will hold one item in the list.
Sub Process_Globals
	Type item3D (bmp As Bitmap, Top As Int, Left As Int, Width As Int, Height As Int)
End Sub
We also have to declare some variables. Note our mCamera variable which will do the 3D conversions and some constants for our lighting effects. On a Paint object we can set color filters which will affect the color values of what we draw with that Paint object. SetLightingColorFilter takes care of that. A LightingColorFilter takes two colors that are used to modify the colors that we are drawing. The first color will be multiplied with the colors we draw, while the second one will be added to the colors we draw. The multiplication will darken the color and adding will make it brighter so we can use this class to model both shadows and highlights. It would have been even better if instead of adding it would have implemented the screen blend mode, but add works OK.
To actually calculate the light we’ll use a simplified version of Phong lighting.
Sub Globals
	'These global variables will be redeclared each time the activity is created.
	'These variables can only be accessed from this module.
	Dim items As List
	Dim HalfHeight As Float

	Dim SCALE_DOWN_FACTOR As Float: SCALE_DOWN_FACTOR = 0.15
	Dim DEGREES_PER_SCREEN As Int: DEGREES_PER_SCREEN = 270

	' Ambient light intensity
    Dim AMBIENT_LIGHT As Int: AMBIENT_LIGHT = 55
    ' Diffuse light intensity
    Dim DIFFUSE_LIGHT As Int: DIFFUSE_LIGHT = 200
    ' Specular light intensity
    Dim SPECULAR_LIGHT As Float: SPECULAR_LIGHT = 70
    ' Shininess constant
    Dim SHININESS As Float: SHININESS = 200
    ' The Max intensity of the light
    Dim MAX_INTENSITY As Int: MAX_INTENSITY = 0xFF

	Dim CurrentRotation As Int
	Dim CurrentTop As Int
	Dim MyCanvas As Canvas

	Dim ScreenTop As Int: ScreenTop = 1
	Dim Panel1 As Panel

	Dim ExDraw As ABExtDrawing
	Dim mCamera As ABCamera
	Dim mMatrix As ABMatrix
	Dim mPaint As ABPaint

	Dim PI As Double: PI= 3.141592653589793238462643383279502884197

	Dim ClearRect As Rect

	Dim CurrY As Int
End Sub
In the Activity_Create sub we initialize mCamera and the other variables like mPaint which we will also need for our lighting. Also our pictures are preloaded.
Sub Activity_Create(FirstTime As Boolean)
	Activity.LoadLayout("1")

	MyCanvas.Initialize(Panel1)

	HalfHeight = Activity.Height / 2

	Dim backbmp As Bitmap
	backbmp.Initialize(File.DirAssets, "background.png")
	Dim backbmp2 As Bitmap
	backbmp2.Initialize(File.DirAssets, "background2.png")
	Dim backbmp3 As Bitmap
	backbmp3.Initialize(File.DirAssets, "background3.png")

	Dim conbmp As Bitmap
	conbmp.Initialize(File.DirAssets, "contact_image.png")
	Dim conbmp2 As Bitmap
	conbmp2.Initialize(File.DirAssets, "contact_image2.png")
	Dim conbmp3 As Bitmap
	conbmp3.Initialize(File.DirAssets, "contact_image3.png")

	items.Initialize
	Dim i As Int
	Dim random As Int
	For i = 0 To 19
		random = Rnd(0,3)
		If random = 0 Then
			items.Add(CreateNewItem(backbmp, conbmp, "Colleague " & i, "Name of colleague " & i, 25, i*175, Activity.Width - 50, 120))
		Else
			If random = 1 Then
				items.Add(CreateNewItem(backbmp2, conbmp2, "Friend " & i, "Name of friend " & i, 25, i*175, Activity.Width - 50, 120))
			Else
				items.Add(CreateNewItem(backbmp3, conbmp3, "Client " & i, "Name of the client " & i, 25, i*175, Activity.Width - 50, 120))
			End If
		End If
	Next

	CurrentRotation = -(DEGREES_PER_SCREEN * ScreenTop) / Activity.Height

	ClearRect.Initialize(0,0,Activity.Width, Activity.Height)

	mCamera.Initialize
	mMatrix.Initialize
	mPaint.Initialize
	mPaint.SetAntiAlias(True)
    mPaint.SetFilterBitmap(True)

	DrawMe
End Sub
The sub CreateNewItem() is used to make one list item. Default B4A canvas drawing functions are used to show how well they work together with the ABExtDrawing functions.
Sub CreateNewItem(Background As Bitmap, icon As Bitmap, Subj As String, desc As String, Left As Int, Top As Int, Width As Int, Height As Int) As item3D
	Dim item As item3D
	Dim c As Canvas
	item.Initialize
	item.bmp.InitializeMutable(Width, Height)

	c.Initialize2(item.bmp)

	' background
	Dim dstR As Rect
	dstR.Initialize(0,0,Width,Height)
	c.DrawBitmap(Background,Null, dstR)

	' draw Icon
	dstR.Initialize(15,15, icon.Width, icon.Height)
	c.DrawBitmap(icon, Null, dstR)

	c.DrawText(Subj, 100, 30,Typeface.DEFAULT_BOLD,16, Colors.White,"LEFT")
	c.DrawText(desc, 100, 60, Typeface.DEFAULT,16, Colors.White,"LEFT")

	item.Top = Top
	item.Left = Left
	item.Width = Width
	item.Height = Height
	Return item
End Sub
In the drawItem() sub all calculations are done for one item in the list. Each item will be a block that will rotate around its X-axis and look like it is rolling on the ground when the list stars to scroll. Each block will be as wide as the item normally is and the depth will be the same as the height. We’ll use the same bitmap for all the sides.
So what do we need to do to achieve this effect? In order to draw the blocks we need to draw the bitmap two times (since we will almost always see two sides of the block). We also need to have some kind of rotation variable to keep track of the main rotation. Since the blocks should rotate when the user scrolls the list and the blocks should have the same rotation (so that they all face up at the same time, see further).
Sub DrawItem(item As item3D)
	Dim CenterX As Float
	Dim CenterY As Float

	' get centerX AND centerY
	CenterX = item.Width / 2
	CenterY = item.Height / 2

    ' get scale
    Dim distFromCenter As Float
	distFromCenter = (item.Top + CenterY - HalfHeight) / HalfHeight
	Dim scale As Float
	scale = (1 - SCALE_DOWN_FACTOR * (1 - Cos(distFromCenter)))

    ' get rotation
    Dim RotationX As Float
	RotationX = CurrentRotation - 20 * distFromCenter
    RotationX = RotationX Mod 90
    If (RotationX < 0) Then
        RotationX = RotationX + 90
    End If

    ' draw it
    If (RotationX < 45) Then
		drawFace(item, CenterX, CenterY, scale, RotationX - 90)
        drawFace(item, CenterX, CenterY, scale, RotationX)

    Else
        drawFace(item, CenterX, CenterY, scale, RotationX)
        drawFace(item, CenterX, CenterY, scale, RotationX - 90)
    End If
End Sub
Finally, DrawFace is called and this is where the magic happens. Worth noting is that the code that will draw one face of the block is the same, it just depends on the rotation, so it’s extracted to a method. To draw a complete block we then simply draw two faces 90 degrees apart at the same place.
To draw a face we first translate the camera so that the face will be drawn closer to us. Then we rotate it and after that we translate it back so we don’t scale it. Keep in mind that the calls to the camera, just like the rotate, translate and scale methods on Canvas, needs to be written in reversed order, so to speak. In the code below, it is the last line that translates the face towards us, then we rotate it, and finally, with the first line, we translate it back.
The rest of drawFace is not that hard. It gets the matrix from the camera, pre and post translates the matrix and then draws the bitmap with the matrix.
This code will draw each item as if placed in the origin in 3D space and then we move the items to the correct place on the screen using pre and post translate on the matrix. This moves what we draw in 2D space without changing the perspective. We could apply the translation in X and Y on the camera instead, then the translation would be in 3D space and it would affect the perspective. We’re not doing that here because I want the appearance of a larger field of view than the fixed field of view of the camera. Instead, we fake it by slightly rotating and scaling the items depending on the distance from center of the screen.
We calculate the light and create a LightingColorFilter that we can set to our Paint object.
Sub drawFace(item As item3D, CenterX As Float, CenterY As Float, scale As Float, RotationX As Float)
	' save the camera state
    mCamera.save

    ' translate AND Then rotate the camera
    mCamera.translate(0, 0, CenterY)
    mCamera.rotateX(RotationX)
	mCamera.translate(0, 0, -CenterY)

    ' get the matrix from the camera AND Then restore the camera
    mCamera.getMatrix(mMatrix)
    mCamera.restore()

    ' translate AND scale the matrix
    mMatrix.preTranslate(-CenterX, -CenterY)
    mMatrix.postScale(scale, scale)
    mMatrix.postTranslate(item.left + CenterX, item.top + CenterY)

    ' set the light
	Dim cosRotation As Double
	cosRotation = Cos(PI * RotationX / 180)
    Dim intensity As Int
	intensity = AMBIENT_LIGHT + (DIFFUSE_LIGHT * cosRotation)
    Dim highlightIntensity As Int
	highlightIntensity = (SPECULAR_LIGHT * Power(cosRotation,SHININESS))
    If (intensity > MAX_INTENSITY) Then
        intensity = MAX_INTENSITY
    End If
    If (highlightIntensity > MAX_INTENSITY) Then
        highlightIntensity = MAX_INTENSITY
    End If
    Dim light As Int
	light = Colors.rgb(intensity, intensity, intensity)
    Dim highlight As Int
	highlight = Colors.rgb(highlightIntensity, highlightIntensity, highlightIntensity)
    mPaint.SetLightingColorFilter(light, highlight)

    ' draw the Bitmap
    ExDraw.drawBitmap4(MyCanvas, item.bmp,  mMatrix, mPaint)
End Sub
The DrawMe() sub is the overall function to draw all the items.
Sub DrawMe()
	Dim i As Int
	ExDraw.save2(MyCanvas, ExDraw.MATRIX_SAVE_FLAG)
	MyCanvas.DrawRect(ClearRect, Colors.Black, True, 1dip)
	'MyCanvas.DrawBitmap(FormBack, Null, formR)
	For i = 0 To items.Size - 1
		DrawItem(items.Get(i))
	Next
	ExDraw.restore(MyCanvas)

	Panel1.Invalidate
End Sub
And in the Panel1_Touch sub we’ll animate our list. Note that it is here that we make sure all boxes face the same. This is done by the lines:
Doing like this will make the blocks rotate DEGREES_PER_SCREEN degrees when the user scrolls the list an entire screen no matter the pixel-height of the screen.
Here is the full sub:
Sub Panel1_Touch (Action As Int, X As Float, Y As Float) As Boolean 'Return True to consume the event
Dim DeltaY As Int
Select Action
Case Activity.ACTION_DOWN
CurrY = Y
'Log("down")
Case Activity.ACTION_MOVE
DeltaY = Y - CurrY
CurrY = Y
Dim i As Int
Dim it As item3D
For i = 0 To items.Size - 1
it = items.Get(i)
it.Top = it.Top + DeltaY
items.Set(i, it)
Next
ScreenTop = ScreenTop + DeltaY
CurrentRotation = -(DEGREES_PER_SCREEN * ScreenTop) / Activity.Height
DrawMe
'Log("move")
Case Activity.ACTION_UP
'Log("up")
End Select
Return True
End Sub
ABExtDrawing is a library I wrote to access more from the Android Drawing classes in B4A. It extends the B4A canvas so you can also use all Paint, Matrix, Region, ColorMatrix and Path functionalities.
Several sub objects are included: ABPaint: a wrapper for thePaint class ABMatrix: a wrapper for the Matrix class ABRegion: a wrapper for the Region class ABColorMatrix: a wrapper for the ColorMatrix class ABRgbFunctions: several functions to manipulate RGB values
Also two extended classes ABRectF: a wrapper around the RectF class. B4A contains the Rect class, but to use some of the functions of this library I needed the float version of Rect. ABPath: a full wrapper for the Path class. B4A contains the Path class but only exposes LineTo. ABPath exposes all functions (like addArc, addOval, etc…)
The main object is ABExtDrawing. You pass the B4A canvas to each function:
Sub Globals
        Dim ExDraw As ABExtDrawing
        Dim MyCanvas As Canvas
        Dim Panel1 as Panel
end Sub

Sub Activity_Create(FirstTime As Boolean)
        If FirstTime Then
		Activity.LoadLayout("2")
		MyCanvas.Initialize(Panel1)
	End If
        drawRim(MyCanvas)
End Sub

Sub drawRim(Canv As Canvas)
	' first, draw the metallic body
	ExDraw.drawOval(Canv, rimRect, rimPaint)
	' now the outer rim circle
	ExDraw.drawOval(Canv, rimRect, rimCirclePaint)
End Sub
The fun part is you can create all kind of Paints:
        ' the linear gradient Is a Bit skewed For realism
	rimPaint.Initialize
	rimPaint.SetFlags(rimPaint.flag_ANTI_ALIAS_FLAG)
	rimPaint.SetLinearGradient2(1,0.40, 0.0, 0.60, 1.0, Colors.RGB(0xf0, 0xf5, 0xf0),Colors.RGB(0x30, 0x31, 0x30),rimPaint.ShaderTileMode_CLAMP)
	rimPaint.DoShaderSingle(1)

	rimCirclePaint.Initialize
	rimCirclePaint.SetAntiAlias(True)
	rimCirclePaint.SetStyle(rimCirclePaint.Style_STROKE)
	rimCirclePaint.SetColor(Colors.ARGB(0x4f, 0x33, 0x36, 0x33))
	rimCirclePaint.SetStrokeWidth(0.005)
You can also use the Save and Restore functions of the canvas:
Sub drawScale(Canv As Canvas)
	ExDraw.drawOval(Canv, scaleRect, ScalePaint)

	ExDraw.save2(Canv, ExDraw.MATRIX_SAVE_FLAG)
	Dim i As Int
	Dim y1 As Float
	Dim y2 As Float
	Dim value As Int
	Dim valueString As String
	For i = 0 To totalNicks
		y1 = scaleRect.top
		y2 = y1 - 0.020

		ExDraw.drawLine(Canv, 0.5, y1, 0.5, y2, ScalePaint)

		If (i Mod 5 = 0) Then
			value = nickToDegree(i)
			If (value >= minDegrees AND value <= maxDegrees) Then
				valueString = value
				ExDraw.drawText(Canv, valueString, 0.5, y2 - 0.015, ScalePaint)
			End If
		End If

		ExDraw.rotate2(Canv, degreesPerNick, 0.5, 0.5)
	Next
	ExDraw.restore(Canv)
End Sub
And write filters like this GreyScale filter:
Sub GrayScale(bmp As Bitmap) As Bitmap
    Dim bmpGrayscale As Bitmap
    bmpGrayscale.InitializeMutable(bmp.Width, bmp.height)
    Dim c As Canvas
    c.Initialize2(bmpGrayscale)

    Dim paint As ABPaint
    paint.Initialize

    Dim mat As ABColorMatrix
    mat.Initialize
    mat.SetSaturation(0)

    paint.SetColorMatrixColorFilter2(mat)

    ExDraw.drawBitmap2(c, bmp, 0, 0, paint)

    Return bmpGrayscale
End Sub
Because of all the possibilities this library has, I may do some more articles on this blog.


 and support ABMaterial