B4X: ABMaterial and using a CDN

cdn

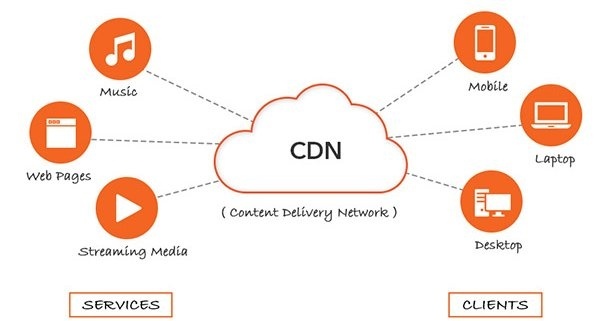
Using a CDN (Content Delivery Network) for your WebApp can be very beneficial:

The Benefits of using a CDN:

  • Different domains. Browsers limit the number of concurrent connections (file downloads) to a single domain. …
  • Files may be pre-cached. …
  • High-capacity infrastructures. … (1200 world-wide)
  • Distributed data centers. …
  • Built-in version control. …
  • Usage analytics. …
  • Boosts performance and saves money.

ABM can already use a CDN for its own framework using the ABM.ActivateUseCDN(“DONATOR_KEY”, “https://cdn.jsdelivr.net/gh/RealAlwaysbusy/ABMaterial@v4.35/“), but from version 4.35 on, ABM will support Cloudinary as a build-in CDN system for your own WebApps.

Cloudinary has a great free plan which can cover a great deal of the webapps you make without any additional cost:

  • Total images and videos: 300,000
  • Managed storage: 10 GB
  • Monthly net viewing bandwidth: 20 GB

In ABM, it can be used for two things:

1. Automatic upload/update of the generated CSS/JS files (the ones you find next to each index.html).
2. Your own assets, like images, videos or outer ‘RAW’ files (xls, doc, …)

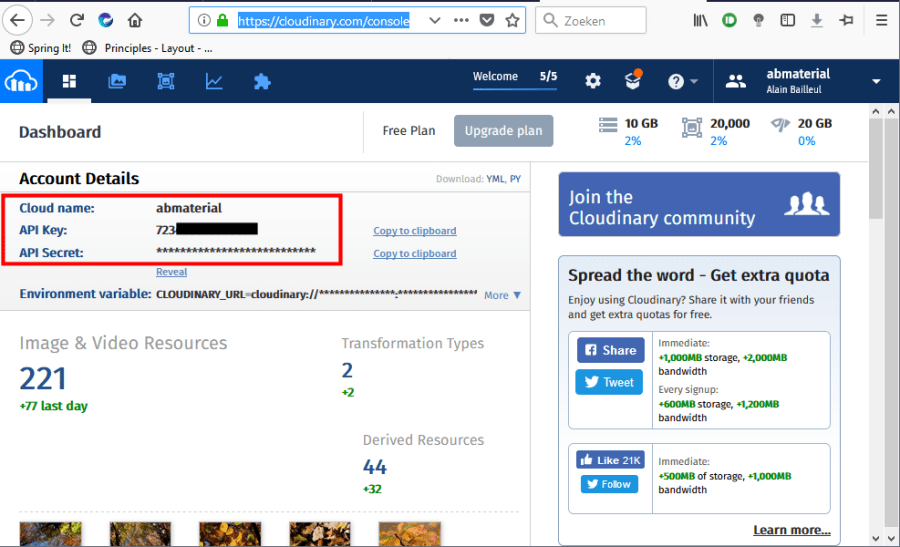
Creating a free account on Cloudinary is pretty straight forward. You make a login and give your ‘cloud’ a name. You will then be able to get your API_KEY and API_SECRET from the management console: https://cloudinary.com/console:

cloudinary1

1. Automatic upload/update when starting the .jar file.

Activate it in the main class:

' just some clear consts to explain the parameters
Dim UPLOAD_GENERATED_JSCSS As Boolean = True
Dim DO_NOT_UPLOAD_GENERATED_JSCSS As Boolean = False
Dim SHOW_DEBUG As Boolean = True
Dim DO_NOT_SHOW_DEBUG As Boolean = False
Dim CLEAR As Boolean = True
Dim DO_NOT_CLEAR As Boolean = False
  
#If RELEASE      
       ABM.ActivateCloudinary("DONATOR_KEY","CLOUD_NAME", "API_KEY", "API_SECRET",UPLOAD_GENERATED_JSCSS, "APPNAME", DO_NOT_SHOW_DEBUG)
#else
       ABM.ActivateCloudinary("DONATOR_KEY","CLOUD_NAME", "API_KEY", "API_SECRET",DO_NOT_UPLOAD_GENERATED_JSCSS, "APPNAME", SHOW_DEBUG)
#end if
' this is for 2, your own assets
ABM.CloudinaryLoadImages(CLEAR)
ABM.CloudinaryLoadAudioVideos(DO_NOT_CLEAR)
ABM.CloudinaryLoadRawFiles(DO_NOT_CLEAR)

What will this code do?
It will create a folder structure in you Cloudinary cloud:

APPNAME/css
APPNAME/js

Every time you start your jar, both these folders will be emptied (so do not put anything else in it!) and the most recent generated .js/.css files will be uploaded. Note: depending on the size of your app, this can take quite some time. e.g. for the demo app it takes about 3 minutes.

There is nothing more you have to do, ABM will have changed all the calls in the HTML from your local drive to the CDN.

2. Your own Assests:

As you can see in (1), we pre-load all the urls of the images/videos and other files. That way it is pretty simple to use the e.g. if we want to use an image using the ABM.CloudinaryGet() command:

Dim img4 As ABMImage
img4.Initialize(page, "img4", ABM.CloudinaryGet("demo/images/sample-1"), 1)
page.Cell(6,1).AddComponent(img4)

As parameter it takes the ‘publicId’ of the asset. In my case my APPNAME was demo, I created a folder images in it in the Cloudinary console and uploaded a file called sample-1.jpg so the public id becomes:

demo/images/sample-1

Note: I’ve noticed when uploading images via the cloudinary console, the public id cuts of the file extension.

The result of the ABM.CloudinaryGet command will be something like:

url: https://res.cloudinary.com/abmaterial/image/upload/v1536580044/demo/images/sample-1.jpg

It is very easy to upload and organize you assets through the Cloudinary console app:

cloudinary2

but sometimes you will want to upload it through B4X code.

So the following API methods do exist:

' using these 3 methods will automatically add them the the internal Cloudinary map
' so you can use them with the ABM.CloudinaryGet() method without reloading.
' The next time you restart your .jar, they will also be loaded.
ABM.CloudinaryUploadImage("publicId", fullFilePath)
ABM.CloudinaryUploadVideo("publicId", fullFilePath)
ABM.CloudinaryUploadRawFile("publicId", fullFilePath)

ABM.CloudinaryDeleteImage("publicId")
ABM.CloudinaryDeleteVideo("publicId")
ABM.CloudinaryDeleteRawFile("publicId")

ABM.CloudinaryDeleteAllImagesWithPrefix("prefix")
ABM.CloudinaryDeleteAllVideosWithPrefix("prefix")
ABM.CloudinaryDeleteAllRawFilesWithPrefix("prefix")

For the last 3 methods, you use a ‘prefix’ to delete files in bulk:

e.g. if I want to delete all images from my images folder, I would do:

ABM.CloudinaryDeleteAllImagesWithPrefix("demo/images/")

Cloudinary has a wide range of API methods (e.g. for image manipulation etc), and maybe I will expand the B4X API to support it too, but for the moment using it as a CDN only, it suffices.

Note that this is a Donator only feature. ABM 4.35 will be available in a couple of weeks.

This concludes the tutorial.

Alwaysbusy

Click here to Donation and support ABMaterial

Advertisement

B4X: ABMaterials B4JS – 07 The UI Connection (part 2)

b4jstut07

This is the second part of the UI (ABMaterial) Connection. I wanted to do this one before releasing ABM 4.25 because it contains some important concepts on defining the events for B4JS in an ABMPage.

I’ve created a B4JS Demo that includes the source code for all the tutorials (so far). It will be included in the download zip.

One of the major advantages of B4JS is that you can check a lot of the users input before heading to the server. And because we have some events (like KeyDown, KeyUp) that we do not have on the server side, we can even do some ‘masking’.

This example makes such a mask for a credit card (every 4 chars a space is inserted and a check is done). It is not finished (e.g. it does not take into account if the user puts its cursor in the middle), but it shows some major concepts of B4JS.

B4JSTut07image

Lets dive into the B4X code:

The B4JS class B4JSInputChecker:

<br>
'Class module
Sub Class_Globals
   Private Page As ABMPage 'ignore, just to be able to run ABMPage functions
   Private ToastID As Int
   Private ABM As ABMaterial 'ignore, just to be able to use ABM constants
End Sub

'Initializes the object. You can add parameters to this method if needed.
Public Sub InitializeB4JS

End Sub

public Sub InputDown(Key As String) As Boolean
   'Log("Down key: " &amp; Key)
   Dim cardInp As ABMInput 'ignore that it is not initialized, you can't initialize one in B4JS anyway
   cardInp.B4JSUniqueKey = "cardInp001"
   Dim CardNumber As String = cardInp.B4JSText
   If Key = "Backspace" Then
       If CardNumber.SubString2(0,CardNumber.Length-1).EndsWith(" ") Then
           CardNumber = CardNumber.SubString2(0,CardNumber.Length - 2)
           cardInp.B4JSText = CardNumber
           CheckCard(CardNumber.Replace(" ", ""))
           ' consume the event
           Return True
       End If
       ' let the Keydown do its thing
       Return False
   End If

   If CardNumber.Length = 19 Then
       CheckCard(CardNumber.Replace(" ", ""))
       Return True
   End If

   If Not(IsNumber(Key)) Then
       ToastID = ToastID + 1
       Page.B4JSShowToast("InputToast" &amp; ToastID, "red", "Please only enter numbers!", 3000, False)
       ' consume the event
       Return True
   End If

   ' let the Keydown do its thing
   Return False
End Sub

public Sub InputUp(KeyCode As Int) As Boolean
   'Log("Up keycode: " &amp; KeyCode)

   Dim cardInp As ABMInput 'ignore that it is not initialized, you can't initialize one in B4JS anyway
   cardInp.B4JSUniqueKey = "cardInp001"
   Dim CardNumber As String = cardInp.B4JSText

   ' we down't want to raise it for the combination keys
   ' AltGraph, Shift, Ctrl, Alt
   Select Case KeyCode
       Case 16, 17, 18
           ' consume the event
           Return True
       Case 8 ' and for the backspace, jump out too: we do not want to re-append the space
           ' consume the event
           CheckCard(CardNumber.Replace(" ", ""))
           Return True
   End Select

   Select Case CardNumber.Length
       Case 4,9,14
           cardInp.B4JSText = CardNumber &amp; " "
   End Select

   'a valid 4012 8888 8888 1881
   CheckCard(CardNumber.Replace(" ", ""))

   ' consume the event
   Return True
End Sub

public Sub CheckCard(CardNumber As String)
   'a valid 4012 8888 8888 1881
   Dim isValid As Boolean = Page.B4JSRunInlineJavascriptMethod("validateCCNum", Array As Object(CardNumber.Replace(" ", "")))
   Dim btnCheck As ABMButton 'ignore
   btnCheck.B4JSUniqueKey = "btnCheck"
   ' for our setButtonCSS method we do need the real ID of the button.  We can get this with the Page.B4JSGetComponentIDFromUniqueID() method!
   Dim ID As String = Page.B4JSGetComponentIDFromUniqueID("btnCheck")
   If isValid Then
       btnCheck.B4JSEnabled = True
       Page.B4JSRunInlineJavascriptMethod("setButtonCSS", Array As String(ID, "background-color: #4caf50 !important"))
   Else
       btnCheck.B4JSEnabled = False
       Page.B4JSRunInlineJavascriptMethod("setButtonCSS", Array As String(ID, "background-color: #F44336 !important"))
   End If
End Sub

' every method you want to call with a B4JSOn... call MUST return a boolean
public Sub InputGotFocus() As Boolean
   ToastID = ToastID + 1
   Page.B4JSShowToast("InputToast" &amp; ToastID, "red", "You are entering the Credit Card", 3000, False)
   ' consume the event
   Return True
End Sub

' every method you want to call with a B4JSOn... call MUST return a boolean
public Sub InputLostFocus() As Boolean
   ToastID = ToastID + 1
   Page.B4JSShowToast("InputToast" &amp; ToastID, "red", "Leaving the Credit Card field...", 3000, False)
   ' consume the event
   Return True
End Sub

' every method you want to call with a B4JSOn... call MUST return a boolean
public Sub CheckInput() As Boolean
   Dim switch1 As ABMSwitch  'ignore that it is not initialized, you can't initialize one in B4JS anyway
   switch1.B4JSUniqueKey = "switch001"

   Dim HasError As Boolean = False

   ToastID = ToastID + 1
   If Not(switch1.B4JSState) Then
       Page.B4JSShowToast("SwitchToast" &amp; ToastID, "green", "Please put the Switch to ON!", 3000, False)
       HasError = True
   End If

   ToastID = ToastID + 1
   Dim CheckBox1 As ABMCheckbox 'ignore that it is not initialized, you can't initialize one in B4JS anyway
   CheckBox1.B4JSUniqueKey = "CheckBox001"
   If Not(CheckBox1.B4JSState) Then
       Page.B4JSShowToast("CheckboxToast" &amp; ToastID, "green", "Please check the Checkbox!", 3000, False)
       HasError = True
   End If

   If HasError = False Then
       ToastID = ToastID + 1
       Page.B4JSShowToast("CheckboxInput" &amp; ToastID, "green", "All looks OK, well done!", 3000, False)
   End If
   ' consume the event
   Return True
End Sub

' every method you want to call with a B4JSOn... call MUST return a boolean
public Sub SwitchClick() As Boolean
   Dim switch1 As ABMSwitch  'ignore that it is not initialized, you can't initialize one in B4JS anyway
   switch1.B4JSUniqueKey = "switch001"

   ToastID = ToastID + 1
   If switch1.B4JSState Then
       Page.B4JSShowToast("SwitchToast" &amp; ToastID, "green", "Switch is ON", 3000, False)
   Else
       Page.B4JSShowToast("SwitchToast" &amp; ToastID, "green", "Switch is OFF", 3000, False)
   End If
   ' consume the event
   Return True
End Sub

' every method you want to call with a B4JSOn... call MUST return a boolean
public Sub CheckBoxClick() As Boolean
   Dim CheckBox1 As ABMCheckbox 'ignore that it is not initialized, you can't initialize one in B4JS anyway
   CheckBox1.B4JSUniqueKey = "CheckBox001"
   ToastID = ToastID + 1
   If CheckBox1.B4JSState Then
       Page.B4JSShowToast("CheckboxToast" &amp; ToastID, "green", "Checkbox ON", 3000, False)
   Else
       Page.B4JSShowToast("CheckboxToast" &amp; ToastID, "red", "Checkbox OFF", 3000, False)
   End If
   ' consume the event
   Return True
End Sub

' every method you want to call with a B4JSOn... call MUST return a boolean
public Sub RadioClick() As Boolean
   Dim Radio1 As ABMRadioGroup 'ignore that it is not initialized, you can't initialize one in B4JS anyway
   Radio1.B4JSUniqueKey = "Radio001"
   ToastID = ToastID + 1
   Page.B4JSShowToast("RadioToast" &amp; ToastID, "green", "Active Radio = " &amp;  Radio1.B4JSGetActive, 3000, False)
   ' example of setting the active radio
   'If Radio1.B4JSGetActive = 0 Then
   '   Radio1.B4JSSetActive(2)
   'End If
   Return True
End Sub

public Sub RangeOnChange(start As String, Stop As String, ConsumeEvent As Boolean) As Boolean
   Log("B4JS Start: " &amp; start)
   Log("B4JS Stop: " &amp; Stop)
   Return ConsumeEvent
End Sub

#if JAVASCRIPT
function setButtonCSS(id, val) {
   $('#' + id).attr('style', val);
}
#End If

And creating the components in ConnectPage():

public Sub ConnectPage()
   '   connecting the navigation bar
   ABMShared.ConnectNavigationBar(page)

   page.Cell(1,1).AddComponent(ABMShared.BuildParagraph(page,"par1","This demo is practical example of B4JS. It uses the B4JSInputChecker B4JS class.") )

   ' input
   Dim cardInp As ABMInput
   cardInp.Initialize(page, "inp1", ABM.INPUT_TEXT, "Credit Card", False, "")
   cardInp.B4JSUniqueKey = "cardInp001"
   ' special case, it has to pass at least the pressed key (ABM.B4JS_PARAM_INPUTKEY or ABM.B4JS_PARAM_INPUTKEYCODE) to it!
   cardInp.B4JSOnKeyDown("B4JSInputChecker", "InputDown", Array As Object(ABM.B4JS_PARAM_INPUTKEY))
   cardInp.B4JSOnKeyUp("B4JSInputChecker", "InputUp", Array As Object(ABM.B4JS_PARAM_INPUTKEYCODE))
   ' some focus stuff
   cardInp.B4JSOnGotFocus("B4JSInputChecker", "InputGotFocus", Null)
   cardInp.B4JSOnLostFocus("B4JSInputChecker", "InputLostFocus", Null)
   page.Cell(2,1).AddComponent(cardInp)

   ' switch
   Dim switch1 As ABMSwitch
   switch1.Initialize(page, "switch1", "ON", "OFF", False, "")
   switch1.B4JSUniqueKey = "switch001"
   switch1.B4JSOnClick("B4JSInputChecker", "SwitchClick", Null)
   page.Cell(3,1).AddComponent(switch1)

   ' checkbox
   Dim CheckBox1 As ABMCheckbox
   CheckBox1.Initialize(page, "CheckBox1", "B4JS Checkbox", False, "")
   CheckBox1.B4JSUniqueKey = "CheckBox001"
   CheckBox1.B4JSOnClick("B4JSInputChecker", "CheckBoxClick", Null)
   page.Cell(4,1).AddComponent(CheckBox1)

   ' radiogroup
   Dim Radio1 As ABMRadioGroup
   Radio1.Initialize(page, "Radio1", "")
   Radio1.B4JSUniqueKey = "Radio001"
   Radio1.AddRadioButton("radio 0", True)
   Radio1.AddRadioButton("radio 1", True)
   Radio1.AddRadioButton("radio 2", True)
   Radio1.SetActive(1)
   Radio1.B4JSOnClick("B4JSInputChecker", "RadioClick", Null)
   page.Cell(5,1).AddComponent(Radio1)

   ' range
   Dim range As ABMRange
   range.Initialize(page, "range", 10, 20, 0, 100, 1, "")
   range.B4JSUniqueKey = "range001"
   ' special case, it has to pass at least ABM.B4JS_PARAM_RANGESTART & ABM.B4JS_PARAM_RANGESTOP!

   range.B4JSOnChange("B4JSInputChecker", "RangeOnChange", Array As Object(ABM.B4JS_PARAM_RANGESTART, ABM.B4JS_PARAM_RANGESTOP, True))
   page.Cell(6,1).AddComponent(range)

   ' button
   Dim btnCheck As ABMButton
   btnCheck.InitializeFlat(page, "btnCheck", "", "", "Check", "red")
   btnCheck.Enabled = False
   btnCheck.B4JSUniqueKey = "btnCheck"
   btnCheck.B4JSOnClick("B4JSInputChecker", "CheckInput", Null)
   page.Cell(7,1).AddComponent(btnCheck) 

   ' refresh the page
   page.Refresh
   ' Tell the browser we finished loading
   page.FinishedLoading
   ' restoring the navigation bar position
   page.RestoreNavigationBarPosition
End Sub

As you see, for every component we want to use in a B4JS class, we have to set the B4JSUniqueKey property.

We also define some events (B4JSOn…). You notice some of them have special parameters, e.g. the ABMInputs B4JSOnKeyDown event. This event MUST have at least the parameter ABM.B4JS_PARAM_INPUTKEY or ABM.B4JS_PARAM_INPUTKEYCODE to be able to work.

For the B4JSOnKeyDown event for example, we pass the ABM.B4JS_PARAM_INPUTKEY param. The order of the params is very important!

In our B4JS class, this is our method definition:

public Sub InputDown(Key As String) As Boolean<span id="mce_SELREST_start" style="overflow:hidden;line-height:0;">&#65279;</span>

Here ABM.B4JS_PARAM_INPUTKEY’s value will be put into the Key param.

You can add additional params (if needed) as for example is done in the range.B4JSOnChange event declaration.

This concludes the tutorial. ABM 4.25 is now available for download for all donators in the feedback app!

Alwaysbusy

Click here to Donation and support ABMaterial

B4X: ABMaterials B4JS – 06 The UI Connection

B4JSTut06

So now that we know the basics of B4JS, lets make something real using a lot of what we have learned together with some ABMaterial components.

In this tutorial, we are going to create a simple calculator where all our ‘logic’ happens on the browsers side.

A video of what we are going to make:

Great, so lets get started!

First we are going to create the B4JS part: the logic of the calculator. This is pretty simple and we make use of the JavaScript eval() function to do the actual calculation.

'Class module
Sub Class_Globals
   ' use public or dim if you want to share this variable over ALL B4JS classes
   ' use private if only within this class
   Public CurrentInput As String

   ' to access the constants
   Public ABM As ABMaterial 'ignore
   ' so we can use an msgbox
   Public Page As ABMPage 'ignore, just to be able to run ABMPage functions
End Sub

'Initializes the object. You can NOT add parameters to this method.
'MUST be called InitializeB4JS is automatically called when using this class
Public Sub InitializeB4JS

End Sub

public Sub ButtonPressed(key As String) As Boolean
   Select Case key
       Case "="
           If CurrentInput  "" Then
               CurrentInput = Page.B4JSRunInlineJavascriptMethod("evaluate", Array As String(CurrentInput))
           End If
       Case "Del"
           If CurrentInput.Length > 0 Then
               CurrentInput = CurrentInput.SubString2(0, CurrentInput.Length - 1)
           End If
       Case Else
           CurrentInput = CurrentInput & key
   End Select
   Dim ResultLabel As ABMLabel 'ignore
   ' use the same key as when you created it
   ResultLabel.B4JSUniqueKey = "ResultLabel"
   ' we must use the B4JSText, not the normal Text property in a B4JS class
   ResultLabel.B4JSText = CurrentInput
   ' consume the event, if any server one should exist
   Return True
End Sub

public Sub OnMouseEnter(uniqueID As String) As Boolean
   Page.B4JSRunInlineJavascriptMethod("setCSS", Array As String(uniqueID, "background-color: #cacaca !important"))
   ' consume the event, if any server one should exist
   Return True
End Sub

public Sub OnMouseLeave(uniqueID As String) As Boolean
   Page.B4JSRunInlineJavascriptMethod("setCSS", Array As String(uniqueID, "background-color: #f5f5f5 !important"))
   ' consume the event, if any server one should exist
   Return True
End Sub

#if JAVASCRIPT
function evaluate(s) {
    // so we get back a string
   return '' + eval(s);
}

function setCSS(id, val) {
    // we got the button, but we want the cell (which is its parent parent)
   $('#' + id).parent().parent().attr('style', val);
}
#End If

Notes:

As said in a previous tutorial, when we use a B4JS class in a ABM components B4JSOn… method, it gets its own instance. This is not very practical for our calculator as the CurrentInput variable must be shared. If we don’t make CurrentInput public, then each button will have its own CurrentInput.

As we don’t want any communication with the server, each method we are going to call returns true: consuming the event on the browser side.

When we dim the ResultLabel label, we do not initialize it again. To remove the warning in B4J, you can just add the ‘ignore after the dim. But what we MUST do, is set the B4JSUniqueKey. It must be the same as what we will set in the next part, the normal ABM Web Page.

Now we are ready to build the graphical UI part in ABMaterial and use the B4JS methods we created here.

We make some themes for our buttons and input field:

public Sub BuildTheme()
   ' start with the base theme defined in ABMShared
   theme.Initialize("pagetheme")
   theme.AddABMTheme(ABMShared.MyTheme)

   theme.AddCellTheme("border")
   theme.Cell("border").BorderColor = ABM.COLOR_BLACK
   theme.Cell("border").BorderWidth = 1
   theme.Cell("border").BorderStyle = ABM.BORDER_SOLID
   theme.Cell("border").VerticalAlign = True
   theme.Cell("border").Align = ABM.CELL_ALIGN_RIGHT

   theme.AddRowTheme("white")
   theme.Row("white").BackColor = ABM.COLOR_GREY
   theme.Row("white").BackColorIntensity = ABM.INTENSITY_LIGHTEN4

   theme.AddLabelTheme("right")
   theme.Label("right").Align = ABM.TEXTALIGN_RIGHT

   theme.AddLabelTheme("white")
   theme.Label("white").ForeColor = ABM.COLOR_WHITE
   theme.Label("white").Align = ABM.TEXTALIGN_CENTER

   theme.AddLabelTheme("black")
   theme.Label("black").ForeColor = ABM.COLOR_BLACK
   theme.Label("black").Align = ABM.TEXTALIGN_CENTER

   theme.AddCellTheme("white")
   theme.Cell("white").BackColor = ABM.COLOR_GREY
   theme.Cell("white").BackColorIntensity = ABM.INTENSITY_LIGHTEN4
   theme.Cell("white").VerticalAlign = True
   theme.Cell("white").Align = ABM.CELL_ALIGN_CENTER
   theme.Cell("white").Clickable = True

   theme.AddCellTheme("black")
   theme.Cell("black").BackColor = ABM.COLOR_BLACK
   theme.Cell("black").VerticalAlign = True
   theme.Cell("black").Align = ABM.CELL_ALIGN_CENTER
   theme.Cell("black").Clickable = True

   theme.AddCellTheme("green")
   theme.Cell("green").BackColor = ABM.COLOR_GREEN
   theme.Cell("green").VerticalAlign = True
   theme.Cell("green").Align = ABM.CELL_ALIGN_CENTER
   theme.Cell("green").Clickable = True
End Sub

In BuildPage() we create our grid layout:

public Sub BuildPage()
   ' initialize the theme
   BuildTheme

   ' initialize this page using our theme
   page.InitializeWithTheme(Name, "/ws/" & ABMShared.AppName & "/" & Name, False, ABMShared.SessionMaxInactiveIntervalSeconds, theme)
   page.ShowLoader=True
   page.PageHTMLName = "index.html"
   page.PageTitle = "Template"
   page.PageDescription = "Template"
   page.PageKeywords = ""
   page.PageSiteMapPriority = ""
   page.PageSiteMapFrequency = ABM.SITEMAP_FREQ_YEARLY

   page.ShowConnectedIndicator = True

   ' create the page grid
   page.AddRows(1,True,"").AddCells12(1,"")
   page.AddRowsM(1,True, 0,0,"").AddCellsOSMP(1,0,0,0,12,12,12,0,0,0,0,"border")
   page.AddRowsM(4,True, 0,0,"white").AddCellsOSMP(4,0,0,0,3,3,3,0,0,0,0,"")
   page.AddRowsM(1,True, 0,0,"").AddCellsOSMP(1,0,0,0,12,12,12,0,0,0,0,"")
   page.AddRows(5,True,"").AddCells12(1,"")

   page.BuildGrid 'IMPORTANT once you loaded the complete grid AND before you start adding components
End Sub

And in ConnectPage() we build the calculator:

public Sub ConnectPage()
   Dim ResultLabel As ABMLabel
   ResultLabel.Initialize(page, "ResultLabel", "", ABM.SIZE_H4, True, "right")
   ' we are going to use this component on the B4JS side, so give it a UNIQUE key
   ResultLabel.B4JSUniqueKey = "ResultLabel"
   ResultLabel.PaddingRight = "10px"
   page.Cell(2,1).AddComponent(ResultLabel)

   ' setting a fixed height to the cell
   page.Cell(2, 1).SetFixedHeight(90, False)

   ' a list with all the buttons so we can easily iterate through them to build the buttons
   Dim Buttons As List = Array As String("7", "8", "9", "/", "4", "5", "6", "*", "1", "2", "3", "-", ".", "0", "Del", "+", "=")
   Dim ButtonPos As Int = 0

   For x = 1 To 4
       For y = 1 To 4
           ' we use just a label for the 'button'
           Dim btn As ABMLabel
           ' as we will raise events from the cell this time, we must give it also a UNIQUE key
           page.Cell(2+x, y).B4JSUniqueKey = "btn" & ButtonPos
           If y < 4 Then
               ' the first three button (white) of the row
               btn.Initialize(page, "" & ButtonPos, Buttons.Get(ButtonPos), ABM.SIZE_H4, True, "black")
               btn.IsTextSelectable = False
               ' setting the white theme
               page.Cell(2+x, y).UseTheme("white")
               ' attaching our B4JS methods to the Cell events.  We pass the labels ID that we can then use in the Javascript SetCSS method
               page.Cell(2+x, y).B4JSOnMouseEnter("B4JSCalculator", "OnMouseEnter", Array As String("btn" & ButtonPos))
               page.Cell(2+x, y).B4JSOnMouseLeave("B4JSCalculator", "OnMouseLeave", Array As String("btn" & ButtonPos))
           Else
               ' the last button in the row (black).  We don't set a hover effect on theù
               btn.Initialize(page, "" & ButtonPos, Buttons.Get(ButtonPos), ABM.SIZE_H4, True, "white")
               btn.IsTextSelectable = False
               page.Cell(2+x, y).UseTheme("black")
           End If
           ' all the cells have a click event and we pass the labels text to the B4JS function to use in the Select Case
           page.Cell(2+x, y).B4JSOnClick("B4JSCalculator", "ButtonPressed", Array As String(Buttons.Get(ButtonPos)))
           ' also setting a fixed height
           page.Cell(2+x, y).SetFixedHeight(90, False)
           ' add we add the component as an Array component
           page.Cell(2+x, y).AddArrayComponent(btn, "btn")
           ' next button
           ButtonPos = ButtonPos + 1
       Next
   Next
   ' finally we also add our last button, the =
   Dim btn As ABMLabel
   ' setting the UNIQUE key
   page.Cell(7, 1).B4JSUniqueKey = "btn" & ButtonPos

   btn.Initialize(page, "" & ButtonPos, Buttons.Get(ButtonPos), ABM.SIZE_H4, True, "white")
   btn.IsTextSelectable = False
   ' using the green theme
   page.Cell(7, 1).UseTheme("green")

   ' also using the ButtonPressed function from B4JS
   page.Cell(7, 1).B4JSOnClick("B4JSCalculator", "ButtonPressed", Array As String(Buttons.Get(ButtonPos)))
   ' setting the height
   page.Cell(7, 1).SetFixedHeight(90, False)
   ' and finally adding it as an Array component
   page.Cell(7, 1).AddArrayComponent(btn, "btn")

   ' and just to be sure if our server is still synced with the browser when we need it, lets show an msgbox
   Dim btnServerResult As ABMButton
   btnServerResult.InitializeFlat(page, "btnServerResult", "", "", "Hey, server what is my current result?", "")
   page.Cell(9, 1).AddComponent(btnServerResult)

   ' refresh the page
   page.Refresh
   ' Tell the browser we finished loading
   page.FinishedLoading
   ' restoring the navigation bar position
   page.RestoreNavigationBarPosition
End Sub

Finally, we add the msgbox to the button on the server so we can prove our server can still receive the current browser situation of the ABMInput field when needed.

Sub btnServerResult_Clicked(Target As String)
Dim ResultLabel As ABMLabel = page.Component("ResultLabel")
page.Msgbox("msgbox", "Your complex calculation is now " & ResultLabel.Text, "Result", "OK", False, ABM.MSGBOX_POS_CENTER_CENTER, "")
End Sub

I've added a lot of comments in the source code so it will be easier to follow.

I've thought a long time on how we could connect the ABM UI in a clean way with the B4JS classes and I'm satisfied with the result. Some may argue why the introduction of B4JSUniqueKey and not just using the ID but it was a real necessity. ABM is actually very smart in how IDs work. It keeps track of its parents and makes it unique if needed. However, as B4JS is ‘compiled’ it doesn’t has this information when running.

For example it is quite possible that at compile time some components don’t even exist yet. (actually, most of them don’t as they are created in ConnectPage()). So the link between the B4JS component and its future ABM counterpart must be done by you, the programmer.

Another thing you could ask is why having .Text and .B4JSText, why can’t the same be used. In theorie there wouldn’t be a problem with that, except an ABMComponent has a lot more properties and methods than what B4JS can do. To distinguish which properties are available in B4JS, I gave them a prefix.

Not all ABM Components properties and methods will be converted. Gradually, some may be added but it is never the intention to convert them all to B4JS. Frankly, it would be an impossible task. ABM is so huge (took me over 2 years day and night to get where we are now). Other components will also be ‘converted’ in the future too, but they will be done on a ‘on-need’ base.

In conclusion, as Mindful mentioned: this paves the way to progressive web apps!

I’ll try to make a download of ABM 4.25 As soon as possible so the donators can have a go with B4JS very soon. :)

For the ones interested in the relevant JavaScript source code of our B4JS class:

var _currentinput="";
var _abm;
var _page;

function b4js_b4jscalculator() {
     var self;
     this.initializeb4js=function(){
          self=this;
          try {
          }
          catch(err) {
               console.log(err.message + ' ' + err.stack);
          }
     };
     this.buttonpressed=function(_key){
          try {
               switch ("" + _key) {
                    case "" + "=":
                         if (_currentinput!="") {
                              _currentinput = evaluate(_currentinput);
                         }
                         break;
                    case "" + "Del":
                         if (_currentinput.length>0) {
                              _currentinput = _currentinput.substring(0,_currentinput.length-1);
                         }
                         break;
                    default:
                         _currentinput = _currentinput+_key;
                         break;
               }
               var _resultlabel={};
               _resultlabel.b4jsvar=$('[data-b4js="resultlabel"]');
               _resultlabel.b4jsvar.html(b4js_buildtext(_currentinput, false));
               return true;
          }
          catch(err) {
               console.log(err.message + ' ' + err.stack);
          }
     };
     this.onmouseenter=function(_uniqueid){
          try {
               setCSS(_uniqueid, "background-color: #cacaca !important");
               return true;
          }
          catch(err) {
               console.log(err.message + ' ' + err.stack);
          }
     };
     this.onmouseleave=function(_uniqueid){
          try {
               setCSS(_uniqueid, "background-color: #f5f5f5 !important");
               return true;
          }
          catch(err) {
               console.log(err.message + ' ' + err.stack);
          }
     };
};

function evaluate(s) {
    // so we get back a string
   return '' + eval(s);
}
function setCSS(id, val) {
    // we got the button, but we want the cell (which is its parent parent)
   $('#' + id).parent().parent().attr('style', val);
}

Alwaysbusy

Click here to Donation and support ABMaterial

B4X: ABMaterials B4JS – 03 Inline Javascript

B4JSTut03

This is another one of those fantastic B4X features that I wanted in B4JS: Inline Javascript.

Just like its big brothers, you can easily put javascript functions in a B4JS class. This last part is important: you can ONLY declare it in a B4JS class. But, as we will see further, you will be able to call the method in your normal ABM Page class.

So, suppose we found a nice method in Javascript to check a credit card. In your B4JS class, you can use #If JAVASCRIPT and #End If to define a javascript region. You can add multiple methods in one block if you want.

Public Sub InitializeB4JS
   Page.B4JSRunMethod("B4JSCalculateDistance", "cHECKCard", Array As String("5105105105105100"))
   Page.B4JSRunMethod("B4JSCalculateDistance", "CheckCard", Array As String("111111"))
End Sub

public Sub CheckCard(cardNumber As String)
   Dim isValid As Boolean = Page.B4JSRunInlineJavascriptMethod("validateCCNum", Array As Object(cardNumber))
   If isValid Then
       Log("Card '" & cardNumber & "' is a valid card. Please continue...")
   Else
       Log("Card '" & cardNumber & "' is NOT valid. Please check the number...")
   End If
End Sub
#If JAVASCRIPT
function validateCCNum(ccnum) {
   var ccCheckRegExp = /[^\d\s-]/;
    var isValid = !ccCheckRegExp.test(ccnum);
    var i;
    if (isValid) {
        var cardNumbersOnly = ccnum.replace(/[\s-]/g,"");
        var cardNumberLength = cardNumbersOnly.length;
        var arrCheckTypes = ['visa', 'mastercard', 'amex', 'discover', 'dinners', 'jcb'];
        for(i=0; i<arrCheckTypes.length; i++) {
            var lengthIsValid = false;
            var prefixIsValid = false;
            var prefixRegExp;
            switch (arrCheckTypes[i]) {
                case "mastercard":
                    lengthIsValid = (cardNumberLength === 16);
                    prefixRegExp = /^5[1-5]/;
                    break;
                case "visa":
                    lengthIsValid = (cardNumberLength === 16 || cardNumberLength === 13);
                    prefixRegExp = /^4/;
                    break;
                case "amex":
                    lengthIsValid = (cardNumberLength === 15);
                    prefixRegExp = /^3([47])/;
                    break;
                case "discover":
                    lengthIsValid = (cardNumberLength === 15 || cardNumberLength === 16);
                    prefixRegExp = /^(6011|5)/;
                    break;
                case "dinners":
                    lengthIsValid = (cardNumberLength === 14);
                    prefixRegExp = /^(300|301|302|303|304|305|36|38)/;
                    break;
                case "jcb":
                    lengthIsValid = (cardNumberLength === 15 || cardNumberLength === 16);
                    prefixRegExp = /^(2131|1800|35)/;
                    break;
                default:
                    prefixRegExp = /^$/;
            }
            prefixIsValid = prefixRegExp.test(cardNumbersOnly);
            isValid = prefixIsValid && lengthIsValid;

            // Check if we found a correct one
            if(isValid) {
                break;
            }
        }
    }

    if (!isValid) {
        return false;
    }

    // Remove all dashes for the checksum checks to eliminate negative numbers
    ccnum = ccnum.replace(/[\s-]/g,"");
    // Checksum ("Mod 10")
    // Add even digits in even length strings or odd digits in odd length strings.
    var checksum = 0;
    for (i = (2 - (ccnum.length % 2)); i <= ccnum.length; i += 2) {
        checksum += parseInt(ccnum.charAt(i - 1));
    }

    // Analyze odd digits in even length strings or even digits in odd length strings.
    for (i = (ccnum.length % 2) + 1; i < ccnum.length; i += 2) {
        var digit = parseInt(ccnum.charAt(i - 1)) * 2;
        if (digit < 10) {
            checksum += digit;
        } else {
            checksum += (digit - 9);
        }
    }

    return (checksum % 10) === 0;
}
#End If

The result in the browsers log:

Card '5105105105105100' is a valid card. Please continue...
Card '111111' is NOT valid. Please check the number...

Pretty cool no? :)

A couple of things we see here in the code (besides the #if JAVASCRIPT part.

1. Calling a javascript function in your B4JS code using Page.B4JSRunInlineJavascriptMethod:

Dim isValid As Boolean = Page.B4JSRunInlineJavascriptMethod("validateCCNum", Array As Object(cardNumber))

It is VERY important (unlike we are used in B4J, that the method name (here validateCCNum) matches the case. e.g. VAlidateCCNum will NOT work!

2. Calling a B4JS function in your B4JS code using Page.B4JSRunMethod:

Page.B4JSRunMethod("B4JSCalculateDistance", "cHECKCard", Array As String("5105105105105100"))

And we’re back on familiar B4X ground :) The case of the method (or class) does not matter as all is lowercased anyway. Why do we have to mention the class, I hear you think. Well this is because we can call a method from ANOTHER B4JS class too!

And moreover, we can also call these methods in our normal ABM webpage!

sub ConnectPage()
 ...
' method 1: calling our own B4JS sub and handeling the result on thebrowser side
   page.B4JSRunMethod("B4JSCalculateDistance", "cHECKCard", Array As String(CardNumber))

   ' method 2: directly calling the Javascript function and handeling the result on the server side
   Dim isValid As Boolean = page.B4JSRunInlineJavascriptMethod("validateCCNum", Array As Object(CardNumber))
   If isValid Then
       Log("Server Card '" & CardNumber & "' is a valid card. Please continue...")
   Else
       Log("Server Card '" & CardNumber & "' is NOT valid. Please check the number...")
   End If
   ...
End Sub

So the result of method 1 (in the Browser log):

Card '5105105105105100' is a valid card. Please continue...
Card '111111' is NOT valid. Please check the number...

And the result of method 2 (in the B4J log):

Server Card '5105105105105100' is a valid card. Please continue...

In the next tutorial (04 – Running Javascript on the server side) I’ll show how you can even run this on the server side, not even needing a browser open. :p

A final note: #if JAVASCRIPT regions do not really belong to the class. They are shared between all B4JS classes you create.

Happy programming!

Alwaysbusy

Click here to Donation and support ABMaterial

B4X: ABMaterials B4JS – 02 Core Functions

B4JS02

I can be short here: all the Core functions in B4J that are mentioned in the B4JS Introduction can be used. So, on a Sunday morning, some light reading which goes perfectly together with a nice breakfast…

Lets look a little into some topics.

Smart String Literal:

This is such an extraordinary B4X feature that I definitely wanted at least some kind of support for it.

An example:

Sub Class_Globals
   Dim myString As String
   Dim myGlobalName As String = "GlobalAlain"
End Sub

'Initializes the object. You can NOT add parameters.
Public Sub InitializeB4JS()
   Dim myName As String = "Alain"

   ' smartstrings (does not support date, time or xml function
   myString = $"Hello planet "B4X"! This is a test
    from ${myName} and ${myGlobalName}"$

   Log("myString.Contains('planet'): " & myString.Contains("planet"))
End Sub

The result in the browsers log:

Hello planet "B4X"! This is a test
    from Alain and GlobalAlain

myString.Contains('planet'): true

As you can see, it can handle quotes in the string, and variables.  It does not support the special $DateTime{}, $Date{}, $Time{} and $xml{} tags.  But you can make a workaround for it by putting it in a variable first:

Dim myDate as String = DateTime.Date(DateTime.Now)
Dim myTime as String = DateTime.Time(DateTime.Now)

Dim myString as String = $"Here is the current date: ${myDate} and the current time: ${myTime}"$

The result in the console is something like this:

Here is the current date: 03/11/2018 and the current time: 08:25:37

Timer:

When using a timer, you must keep in mind that it runs in the browser.  This means, even when your server is down, your timer will keep running.

The usage is exactly as the B4J counterpart:

Sub Class_Globals
   Private lblTimer As Timer

   Private Page As ABMPage 'ignore, just to be able to run ABMPage functions
   Private ToastID As Int
   Private ABM As ABMaterial 'ignore, just to be able to use ABM constants
End Sub

' Initializes the object. You can NOT add parameters and MUST be called InitializeB4JS.
' is automatically called when the class is created in Javascript
Public Sub InitializeB4JS()
   lblTimer.Initialize("lblTimer", 5000)
End Sub

Sub lblTimer_Tick
       ToastID = ToastID + 1
       Page.B4JSShowToast("TimerToast" & ToastID, "green", "I'm shown in the timer without the server every 5 seconds!", 3000, False)
End Sub

StringBuilder:

Although the Smart String Literal is still better to use, B4JS does also support the StringBuilder.

Dim sb As StringBuilder
sb.Initialize
sb.Append("0123456789").Append(CRLF).Append("0123456789")
Log("sb.ToString: " & sb.ToString)
Log("Length: " & sb.Length)  ' should show 21, including the return
sb.Insert(2,"X")
Log("sb.ToString: " & sb.ToString)
sb.Remove(2,3)
Log("sb.ToString: " & sb.ToString)

The result output in the Browser console:

sb.ToString: 0123456789
0123456789
Length: 21
sb.ToString: 01X23456789
0123456789
sb.ToString: 0123456789
0123456789

This concludes this tutorial.  As a B4X developer, there are not many differences between B4JS and the familiar B4X syntax, which makes it very easy to get started with.

The next tutorial will dig a bit deeper into using inline JavaScript, another feature that speeds up development considerably.

Alwaysbusy

Click here to Donation and support ABMaterial

B4X: ABMaterials B4JS – 01 Getting Started

In this first tutorial, we are going to create a killer method to calculate the distance between two GEO locations. There are better ways to do so, but for demos sake…

Creating a B4JS class is very simple. Just use the menu in B4J and add a Standard Class.

'Class module
Sub Class_Globals

End Sub

Public Sub Initialize

End Sub

First thing we MUST do is renaming the Initialize method to InitializeB4JS. This is because the transpiler uses this method name to determine it has to translate this class to JavaScript.

This InitializeB4JS method can NOT have parameters!

Now we can start adding our code, just as usual in B4J. As almost the whole Core library of B4J is available, this is pretty forward. Except from the ABM methods, this could easily be seen as B4J.

'Class module
Sub Class_Globals
   ' use public or dim if you want to share this variable over ALL B4JS classes
   ' use private if only within this class
   Dim ToKM As Double = 1.609344
   Dim ToMiles As Double = 0.8684

   ' to access the constants
   Public ABM As ABMaterial 'ignore
   ' so we can use an msgbox
   Public Page As ABMPage 'ignore, just to be able to run ABMPage functions
End Sub

'Initializes the object. You can NOT add parameters to this method.
'MUST be called InitializeB4JS is automatically called when using this class
Public Sub InitializeB4JS

End Sub

public Sub CalcDistance(Lat1 As Double, Lon1 As Double, Lat2 As Double, Lon2 As Double, Unit As String)
   Dim theta As Double
   Dim Distance As Double
   theta = Lon1 - Lon2
   Distance = Sin(deg2rad(Lat1)) * Sin(deg2rad(Lat2)) + Cos(deg2rad(Lat1)) * Cos(deg2rad(Lat2)) * Cos(deg2rad(theta))
   ' logging some intermediate value
   Log("Distance = " & Distance)
   Distance = ACos(Distance)
   Distance = rad2deg(Distance)
   ' logging some intermediate value
   Log("Distance = " & Distance)
   Distance = Distance * 60 * 1.1515
   ' if we would use Page.Msgbox here, we would see in the logs an error: msgbox is NOT supported in B4JS!
   ' we must use the B4JS equivalent method Page.B4JSMsgbox
   Select Case Unit.ToUpperCase
       Case "K"
           Page.B4JSMsgbox("msgbox", "The distance is " & (Distance * ToKM) & " kilometers!", "Tutorial", "OK", False, ABM.MSGBOX_POS_CENTER_CENTER, "")
       Case "N"
           Page.B4JSMsgbox("msgbox", "The distance is " & (Distance * ToMiles) & " miles!", "Tutorial", "OK", False, ABM.MSGBOX_POS_CENTER_CENTER, "")
       Case Else
           Page.B4JSMsgbox("msgbox", "No idea what you are doing :-)", "Tutorial", "OK", False, ABM.MSGBOX_POS_CENTER_CENTER, "")
   End Select
End Sub

' some helper methods
Sub deg2rad(Deg As Double) As Double
   Return Deg * cPI / 180
End Sub

Sub rad2deg(Rad As Double) As Double
   Return Rad * 180 / cPI
End Sub

VERY IMPORTANT!!!
Depending on how you declare the variable in Class_Globals, a variable is shared between class instances or not:

This concept becomes very important when we start using ABMComponents because when you attach a B4JSOn… event to an ABMComponent, it gets its own instance of your class. The Public/Dim variables will be shared among all the components using this B4JS Class

To use our new method, I’ll make a button in ConnectPage() on the ABM page (this will be explained in a future tutorial) and when we click, we do a calculation:

Dim btn As ABMButton
btn.InitializeFlat(page, "btn", "", "", "Calculate", "")
' B4JSUniqueKey is explained in a later turorial
btn.B4JSUniqueKey = "btn001"
' define the B4JS OnClickedEvent
btn.B4JSOnClick("B4JSCalculateDistance", "CalcDistance", Array As Object(32.9697, -96.80322, 29.46786, -98.53506, "K"))
page.Cell(2,1).AddComponent(btn)

Alternative, not using an ABMButton but calling our method directly:

page.B4JSRunMethod("B4JSCalculateDistance", "CalcDistance", Array As Object(32.9697, -96.80322, 29.46786, -98.53506, "K"))

So let’s check our results (click to enlarge):

B4JSTut1a

1. In the browsers log we see our two intermediate log() calls.
2. the solution to our call is shown in a message box.

But in the B4J log we also see that the normal btn_Click event is raised! That is not what we want.

To avoid this, we make a simple change to our CalcDistance method. We return a boolean true: this is saying ‘consume the click on the browser side and don’t go to the server‘.

public Sub CalcDistance(Lat1 As Double, Lon1 As Double, Lat2 As Double, Lon2 As Double, Unit As String) As Boolean
   ...
   ' important, if we do not want to raise the servers btn_click events, we must return true
   Return True
End Sub

And hooray, our server is not contacted any more! :)

B4JSTut1b

Ultimate proof we are not contacting the server for this code. I’ve stopped the server app and I can still use the button:

B4JSTut1c

This concludes the first tutorial.

For those interested in the JavaScript generated for our class, here it is:

var_tokm=1.609344;
var _tomiles=0.8684;
var _abm;
var _page;
function b4js_b4jscalculatedistance() {
     var self;
     this.initializeb4js=function(){
          self=this;
          try {
          }
          catch(err) {
               console.log(err.message + ' ' + err.stack);
          }
     };
     this.calcdistance=function(_lat1,_lon1,_lat2,_lon2,_unit){
          try {
               var _theta=0;
               var _distance=0;
               _theta = _lon1-_lon2;
               _distance = (Math.sin(self.deg2rad(_lat1)))*(Math.sin(self.deg2rad(_lat2)))+(Math.cos(self.deg2rad(_lat1)))*(Math.cos(self.deg2rad(_lat2)))*(Math.cos(self.deg2rad(_theta)));
               console.log("Distance = "+_distance);
               _distance = (Math.acos(_distance));
               _distance = self.rad2deg(_distance);
               console.log("Distance = "+_distance);
               _distance = _distance*60*1.1515;
               switch ("" + _unit.toUpperCase()) {
                    case "" + "K":
                         var _b4js_returnname="msgbox";
                         b4js_msgbox("default","Tutorial","The distance is "+(_distance*_tokm)+" kilometers!","OK",'swal2pos-cc', false);;
                         break;
                    case "" + "N":
                         var _b4js_returnname="msgbox";
                         b4js_msgbox("default","Tutorial","The distance is "+(_distance*_tomiles)+" miles!","OK",'swal2pos-cc', false);;
                         break;
                    default:
                         var _b4js_returnname="msgbox";
                         b4js_msgbox("default","Tutorial","No idea what you are doing :-)","OK",'swal2pos-cc', false);;
                         break;
               }
               self.testjson();
               callAjax("https://jsonplaceholder.typicode.com/posts/1","GET","jsonp", "","myJob1", true,"b4jscalculatedistance");
               return true;
          }
          catch(err) {
               console.log(err.message + ' ' + err.stack);
          }
     };

     this.deg2rad=function(_deg){
          try {
               return _deg*Math.PI/180;
          }
          catch(err) {
               console.log(err.message + ' ' + err.stack);
          }
     };
     this.rad2deg=function(_rad){
          try {
               return _rad*180/Math.PI;
          }
          catch(err) {
               console.log(err.message + ' ' + err.stack);
          }
     };
}

In the text tutorial we are going to see how we can use inline JavaScript snippets within our B4JS classes!

Alwaysbusy

Click here to Donation and support ABMaterial

B4X: Writing JavaScript with ABMaterials B4JS

B4JS

After a delay of more of a year working on other ABM stuff, I finally got back on track with B4JS. I will make a series of tutorials explaining how it works. B4JS is part of the ABMaterial library 4.25 which is going to be released next week.

INTRODUCTION

One way to look at B4JS is as some kind of new platform in B4X, that uses a very similar syntax as B4J. At runtime, the B4J source code is transpiled to pure JavaScript. The generated source code can then be used in e.g. an ABMaterial Web App, or maybe even as a base for another JavaScript library.

A typical B4JS class could look like this:

Sub Process_Globals
   Dim myString As String
   Public pubMap As Map

   Dim timer As Timer
   Dim myGlobalName As String = "GlobalAlain"
End Sub
'Initializes the object. You can NOT add parameters.
Public Sub InitializeB4JS()
   pubMap.Initialize

   Dim myName As String = "Alain"
   ' smartstrings do not support date, time or xml functions
   myString = $"Hello planet "B4X"! This is a test
    from ${myName} and ${myGlobalName}"$
   Log("myString.Contains('planet'): " & myString.Contains("planet"))
   Dim myLocalInt As Int = 15
   myLocalInt = myLocalInt * myString.Length

   LogMe("15 x the length of " & myString & " = " & myLocalInt)

   For i=0 To 50
       myLocalInt = myLocalInt + 2
       Select Case myLocalInt
           Case 20, 40
               Log(i)
               pubMap.Put("key" & i, i)
           Case Else
               Log("less than 20")
       End Select
   Next

   timer.Initialize("timer", 1000)
   timer.Enabled = True

   Dim sb As StringBuilder
   sb.Initialize
   sb.Append("lijn 1").Append(CRLF).Append("lijn 2")
   Log(sb.ToString)
   Log(sb.Length)
   sb.Insert(2,"X")
   Log(sb.ToString)
   sb.Remove(2,3)
   Log(sb.ToString)
End Sub
Private Sub Timer_Tick
   timer.Enabled = False
   Log("timer ticking")
   If timer.Enabled = False Then
       timer.Interval = timer.Interval + 1000
       Log("timer new interval: " & timer.Interval)
       timer.Enabled = True
   End If
End Sub

Looks very familiar, no? :)

Having the browser doing some stuff using JavaScript can have some big advantages by relieving some pressure from your server (checking if a form is filled in correctly, or changing the visibility of an ABMContainer if a user clicks a button).

But it also demands a great responsibility from the programmer not to expose to much information to the user. Never, ever write sensitive stuff like SQL, passwords etc in B4JS!

Another advantage is being able to expose some events (like the KeyUp/KeyDown events in an ABMInput field). They are deliberately omitted in ABM, because such events could potentially kill your server. But in Javascript, we could use them e.g. to check if the user could entry numbers, or if fits an email mask.

Having a Timer running on the browser side can also be handy.

First an overview of the syntax B4JS can handle:

OVERVIEW

Core library
Variable types:

Bit:

String:

List:

Map:

StringBuilder:

DateTime:

Keywords:

Operators:

Control Structures:

Timer:

Smart String Literal:

JSON library
JSONParser:

JSONGenerator:

ABMaterial library (as of 2018/03/10, for the latest list check the B4X forum):
ABMLabel:

EVENTS: B4JSOnClick, B4JSOnMouseEnter, B4JSOnMouseLeave

ABMInput:

ABMContainer:

ABMSwitch:

ABMCheckbox:

ABMRadioGroup:

ABMButton:

ABMPage:

ABMRow:

B4JSUniqueKey

EVENTS: B4JSOnClick, B4JSOnMouseEnter, B4JSOnMouseLeave

ABMCell:

B4JSUniqueKey

EVENTS: B4JSOnClick, B4JSOnMouseEnter, B4JSOnMouseLeave

TUTORIALS

In the next following days, I would like to cover the following topics:

01. Getting started
02. Core functions
03. Inline JavaScript
04. Running JavaScript on the server side (mini NodeJS?)
05. JSON & Ajax Calls
06. The UI (ABMaterial) connection

Alwaysbusy

Click here to Donation and support ABMaterial

B4X: Responsive containers in ABMaterial 4.25

ABMDragonfly4.00

Next to the normal responsive page behaviour, in ABMaterial 4.25 for B4J, you will be able to do this with containers too!

Let’s watch it at work first:

This may not sound super special, but it’s a biggie! There are very few frameworks out there that can do this, so I’m very proud of this one.

Nice but that must ask for a lot of control code, no?“, I hear you ask.
Well, here it is:

gridContainer.IsResponsiveContainer = True

Done! 🙂

Just by setting gridContainer.IsResponsiveContainer = True, you just made the ABMContainer device responsive just like a page. This means you can from now on actually create controls that behave differently depending on the device you are on.

For example, setting this grid on a container, the last 5 cells will wrap differently on a phone, tablet or desktop:

gridContainer.AddRows(1,True,"").AddCells12(1,"")
gridContainer.AddRows(1,True,"").AddCellsOSMP(5,0,0,0,12,6,4,0,0,0,0,"")

I also added some powerful tools to adjust the layout of your WebApp according to the device you are on:

Page.GetCurrentPageSize:
Returns the current page size (phone, tablet, desktop). You can use this method e.g. in ConnectPage to determine the state of the current page size and act accordingly.

public Sub ConnectPage()
   Log("Current page size: " & page.GetCurrentPageSize)
   ...
End Sub

An event Page_SizeChanged will return the same value in the ‘current’ parameter if the user changes the window size. (It also returns the ‘previous’ state).

Note that this event is NOT raised at load time! Use Page.GetCurrentPageSize to check that.

Sub Page_SizeChanged(previous As String, current As String)
   Log(previous & " -> " & current)
   Select Case current
       Case "phone"
           gridContainer.MarginLeft = "0px"
           gridContainer.SetFixedWidth("100%")
       Case "tablet"
           gridContainer.MarginLeft = "210px"
           gridContainer.SetFixedWidth("calc(100% - 210px)")
       Case "desktop"
           gridContainer.MarginLeft = "210px"
           gridContainer.SetFixedWidth("calc(100% - 610px)")
   End Select
   gridContainer.Refresh
End Sub

Containers on a fixed position:
Next to setting a fixed with and height of an ABMContainer, you can now also set a fixed position. This can be handy to create ‘floating’ sidebars for example.

compContainer.SetFixedPosition("0px", "", "56px", "")

Params: left, right, top,bottom

Set a parameter to empty string when you don not want to set it.

These 3 new features used together give you an immense power over how your WebApp should behave depending on the device it is running on, with very little effort.

Another year has passed:

2017 has been a great year for B4X and ABMaterial!

B4X has grown to be a very powerful player in develop land.  The already productive RAD IDE has received a couple of very innovative features to help you even more with your app development. Anywhere Software is always right on top of all the new stuff Android, iOS and all the other supported platforms throw at us.  And being stable and reliable makes this a unique environment. The growth of the forum and the quality of the messages/responses are the real proof of this.  Thanks a lot Erel for this beautiful tool.  It is without a doubt the best cross-platform tool one can use for the moment!

And ABMaterial is lucky to be able to stand on the shoulders of this giant.  ABM has surpassed my biggest expectations this year.  It is great to see a lot of you are using it to make amazing webapps and even can make a living out of it.  This was definitely the ‘year of speed‘.  Very few frameworks can match ABM when it comes to develop and execution time. And there is a lot more in the pipeline for the upcoming months!

Thank you all for following my blog!  You inspire me every day to push the limits of the tools and frameworks I make.

Rest me only to wish you all the very best and I hope to see you back in 2018!

Alwaysbusy

Click here to Donation and support ABMaterial

B4X: ABMaterial 3.75 Public/4.00 Donators released

ABMDragonfly4.00

ABMaterial Dragonfly (4.00) for B4X is available. Yes, it has a new name! What started as version 3.81 got upgraded to a new major version, especially since it uses a new cache control system.

ABMaterial has always been one of the fastest RADs from its start, now over 2 years ago.  But with 4.00, we’ll take it to a whole new level!

Mindful and I have spend 5 days (and nights) checking out how we could cache ABMaterial to the extreme without losing any of its functionality.  The results are just ridiculous…

Finish times are less than 10% of the time on the second and next loads. So on 3G, on the users next visit(s), the WebApp is almost just as fast as on high speed cable!

And this system not only works with the same page. Once one page has been loaded, all the other pages can take gain of this system. Even when the user revisits your app much later.

Furthermore there is the new debug feature to check how your apps work on different device sizes.  See it at work here:

Add this snippet to you main module, AFTER starting the server:

#If DEBUG
' in debug mode, start the browser and open the app on all devices (DOES NOT WORK IF EDGE IS YOUR DEFAULT BROWSER!)
ABM.ViewerOpenAllDevices("http://localhost:" & port & "/" & ABMShared.AppName & "/", 100)

' or open a specific device as default (DOES NOT WORK IF EDGE IS YOUR DEFAULT BROWSER!)
'ABM.ViewerOpenDevice("http://localhost:" & port & "/" & ABMShared.AppName & "/", 300, ABM.VIEWER_TABLET)

' or just open de browser, no multiple devices (should work in Edge)
'ABM.ViewerOpen("http://localhost:" & port & "/" & ABMShared.AppName & "/")
#End If

Lots of new theme properties! Check out the demo on how to use  them in the new Dragonfly theme.  As winter is coming and days are getting shorter (at least here in the northern hemisphere), I went for a ‘Night’ theme this time.

ABMaterial DragonFly is now available on 750+ locations worldwide on CDN!  If you use the CDN, you do not need to upload the css/js/fonts folders to your own server anymore!

This means only your own assets (images etc) from the www folder have to be available on your server. De demo running on abmaterial.com for example is working like this.

Usage:

ABM.ActivateUseCDN("DONATORKEY", "https://cdn.jsdelivr.net/gh/RealAlwaysbusy/ABMaterial@v4.03/")

The over 20 new fixes and fulfilled wishes make ABMaterial 4.00 very stable, just like its ‘parent’ programming language: B4X.  It is a real joy knowing one can depend on a strong, bug free environment.  Erel from Anywhere Software rulez!

Happy programming!

Alwaysbusy

Click here to Donation and support ABMaterial

B4J: Creating a Star Rating component in ABMaterial

StarRating

Michał asked me in the feedback app to implement some kind of Star Rating component. As this is not so commonly needed, I thought this could be another good example of an ABMCustomComponent. One can ‘hover’ over the stars to set its value or it can be set and retrieved by code.

I show you how to do it in ABMaterial 3.75 first with the new features (released soon), and will then explain what needs to be changed for previous versions.

So let’s get started!

1. We create a new standard class CompStarRating:

'Class module
Sub Class_Globals
Public ABMComp As ABMCustomComponent
Dim myInternalName As String
End Sub

'Initializes the object. You can add parameters to this method if needed.
Public Sub Initialize(InternalPage As ABMPage, ID As String, radioName As String)
myInternalName = radioName
Dim CSS As String = $"
#half-stars-example .rating-group {
display: inline-flex;
}
#half-stars-example .rating__icon {
pointer-events: none;
}
/* This is an important part: we MUST override the Materialize CSS implementation of the the radio button! */
#half-stars-example .rating__input + label:before,
#half-stars-example .rating__input + label:after {
position: absolute !important;
left: -9999px !important;
}
#half-stars-example .rating__label {
cursor: pointer;
padding: 0 0.1em;
font-size: 2rem;
margin-top: 1rem;
}
#half-stars-example .rating__label--half {
padding-right: 0;
margin-right: -0.6em;
z-index: 2;
}
#half-stars-example .rating__icon--star {
color: orange;
}
#half-stars-example .rating__icon--none {
color: #eee;
}
#half-stars-example .rating__input--none:checked + .rating__label .rating__icon--none {
color: red;
}
#half-stars-example .rating__input:checked ~ .rating__label .rating__icon--star {
color: #ddd;
}
#half-stars-example .rating-group:hover .rating__label .rating__icon--star,
#half-stars-example .rating-group:hover .rating__label--half .rating__icon--star {
color: orange;
}
#half-stars-example .rating__input:hover ~ .rating__label .rating__icon--star,
#half-stars-example .rating__input:hover ~ .rating__label--half .rating__icon--star {
color: #ddd;
}
#half-stars-example .rating-group:hover .rating__input--none:not(:hover) + .rating__label .rating__icon--none {
color: #eee;
}
#half-stars-example .rating__input--none:hover + .rating__label .rating__icon--none {
color: red;
}"$
ABMComp.Initialize("ABMComp", Me, InternalPage, ID, CSS)
End Sub

Sub ABMComp_Build(InternalPage As ABMPage, internalID As String) As String
Return $"
<div id="half-stars-example">
<div id="${internalID}" class="rating-group"><input id="rating-0" class="rating__input rating__input--none" checked="checked" name="${myInternalName}" type="radio" value="0" />
<label class="rating__label" title="0 stars" for="rating-0"> </label>
<input id="rating-00" class="rating__input" type="radio" value="-1" />
<label class="rating__label rating__label--half" title="0.5 stars" for="rating-05"><i class="rating__icon rating__icon--star fa fa-star-half"></i></label>
<input id="rating-05" class="rating__input" name="${myInternalName}" type="radio" value="0.5" />
<label class="rating__label" title="1 star" for="rating-10"><i class="rating__icon rating__icon--star fa fa-star"></i></label>
<input id="rating-10" class="rating__input" name="${myInternalName}" type="radio" value="1" />
<label class="rating__label rating__label--half" title="1.5 stars" for="rating-15"><i class="rating__icon rating__icon--star fa fa-star-half"></i></label>
<input id="rating-15" class="rating__input" name="${myInternalName}" type="radio" value="1.5" />
<label class="rating__label" title="2 stars" for="rating-20"><i class="rating__icon rating__icon--star fa fa-star"></i></label>
<input id="rating-20" class="rating__input" name="${myInternalName}" type="radio" value="2" />
<label class="rating__label rating__label--half" title="2.5 stars" for="rating-25"><i class="rating__icon rating__icon--star fa fa-star-half"></i></label>
<input id="rating-25" class="rating__input" name="${myInternalName}" type="radio" value="2.5" />
<label class="rating__label" title="3 stars" for="rating-30"><i class="rating__icon rating__icon--star fa fa-star"></i></label>
<input id="rating-30" class="rating__input" name="${myInternalName}" type="radio" value="3" />
<label class="rating__label rating__label--half" title="3.5 stars" for="rating-35"><i class="rating__icon rating__icon--star fa fa-star-half"></i></label>
<input id="rating-35" class="rating__input" name="${myInternalName}" type="radio" value="3.5" />
<label class="rating__label" title="4 stars" for="rating-40"><i class="rating__icon rating__icon--star fa fa-star"></i></label>
<input id="rating-40" class="rating__input" name="${myInternalName}" type="radio" value="4" />
<label class="rating__label rating__label--half" title="4.5 stars" for="rating-45"><i class="rating__icon rating__icon--star fa fa-star-half"></i></label>
<input id="rating-45" class="rating__input" name="${myInternalName}" type="radio" value="4.5" />
<label class="rating__label" title="5 stars" for="rating-50"><i class="rating__icon rating__icon--star fa fa-star"></i></label>
<input id="rating-50" class="rating__input" name="${myInternalName}" type="radio" value="5" /></div>
</div>
"$
End Sub

public Sub GetCurrentRating(InternalPage As ABMPage) As Double
Dim script As String = $"return $('input[name=${myInternalName}]:checked').val();"$
Dim ret As Future = InternalPage.ws.EvalWithResult(script, Null)
InternalPage.ws.Flush

Return ret.Value
End Sub

public Sub SetCurrentRating(InternalPage As ABMPage, value As Double) {
Dim script As String = $" $('input[name=${myInternalName}][value="${value}"]').prop('checked', 'checked');"$
InternalPage.ws.Eval(script, Null)
InternalPage.ws.Flush
End Sub

' Is useful to run some initalisation script.
Sub ABMComp_FirstRun(InternalPage As ABMPage, internalID As String)
Dim script As String = $""$
InternalPage.ws.Eval(script, Array As Object(ABMComp.ID))
' flush not needed, it's done in the refresh method in the lib
End Sub
' runs when a refresh is called
Sub ABMComp_Refresh(InternalPage As ABMPage, internalID As String)
Dim script As String = $""$
InternalPage.ws.Eval(script, Array As Object(ABMComp.ID))
End Sub
' do the stuff needed when the object is removed
Sub ABMComp_CleanUp(InternalPage As ABMPage, internalID As String)
End Sub

ABMaterial users will notice I have added the CSS directly into the component. By doing so, we do not need to use the page.AddExtraCSSFile method in the Page_Build() method. (you can still do it this way, and in some cases it may be better as this part can be big. And in the final version, compress it!). In ABMaterial before version 3.75, using AddExtraCSSFile is the only way possible.

The only difficult part in the CSS was I had to override Materialize CSS’s implementation of a radio button (the ‘circle’). So we had to get rid of it.

2. Now we can make a variable for our StarComponent in the page Class_Globals, as we want to be able to Set and Get the value:

Dim myRating As CompStarRating

3. In Page_Connect() we add our component and a couple of buttons:

...
myRating.Initialize(page, "myRating", "rating")
page.Cell(1,1).AddComponent(myRating.ABMComp)

Dim btn As ABMButton
btn.InitializeFlat(page, "btn", "", "", "Get value", "")
page.Cell(2,1).AddComponent(btn)

Dim btn2 As ABMButton
btn2.InitializeFlat(page, "btn2", "", "", "Set 2.5 stars value", "")
page.Cell(3,1).AddComponent(btn2)
...
page.Refresh
...

4. And our Get and Set code in the buttons:

Sub btn_Clicked(Target As String)
Dim value As Double = myRating.GetCurrentRating(page)
Log(value)
End Sub

Sub btn2_Clicked(Target As String)
myRating.SetCurrentRating(page, 2.5)
End Sub

That is all! :)

Changes for versions of ABMaterial before 3.75

1. Save the CSS string into a text file (e.g. star.rating.css) and copy it to the /css/custom folder.
2. Remove the CSS param from ABMComp.Initialize(“ABMComp”, Me, InternalPage, ID, CSS)

ABMComp.Initialize("ABMComp", Me, InternalPage, ID) '<-- CSS param deleted

3. In Sub ABMComp_Build(InternalPage As ABMPage, internalID As String) As String remove the InteranlPage param:

Sub ABMComp_Build(internalID As String) As String

4. In Page_Build(), load the css file you created:

page.AddExtraCSSFile("custom/star.rating.css")

Alwaysbusy

Click here to Donation and support ABMaterial

B4J: creating a reCAPTCHA component in ABMaterial

reCAPTCHA is a free service that protects your website from spam and abuse. reCAPTCHA uses an advanced risk analysis engine and adaptive CAPTCHAs to keep automated software from engaging in abusive activities on your site. It does this while letting your valid users pass through with ease.

First, we do have to register a Google API key for our WebApp here.

After registering, we receive our API key:
For this demo, I’m using the developer API key (which works with localhost) so it will show a warning that this is not the real key in red.
NOTE: this code is for ABMaterial 3.75. For earilier versions, see below what needs to be changed in the code.

Create a new class CompReCAPTCHA:

'Class module
Sub Class_Globals
   Public ABMComp As ABMCustomComponent
   Dim mAPIKey As String
End Sub

'Initializes the object. You can add parameters to this method if needed.
Public Sub Initialize(InternalPage As ABMPage, ID As String, APIKey As String)
   ABMComp.Initialize("ABMComp", Me, InternalPage, ID, "")
   mAPIKey = APIKey
End Sub
Sub ABMComp_Build(InternalPage As ABMPage, internalID As String) As String
   Return $"
<div id="${internalID}render" class="g-recaptcha" data-sitekey="${mAPIKey}"></div>
"$
End Sub
' Is useful to run some initalisation script.
Sub ABMComp_FirstRun(InternalPage As ABMPage, internalID As String)
   Dim script As String = $"grecaptcha.render(
"${internalID}render",
{"sitekey": "${mAPIKey}", "theme": "light"}
) "$
   InternalPage.ws.Eval(script, Array As Object(ABMComp.ID))
   ' flush not needed, it's done in the refresh method in the lib
End Sub

public Sub Reset(InternalPage As ABMPage)
   Dim script As String = $"grecaptcha.reset()"$
   InternalPage.ws.Eval(script, Null)
   InternalPage.ws.Flush
End Sub

public Sub CheckValidation(InternalPage As ABMPage) As Boolean
   Dim script As String = $"return (grecaptcha && grecaptcha.getResponse().length !== 0);"$
   Dim ret As Future = InternalPage.ws.EvalWithResult(script, Null)
   InternalPage.ws.Flush

   Return ret.Value
End Sub
' runs when a refresh is called
Sub ABMComp_Refresh(InternalPage As ABMPage, internalID As String)
   Dim script As String = $""$
   InternalPage.ws.Eval(script, Array As Object(ABMComp.ID))
End Sub
' do the stuff needed when the object is removed
Sub ABMComp_CleanUp(InternalPage As ABMPage, internalID As String)
End Sub

In BuildPage(), add the Google api:

page.AddExtraJavaScriptFile("<a class="linkification-ext" title="Linkification: https://www.google.com/recaptcha/api.js" href="https://www.google.com/recaptcha/api.js">https://www.google.com/recaptcha/api.js</a>")

In Class_Globals make a variable:

Dim myReCAPTCHA As CompReCAPTCHA

In ConnectPage create the component (and a couple of buttons):

...
' note that this is Googles demo API key.  Use your own!
myReCAPTCHA.Initialize(page, "myReCAPTCHA", "6LeIxAcTAAAAAJcZVRqyHh71UMIEGNQ_MXjiZKhI")
page.Cell(1,1).AddComponent(myReCAPTCHA.ABMComp)

Dim btn As ABMButton
btn.InitializeFlat(page, "btn", "", "", "Submit", "")
page.Cell(1,1).AddComponent(btn)

Dim btn2 As ABMButton
btn2.InitializeFlat(page, "btn2", "", "", "Reset", "")
page.Cell(1,1).AddComponent(btn2)

' refresh the page
page.Refresh
...

The code in the buttons to check its validation and to reset the captcha.

Sub btn_Clicked(Target As String)
   Dim bool As Boolean = myReCAPTCHA.CheckValidation(page)
   Log(bool)
End Sub

Sub btn2_Clicked(Target As String)
   myReCAPTCHA.Reset(page)
End Sub

Et voila, we do have a new reCAPTCHA component at our disposal in ABMaterial!

For ABMaterial pre 3.75, make these changes in the code:

Public Sub Initialize(InternalPage As ABMPage, ID As String, APIKey As String)
   ABMComp.Initialize("ABMComp", Me, InternalPage, ID) ' last param removed
   mAPIKey = APIKey
End Sub
...
Sub ABMComp_Build( internalID As String) As String ' InternalPage param removed
   Return $"
<div id="${internalID}render" class="g-recaptcha" data-sitekey="${mAPIKey}"></div>
"$
End Sub

Until next Time!

Alwaysbusy

Click here to Donation and support ABMaterial

B4J: Printing/Reporting with upcoming ABMaterial 3.75

2
A sneak peek on a new feature of ABMaterial for B4J I’m working on: Printing/Reporting.

This is an example of a report in ABMaterial. You build it right into your other pages and just by setting a couple of parameters, you control what will be shown on screen and what will be printed.

1
The block your see above ‘INVOICE’ will not be printed, just my setting lbl.IsPrintable = false.  What is shown on screen you control by using the normal ABM.VISIBLE_ constants. For example there are some additional notes with a chart that you can’t see here on screen, but will be printed.

You can use almost every ABM component in your report. Good examples are the ABMChart, the ABMChronologyList or even like in this example you can let your client sign the document using an ABMSignaturePad and print it right out.

The ABM components avoid being split over two pages (e.g. an image will be printed on the next page if it does not fit). Browsers let you control very little on how things are printed, but I’ve added some things like ReportFooter.row(3).PrintPageBreak = ABM.PRINT_PAGEBREAK_BEFORE_ALWAYS to give you some control.

Note that the navigation bar is not printed either. All of this is taken care for you automatically by ABMaterial!

3
Some example pdf prints from the demo app (without making any modification to the source code!). Try printing the same pages with ABMaterial 3.50 or before and you’ll see the difference.

http://gorgeousapps.com/PrintExamples.zip

Making the above ‘invoice report’ is really simple and in the spirit of ABMaterial. I’ve created a new component ABMReport (and ABMReportBlock) which you can use just like you would make an ABMCustomComponent.

Relevant source code snippet of the above report (the Build event is where the magic happens, the rest are more helper methods):

Sub Class_Globals
   Dim ABM As ABMaterial
   Dim Report As ABMReport

   ' some CSS to format the 'body' of the report
   Dim ReportCSS As String = $"
   .repheader, .repfooter, .repheaderright, .repfooterright {
     background-color: lightgray;
     font-size: 1.8rem;
   }
   .repheaderright, .repbodyright, .repfooterright {
     text-align: right;
   }
   .repbody, .repbodyright {
     font-size: 1.5rem;
   }

   @media only print {
     html { font-size: 60%}
   }"$

   Dim mSQL As SQL 'ignore
   Dim mInvoiceID As Int 'ignore
End Sub

Public Sub Initialize(InternalPage As ABMPage, ID As String)
   Report.Initialize("Report", Me, InternalPage, ID, ReportCSS, "")
End Sub

Sub Report_Build(InternalPage As ABMPage, internalID As String)
   ' the report header
   Dim ReportHeader As ABMContainer = Report.Header.InitializeAsContainer(InternalPage, "reportheader", "", ABM.PRINT_PAGEBREAK_INSIDE_AVOID)
   ReportHeader.AddRows(1,False, "border").AddCells12(1,"")
   ReportHeader.AddRows(1,False, "").AddCellsOS(1,0,0,0,9,9,9,"").AddCellsOSMP(1,0,0,0,3,3,3,20,0,0,0,"right")
   ReportHeader.AddRows(1,False, "").AddCellsOS(1,0,0,0,7,7,7,"").AddCellsOS(1,0,0,0,5,5,5,"")
   ReportHeader.BuildGrid

   ReportHeader.CellR(0,1).AddComponent(BuildLabel(InternalPage, "repTitle", "{B}I N V O I C E{/B}", ABM.SIZE_H4, "center", True, ABM.VISIBILITY_ALL))
   ReportHeader.CellR(1,1).AddComponent(BuildLabel(InternalPage, "repAddress", "Jonathan Neal{BR}{BR}101 E. Chapman Ave{BR}Orange, CA 92866{BR}{BR}(800) 555-1234",ABM.SIZE_H5, "", True, ABM.VISIBILITY_ALL))
   ReportHeader.CellR(0,2).AddComponent(BuildImage(InternalPage, "repImg", "../images/logo2.png", True, ABM.VISIBILITY_ALL))
   ReportHeader.CellR(1,1).AddComponent(BuildLabel(InternalPage, "repCompany", "{B}Some Company{/B}{BR}{B}c/o Some Guy{/B}", ABM.SIZE_H4, "", True, ABM.VISIBILITY_ALL))
   ReportHeader.CellR(0,2).AddComponent(Build3Block(InternalPage, "repInvoiceData", "{B}Invoice #{/B}", "101138", "{B}Date{/B}", "Januari 1, 2017","{B}Amount Due{/B}","$ 600.00", True, ABM.VISIBILITY_ALL)   )

   ' the report body
   Dim Body As ABMReport
   Body.Initialize("Body", Me, InternalPage, internalID & "body", "", ABM.PRINT_PAGEBREAK_INSIDE_AVOID)
   ' header of the body
   Body.Header.InitializeAsTexts(Array As String("Year(s) Overview", "Q1", "Q2", "Q3", "Q4"), Array As Int(40,15,15,15,15), Array As String("repheader","repheaderright","repheaderright","repheaderright","repheaderright"), "")

   ' detail lines: here you can e.g. run queries but for demo purposes let's do everything manual
   Dim sums(5) As Int
   For i = 1 To 9
     ' change the class of the last column on the second row
     Dim ColorClass As String = "repbodyright"
     If i = 2 Then
       ColorClass = "repbodyright red-text"
     End If

     ' create a text block
     Dim block As ABMReportBlock
     block.InitializeAsTexts(Array As String("Year 200" & i, 200*i, 300*i, 400*i, 500*i), Array As Int(40,15,15,15,15), Array As String("repbody","repbodyright",ColorClass, "repbodyright","repbodyright"), "")
     Body.AddBodyBlock(block)

     ' dirty way to make the sums
     For k = 1 To 4
       sums(k) = sums(k) + (20 + (k-1)*100) * i
     Next
   Next

   ' footer of the body
   Body.Footer.InitializeAsTexts(Array As String("{NBSP}", sums(1) , sums(2), "{B}" & sums(3) & "{/B}", sums(4)), Array As Int(40,15,15,15, 15), Array As String("repfooter", "repfooterright","repfooterright","repfooterright","repfooterright"), "")
   ' add the subreport 'body' to the body of the main report
   Report.AddBodySubReport(Body)

   ' the report footer
   Dim ReportFooter As ABMContainer = Report.Footer.InitializeAsContainer(InternalPage, "reportfooter", "", "")

   ReportFooter.AddRows(1,False, "").AddCells12(1,"")
   ReportFooter.AddRows(1,False, "").AddCellsOS(1,0,0,0,2,2,2,"").AddCellsOSMP(1,0,0,0,5,5,5,0,0,10,40,"").AddCellsOS(1,0,0,0,5,5,5,"")
   ReportFooter.AddRows(1,False, "").AddCells12(1,"")
   ReportFooter.AddRows(1,False, "").AddCells12(1,"")
   ReportFooter.AddRows(1,False, "").AddCellsOSMP(1,4,4,4,4,4,4,0,0,0,0,"")
   ReportFooter.AddRows(2,False, "").AddCells12(1,"")
   ReportFooter.BuildGrid

   ReportFooter.CellR(1,1).AddComponent(BuildLabel(InternalPage, "RepSignatureLbl", "Please sign this document", ABM.SIZE_H5, "", True, ABM.VISIBILITY_ALL))
   ReportFooter.CellR(0,2).AddComponent(BuildSignature(InternalPage, "repSignature", True, ABM.VISIBILITY_ALL))
   ReportFooter.CellR(0,3).AddComponent(Build3Block(InternalPage, "repTotalData", "{B}Total{/B}","$ 600.00","{B}Amount Paid{/B}","$ 0.00","{B}Balance Due{/B}","$ 600.00", True, ABM.VISIBILITY_ALL))

   ' avoid row 2 to be broken (can give weird results, depends on browser support!)
   ReportFooter.row(2).PrintPageBreak = ABM.PRINT_PAGEBREAK_INSIDE_AVOID

   ' alaways break before printing row 3
   ReportFooter.row(3).PrintPageBreak = ABM.PRINT_PAGEBREAK_BEFORE_ALWAYS

   ' all the rest is only visible on the print, not on the screen
   ReportFooter.CellR(1,1).AddComponent(BuildLabel(InternalPage, "AdditionalNotes", "{B}A D D I T I O N A L {NBSP}  N O T E S{/B}", ABM.SIZE_H4, "center", True, ABM.VISIBILITY_HIDE_ALL))
   ReportFooter.CellR(0,1).AddComponent(BuildDivider(InternalPage, "divider", True, ABM.VISIBILITY_HIDE_ALL))
   ReportFooter.CellR(0,1).AddComponent(BuildLabel(InternalPage, "note1", "Note 1: A finance charge of 1.5% will be made on unpaid balances after 30 days.", ABM.SIZE_H6, "", True, ABM.VISIBILITY_HIDE_ALL))
   ReportFooter.CellR(1,1).AddComponent(BuildLabel(InternalPage, "note2", "Note 2: Your current purchase chart.", ABM.SIZE_H6, "", True, ABM.VISIBILITY_HIDE_ALL))

   ' create a pie chart
   Dim chart5 As ABMChart
   chart5.Initialize(InternalPage, "chart5", ABM.CHART_TYPEPIE, ABM.CHART_RATIO_SQUARE, "chart5theme")
   chart5.Visibility = ABM.VISIBILITY_HIDE_ALL
   ' Something special, Label interpolation.  the value will transformed into a percentage format (This is Javascript!)
   Dim SumValues As Int = 30+50+70+80+100+140+170
   chart5.OptionsPie.LabelInterpolation = "Math.round(value / " & SumValues  & " * 100) + '%'"
   ' add ONE serie
   Dim Serie5A As ABMChartSerie
   Serie5A.InitializeForPie
   Serie5A.SetValues(Array As Int(30,50,70,80,100,140,170))
   chart5.AddSerie(Serie5A)
   ' add the chart to the cell
   ReportFooter.CellR(1,1).AddComponent(chart5)
End Sub

' Helper Methods
Sub BuildLabel(internalPage As ABMPage, ID As String, Text As String, Size As String, theme As String, isPrintable As Boolean, Visibility As String) As ABMLabel
   Dim tmpLbl As ABMLabel
   tmpLbl.Initialize(internalPage, ID, Text, Size, False, theme)
   tmpLbl.IsPrintable = isPrintable
   tmpLbl.Visibility = Visibility
   Return tmpLbl
End Sub
...

It will never be able to print everything of course (e.g. scrolling components), but I’m pretty happy with the things it will be able to do.  Browser support for report printing is still in its infancy I’m afraid and it will take some time before all browsers are lined up supporting all HTML printing features.

But, together with the new ABMreport component, you will already be able to create reports with very little effort using ABMaterial and B4J!

ABMaterial 3.75 will be available for donators in a couple of weeks.

Alwaysbusy

Click here to Donation and support ABMaterial

B4J: ABMaterial 3.20 Public/3.50 Donators Released!

ABMB4JABMaterial 3.50 for B4J introduces Drag & Drop of ABMContainers between Cells! This new feature took a couple of weeks to implement, but I’m proud of the result.
It opens up a whole new range of possibilities for Web Apps.

Not many bug fixing needed in this release. Proves ABMaterial is really stable and truly production ready! (Happy face)

ABMGoogleMap also adds the possibility to use marker clusters, which cleans up your google map if you have many markers in one map.

GM2

Head to the ABMaterial section on this blog to get your free copy of 3.20, or make a small donation to support the development and get the latest 3.50 version + 9 extra libraries and tools to use in your own projects!

Have a great summer!

Alwaysbusy

Click here to Donation and support ABMaterial


B4A + B4J: Profile your apps ‘live’ with ABMonitor

ABMonitor2

It has been some time since I could give my donators a new goodie;), and this time it is a library/tool to profile and monitor your B4J + B4A (7.01+) apps (not limited to ABMaterial WebApps!) I’ve been needing something like this for some time for my own projects, but couldn’t find one that suited me.  This can be a very good asset to find Memory Leaks or to track which method takes up to much time.

Using a very simple API, you can track how long the code execution time is, the times hit, average time, memory usage etc for any block of code you want to investigate.  I deliberately gave you this API freedom, as profiling ALL your code (as most programming languages do) is just drowning you in to much information so you don’t see the wood for the trees anymore.

QUICK NOTE: Do not forget to set your DONATORKEY and the port in the Viewer params.txt . The same port and the IP of your Viewer have to be used in the apps you are monitoring!

How it works:
ABMonitor uses the Jamon library, which has a extremely low overhead on your code. Just by disabling it (using the SetActive method), you can actually leave it in your production apps if you want (or use B4Js conditional compiling if you want to get rid of it all together in a production app).

ABMonitor consists of two main parts:
1. The ‘live’ ABMonitor Viewer.

Instructions: Simply start the Viewer in a command prompt using: java -jar ABMonitor.jar

This Viewer shows all the stuff you are monitoring with the API. It shows e.g. how many times some part of your code was hit, how long it took, what the average time was, when it was last accessed, memory consumption etc… It is presented in a TreeView Table, so you can check every detail (depending on how deep you’ve coded your profiling).  At the bottom, the last 50 runs are presented in some line charts.

Because the IDE of B4X is ‘live’, so is the Viewer! Thanks to this unique feature of the B4X products, you can update your code and see the results in the Viewer immediately.

Little side note: This ‘live’ IDE part is a little-known/promoted feature (except within the B4X community of course, as for us this is normal), but it has a HUGE advantage over any other tool out there.  In similar market aimed tools, like Xojo for example, you have to compile and re-compile every single time you make the smallest of changes to your code (on bigger projects it takes up to 20 minutes, some users reported). In B4X, just change the code, and continue running.  Not happy with it? Change it again and see what gives. BIG production time-saver! Some of you who used to program in VB6 know what I mean…

2. The ABMonitorB4X libraries (ABMonitorB4A.jar/ABMonitorB4J.jar).

Install instructions: Copy the xml and jars (dont’t forget jamon-2.81.jar), to your B4A or B4J libraries folder. In the IDE select the ABMonitorB4X library, the RandomAccessFile library and the Network library.

This API connects your own apps with the monitor. It basically consists of a Start and a Stop method.

First, we have to make the connection with the Viewer. Thanks to Erels new Resumable Subs, doing this is a breeze:

In Main make some declarations:

Sub Process_Globals
   Public Monitor As ABMonitor

   Private port As Int = 10090 ' &amp;lt;-- Set your Viewers Port!
   Private ip As String = "127.0.0.1" ' &amp;lt;-- Set your Viewers IP!
   Private abmonitor As AsyncStreams
   Private client As Socket

   ' Useful to quickly activate/deactivate the monitoring
   Public TRACKMONITOR As Boolean = True
End Sub

Next add the following resumable sub:

Sub ConnectMonitor()
   Dim c As Socket
   c.Initialize("client")
   c.Connect(ip, port, 5000)
   Wait For Client_Connected (Successful As Boolean)
   If Successful Then
     client = c
     abmonitor.InitializePrefix(client.InputStream, False, client.OutputStream, "abmonitor")
     Log("ABMonitor connected")
     Monitor.SetActive("Template", True,abmonitor, 5)
   Else
     Log("ABMonitor disconnected")
   End If
End Sub

Sub abmonitor_Error
   Monitor.SetActive("Template", False,Null, 0)
   Log("ABMonitor disconnected")
End Sub

You can set the interval the data should be send to the Viewer, in seconds, with the last parameter in ‘Monitor.SetActive(“Template”, True,abmonitor, 5)’.  In this example, it is every 5 seconds.  Note: This does not mean it is tracked every 5 seconds! The library will continue tracking everything, but it will only send all the info over to the Viewer every 5 seconds.

Finally, Initialize the monitor and call the resumable sub when your app starts (a good place is e.g. before StartMessageLoop in a Server app):

...
Monitor.Initialize("YOURDONATORKEY")

ConnectMonitor

StartMessageLoop

Ready to do some monitoring!

As I said, there are basically only two commands: Start and Stop.

There are two ways to monitor/profile your code (you can mix the use of them):

a. Monitor some code:
You want to monitor a query, or a whole sub, … In general this is a complete block of code.

Good practice is using the class/module name as the Group parameter, and the method name as the Label, but you can put whatever you want. This will later be used in the Viewer to group stuff. (Group and Label are the first and second parameters in the calls).

Example:

Private Sub WebSocket_Connected (WebSocket1 As WebSocket)
   If Main.TRACKMONITOR Then Main.Monitor.Start("ABMPageTemplate", "WebSocket_Connected", "")

   '   ... the code you want to monitor

   If Main.TRACKMONITOR Then Main.Monitor.Stop("ABMPageTemplate", "WebSocket_Connected", "")
End Sub

Or tracking a query:

..
If Main.TRACKMONITOR Then Main.Monitor.Start("ABMPageTemplate", "MySlowQuery", "")

Dim SQL_str As String
SQL_str = "SELECT cases.CaseID, cases.CaseUserID, cases.CaseType, cases.CaseSummary FROM tCases WHERE cases.CaseStatus=1;"
Dim cases As List = DBM.SQLSelect(SQL, SQL_str, Null)

If Main.TRACKMONITOR Then Main.Monitor.Stop("ABMPageTemplate", "MySlowQuery", "")
...

b. Monitor methods which are used in multiple places, and you want to know where it was called.
You have for example a page.Refresh method, which is called in multiple places. You can use the third parameter to set the ‘caller’. In general there will only be one line of code between the start() and stop().

This caller will later be used in the Viewer to build a call tree (or stack trace)

Example:

Private Sub WebSocket_Connected (WebSocket1 As WebSocket)
     ...
     If Main.TRACKMONITOR Then Main.Monitor.Start("ABMPageTemplate", "page.Refresh", "WebSocket_Connected")
     page.Refresh
     If Main.TRACKMONITOR Then Main.Monitor.Stop("ABMPageTemplate", "page.Refresh", "WebSocket_Connected")
     ...
End Sub

public Sub ConnectPage()
   ...
   ' refresh the page
   If Main.TRACKMONITOR Then Main.Monitor.Start("ABMPageTemplate", "page.Refresh", "ConnectPage")
   page.Refresh
   If Main.TRACKMONITOR Then Main.Monitor.Stop("ABMPageTemplate", "page.Refresh", "ConnectPage")
   ...
End Sub

As you can see, you are totally free to monitor anything you want.

Call for action: if anyone out there is a guru in making B4i libraries, please PM me!  The java library code is quite simple and it shouldn’t be to hard for an experienced B4i library coder to write one which can connect to the same Viewer.  If we got this one too, then we’ve covered all major platforms in B4X!

ABMonitor is part of a multi-pack on libraries, frameworks and tools all Donators to this blog receive.

Included are currently:

ABMaterial (B4J) A very powerful framework combining a tuned Materialize CSS with the free programming tool B4J. It allows creating Web Apps that not only look great thanks to Googles Material Design, but can be programmed with the powerful free tool from Anywhere Software without having to write a single line of HTML, CSS or Javascript code!

ABExchange (B4J) It can be used to sync the ABMCalendar control with your exchange server and outlook. It can also send a mail.

ABJasperReports (B4J) his is a little library that allows you to export reports created in Jasper Reports in your B4J applications. They can be exported to pdf, html and xls. You can use parameters defined in JasperReports.

ABPDFBox (B4J) With this library you can print PDF files (either by showing a dialogbox or directly to a specified printer). Works in UI and NON-UI apps.

ABMonitor (B4J + B4A) Tool to monitor/profile your B4A (7.01+) and B4J code! Includes the libraries for both platform + the ABMonitor Viewer. See the tutorial for more info.

ABCron (B4J + B4A) A more advanced timer library that can schedule more intelligently tasks using Cron expressions. You can also set a start and end datetime. I’ve added a method RestartApplicationNONUI() that should restart you .jar file when the Cron expression is met.

ABEvaluator (B4J + B4A) Evaluate mathematical expressions. You can also write your own functions in B4J/B4A.

ABPlugin (B4J) Create Live plugins for you own apps. This means you can create plugins that can be added/removed while your app is running. Note it is a little experiment that shows the power of B4J. The ‘compile to library’ feature of B4J is very handy to create plugins.

ABZXCVBN (B4J + B4A) Realistic password strength estimation.

ABTreeTableView (B4J) Custom B4J component which combines a TreeView with a TableView.

Until next time!

Alwaysbusy

Click here to Donation and support ABMaterial

B4J: New in ABMaterial 3.50: Drag and Drop about anything

ABMDragDrop

It may have been a bit silent the last few weeks around ABMaterial, but behind the scenes I have been working nights and weekends on maybe the biggest new feature since Chipmunk was introduced: Drag & Drop!

In 3.50, it will be possible to drag ABMContainers (and hence about anything in it) from one cell to another.

Let’s watch a video demonstration first:

Pretty cool hè!

How it works in B4J:
I explain the basics here, the DragDrop demo project included in the ABMaterial 3.50 download will show all tricks shown in the demo video.

1. Page_ParseEvent() gets a little bit of extra code to sync the moves made in the browser with our server

...
If SubExists(Me, eventName) Then
     Params.Remove("eventname")
     Params.Remove("eventparams")
     ' BEGIN NEW DRAGDROP
     If eventName = "page_dropped" Then
       page.ProcessDroppedEvent(Params)
     End If
     ' END NEW DRAGDROP
     Select Case Params.Size
     ...

2. Next we define a ‘DRAG’ group:

' name, minimum height of a cell
page.DragDropCreateGroup("DRAG", 150)

3. We add cells to this ‘DRAG’ group we want to drag & drop between. The last ‘null’ parameter can be any ABMComponent you want to use a title of the cell (e.g. the COLUMN X ABMLabel in the demo).

page.DragDropAddZone("DRAG", "DRAGCELL1", page.Cell(3,1),null)
page.DragDropAddZone("DRAG", "DRAGCELL2", page.Cell(3,2),null)
page.DragDropAddZone("DRAG", "DRAGCELL3", page.Cell(3,3),null)

4. We add our draggable ABMContainers to the cells. Note: they MUST be added with AddArrayComponent!

Here we also enable them to be draggable with cont.EnableDragDropZone().  There is also a shortcut method to enable/disable all ‘Zones/Cells’ in a group with cont.EnableDragDropAllZonesFromGroup() in one go.

page.Cell(3,1).AddArrayComponent(CreateCard("1", True, True, True, "I may be dragged everywhere", "../images/list1.jpg"), "Cards")
...

Sub CreateCard(ID As String, AllowInCell1 As Boolean, AllowInCell2 As Boolean, AllowInCell3 As Boolean, Title As String, image As String) As ABMContainer
  Dim cont As ABMContainer
  cont.Initialize(page, ID, "")
  cont.AddRows(1,True,"").AddCells12(1, "")
  cont.BuildGrid

  cont.IsTextSelectable = False

  If AllowInCell1 Then
    ' can be dragged to zone 1 of 'DRAG'
    cont.EnableDragDropZone("DRAG","DRAGCELL1",True)
  End If
  If AllowInCell2 Then
    ' can be dragged to zone 2 of 'DRAG'
    cont.EnableDragDropZone("DRAG","DRAGCELL2",True)
  End If
  If AllowInCell3 Then
    ' can be dragged to zone 3 of 'DRAG'
    cont.EnableDragDropZone("DRAG","DRAGCELL3",True)
  End If
  cont.EnableDragDropZone("DRAG","DRAGCELL4",True) ' for the sidebar

  Dim card As ABMCard
  card.InitializeAsCard(page, "card", "MY CARD", Title, ABM.CARD_SMALL, "")
  card.Image = image
  card.AddAction("Press me")

  ' add the card to the page
  cont.Cell(1,1).AddComponent(card)
  Return cont
End Sub

5. There are three events you will receive (all on Page level):

Sub Page_DragStart(component As String, source As String)
  Log("Drag start: " & component)
End Sub

Sub Page_DragCancelled(component As String, source As String)
  Log("Drag cancelled: " & component)
End Sub

' there are four parameters: component, source , target, before
Sub Page_Dropped(Params As Map)
  Log("Dropped: " & Params.Get("component"))
End Sub

And this is basically it! Very simple without having to write any HTML, CSS, PHP or Javascript. All done in pure B4J!

I’m finishing up ABMaterial 3.50, ABMonitor (an upcoming article on this for B4J and B4A soon on the blog) and ABTreeTableView now and early next week I think I may be able to release it to the donators.

Cheers,

Alwaysbusy

Click here to Donation and support ABMaterial

B4X: ABMaterial 3.03 Public/3.20 Donators released

A lot of internal changes were made in the ABMaterial 3.20 ‘Chipmunk’ release.  For example, ABMContainer has been rewritten from the ground-up, but with minimal impact to your existing projects.  It allows adding them as array components, and has much shorter ID tags in the generated HTML.

Mindful and Stanmiller had another go on the cache issues.  They came up with a very nice solution (I had tears in my eyes) and both have done extensive testing on this subject. A big thanks again!  ABM 3.20 is backwards compatible with the previous 3.0.3 Cache System, but I would advice you to make the changes whenever you have the chance.

A nice new feature for mobile devices is the New Debug feature using a modified version of Conzole!

New Debug at work:

Using this new feature is very simple in B4J:

First, you have to enable the console in BuildPage():

' params are: open on load, width
page.DebugConsoleEnable(True, 300)

Two methods can be used to show or hide the console programmaticaly. Can be handy as a buid-in tool in your apps where the user enters a code on his device and you can then check the console.

page.DebugConsoleShow
page.DebugConsoleHide

Now you can start doing some cool stuff 🙂 Some examples:

Show some text, or a server value (note: strings must be between single quotes!)

page.DebugConsoleLog("'Server click at: " & DateTime.Time(DateTime.Now) & "'") ' shows the text

Now I generated an error on purpose, so the demo can show it catches the error:

page.DebugConsoleLog("'value: ' + $('#pi002-r2c1').html();") ' generates an error, the ; at the end is wrong

Same code, but with the correct javascript syntax, showing the html() value of the tag:

page.DebugConsoleLog("'value: ' + $('#pi002-r2c1').html()") ' generates the html value of the pi002-r2c1 tag

It works also on the desktop, although you probably will use the Chrome console as you can do more.

But there is more. You can also redirect all browser console message directly into the B4J log window!  You can use the following commands anywhere in your own code to start/stop receiving the browser console messages.

page.DebugConsoleB4JStart
page.DebugConsoleB4JStop

This is a very powerful feature if you develop Webapps for mobile devices.  It can be done otherwise, but it is a pain in the a$$ to set it up. Now, you can easily debug it on your iPhone, iPad, Android or any other device.

ABMaterial 3.20 has over 20 new features and bug fixes.  Following the same philosophy as B4X, the quick release cycle has proven to work very well for ABMaterial and its many users.  Donators will receive their download mail shortly.  The public version 3.03 can be downloaded from this blog too.

I’m also glad that with these releases, now everyone can work with ‘Chipmunk‘, and this does also mean the development cycle for ‘Butterfly‘  has ended.

I would like to take this opportunity to thank everyone for the support, hourless testing and inventive ideas you came up with in the last few years. You’ve made ABMaterial one hell of a WebApp Development Tool!

ThankYou

But we are not at the end! Far from it as I already have big ideas for the next releases.

Until then, happy programming!

Alwaysbusy

Click here to Donation and support ABMaterial

B4J: ABMaterial Facebook-like timeline in less than 200 lines!

ABMFacebook50

I recently had a question if it was possible to create a Facebook-like WebApp with ABMaterial for B4J. I had some time to spare tonight (yeah right):rolleyes: and decided to give it a go…

All I needed were a couple of ABMContainers and the new CloseContent/OpenContent feature introduced in 3.02. The existing NextContent system would provide the infinite page.

It also uses a ABMCustomComponent for the ‘Like’ feature (I based it on this project), and you can find the source code of the class under the video:

About an hour, and 200 lines of B4J code later, I had a working timeline!  A real project would of course need some way to add an article, save them in the database, user management, etc but this is out of scope of this article.

Note: This example will be included in the upcoming 3.02 Maintenance Update, but I would like to share the source source code for the ‘Like’ functionality beforehand.

Source code for the ‘Like’ custom component.
You’ll need this zip file for the images and js/css files. Put the images and css in the /www/css/custom folder, the js file in the /www/js/custom/ folder.

The class LikeComponent:

'Class module
Sub Class_Globals
   Public ABMComp As ABMCustomComponent
   Public Counter As Int
End Sub

'Initializes the object. Countries and data are Json Strings
Public Sub Initialize(InternalPage As ABMPage, ID As String, AlreadyLiked As Int)
   ABMComp.Initialize("ABMComp", Me, InternalPage, ID)
   Counter = AlreadyLiked
End Sub

Sub ABMComp_Build(internalID As String) As String
   Return $"
<div id="${internalID} class="facebook-reaction"><!-- container div for reaction system -->
        <span class="like-btn"> <!-- Default like button -->
          <span class="like-btn-emo like-btn-default"></span> <!-- Default like button emotion-->
           <span class="like-btn-text">Like</span> <!-- Default like button text,(Like, wow, sad..) default:Like  -->
<ul class="reactions-box"> <!-- Reaction buttons container-->
	<li class="reaction reaction-like" data-reaction="Like"></li>
	<li class="reaction reaction-love" data-reaction="Love"></li>
	<li class="reaction reaction-haha" data-reaction="HaHa"></li>
	<li class="reaction reaction-wow" data-reaction="Wow"></li>
	<li class="reaction reaction-sad" data-reaction="Sad"></li>
	<li class="reaction reaction-angry" data-reaction="Angry"></li>
</ul>
</span>
<div class="like-stat"> <!-- Like statistic container-->
           <span class="like-emo"> <!-- like emotions container -->
             <span class="like-btn-like"></span> <!-- given emotions like, wow, sad (default:Like) -->
           </span>
           <span class="like-details">${Counter} others</span></div>
</div>
"$
End Sub

Sub ABMComp_FirstRun(InternalPage As ABMPage, internalID As String)
   Dim script As String = $"$("#${internalID} .reaction").on("click",function(){  // like click
     var data_reaction = $(this).attr("data-reaction");
     $("#${internalID} .like-details").html("You and ${Counter} others");
     $("#${internalID} .like-btn-emo").removeClass().addClass('like-btn-emo').addClass('like-btn-'+data_reaction.toLowerCase());
     $("#${internalID} .like-btn-text").text(data_reaction).removeClass().addClass('like-btn-text').addClass('like-btn-text-'+data_reaction.toLowerCase()).addClass("active");;

     if(data_reaction == "Like") {
         $("#${internalID} .like-emo").html('<span class="like-btn-like"></span>');
     } else {
         $("#${internalID} .like-emo").html('<span class="like-btn-like"></span><span class="like-btn-'+data_reaction.toLowerCase()+'"></span>');
     }
     var json = {'target': '${internalID}', 'like': data_reaction};
     b4j_raiseEvent('likecomponent_liked', json);
     });    

     $("#${internalID} .like-btn-text").on("click",function(){ // undo like click
     if($(this).hasClass("active")){
       $("#${internalID} .like-btn-text").text("Like").removeClass().addClass('like-btn-text');
       $("#${internalID} .like-btn-emo").removeClass().addClass('like-btn-emo').addClass("like-btn-default");
       $("#${internalID} .like-emo").html('<span class="like-btn-like"></span>');
       $("#${internalID} .like-details").html("${Counter} others");
       var json = {'target':'${internalID}'};
         b4j_raiseEvent('likecomponent_unliked', json);
       }
     })"$

   InternalPage.ws.Eval(script, Array As Object(ABMComp.ID))
   ' flush not needed, it's done in the refresh method in the lib
End Sub

Sub ABMComp_Refresh(InternalPage As ABMPage, internalID As String)

End Sub

' do the stuff needed when the object is removed
Sub ABMComp_CleanUp(InternalPage As ABMPage, internalID As String)

End Sub

Usage:

Sub Class_Globals
   ...
   Dim myLike As LikeComponent
   ...
End Sub

' adding the component
myLike.initialize(page, ID & "Like", Rnd(20, 500))
myContainer.Cell(4,1).AddComponent(myLike.ABMComp)

Events (the name LikeComponent is set in the FirstRun() method of the class:

public Sub LikeComponent_Liked(value As Map)
   Log(value.Get("like") & " ----> " & value.Get("target"))
End Sub

public Sub LikeComponent_UnLiked(value As Map)
   Log("Unliked ----> " & value.Get("target"))
End Sub

Et voila,  a nice little demonstration of what you can make using B4J and ABMaterial.

I’ll end with a little word of advice:

If you only plan to learn one programming language this year, B4X is definitely the one you should pick!  With ABMaterial, I give you the power to write responsive, professional WebApps, and with the other B4X tools you write native Android, iOS, Desktop (Mac, Windows, Linux), Raspberry Pi and Arduino apps.  All with the same language!  You’ll wonder why you ever bothered looking at all those other pricy programming tools out there…

Happy programming!

Alwaysbusy

Click here to Donation and get the latest ABMaterial first!

B4A: ABFlicB4A library for Flic buttons

cute-as-a-button-1

You probably have seen these nifty little IoT Flic buttons around. They are a fun and relative cheap BLE button that allows you to do something when the button is clicked, doubleclicked or hold.

I decided to write a wrapper for the Android SDK to use with B4A.

How to use:
1. Install the Flic app from the Google Play.
2. On their developer page, create a new app: you get a key and a secret.
3. Copy the ABFlicB4A library jar and xml to your library folder and select it in B4A

Here is a small video demonstrating the library.  You can the use the full power of B4A to do about, well, everything…

Example usage code:

Sub Process_Globals

End Sub

Sub Globals
   Private flic As ABFlic
   Private Button2 As Button
   Private Button3 As Button
   Private Button4 As Button
   Private Label1 As Label
   Private Button1 As Button

   Private MyFlicID As String

   Private FlicResults As List
End Sub

Sub Activity_Create(FirstTime As Boolean)
   Activity.LoadLayout("1")
   FlicResults.Initialize
   FlicResults.Add("RESULTACTION_HOLD")
   FlicResults.Add("RESULTACTION_SINGLECLICK")
   FlicResults.Add("RESULTACTION_DOUBLECLICK")
End Sub

Sub Activity_Resume
   ' your key and secret
   flic.Initialize("Flic", "d60d36a0-XXXXXXXXXXXXXXXXXXXXXXXXXXXXXXXXX", "db5c2b3d-XXXXXXXXXXXXXXXXXXXXXXXXXXXXXXXXX", "ABFlicTest")
End Sub

Sub Button1_Click
   flic.ForgetButton(MyFlicID)
End Sub

Sub Button2_Click
   flic.GrabButton
End Sub

Sub Button3_Click
   flic.StartListening
End Sub

Sub Button4_Click
   flic.StopListening
End Sub

Sub flic_Added(buttonID As String, Name As String)
   MyFlicID = buttonID
   Log("Added: " & buttonID)
   Label1.Text = "Added: " & buttonID & CRLF & Label1.Text
End Sub

Sub flic_Clicked(buttonID As String, wasQueued As Boolean, timeDiff As Int)
   MyFlicID = buttonID
   Log("Clicked: " & buttonID)
   Label1.Text = "Clicked: " & buttonID & CRLF & Label1.Text
End Sub

Sub flic_DoubleClicked(buttonID As String, wasQueued As Boolean, timeDiff As Int)
   MyFlicID = buttonID
   Log("DoubleClicked: " & buttonID)
   Label1.Text = "DoubleClicked: " & buttonID & CRLF & Label1.Text
End Sub

Sub flic_Holded(buttonID As String, wasQueued As Boolean, timeDiff As Int)
   MyFlicID = buttonID
   Log("Holded: " & buttonID)
   Label1.Text = "Holded: " & buttonID & CRLF & Label1.Text
End Sub

Sub flic_Removed(buttonID As String)
   MyFlicID = ""
   Log("Removed: " & buttonID)
   Label1.Text = "Removed: " & buttonID & CRLF & Label1.Text
End Sub

Sub flic_Error(err As Int)
   Log("Error: " & err)
   Label1.Text = "Error: " & err & CRLF & Label1.Text
End Sub

I’m currently working on a Desktop/Raspberry Pi version of this library, which I will share in the B4J forum later.

The library can be found at the B4A forum.

Happy programming!

Alwaysbusy

B4J: Msgbox and Inputbox in ABMaterial 2.51

upload_2017-2-12_12-0-6
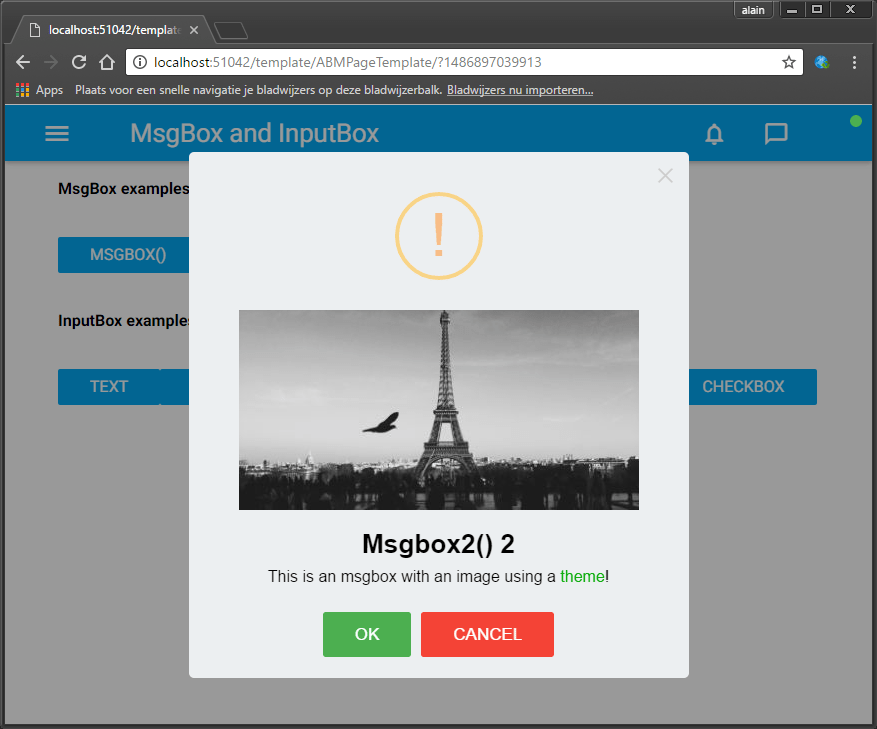
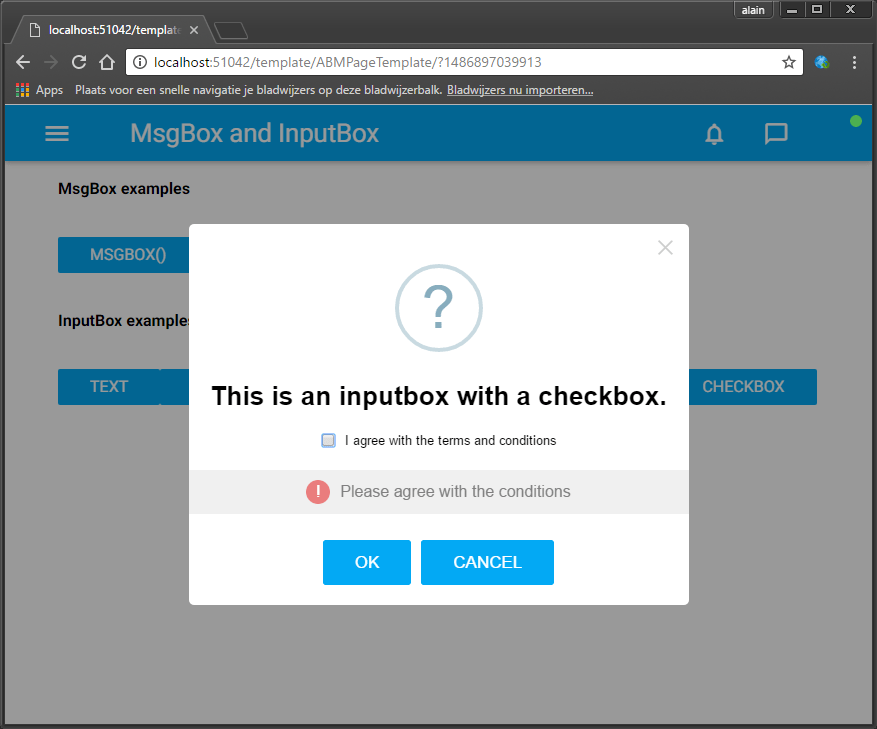
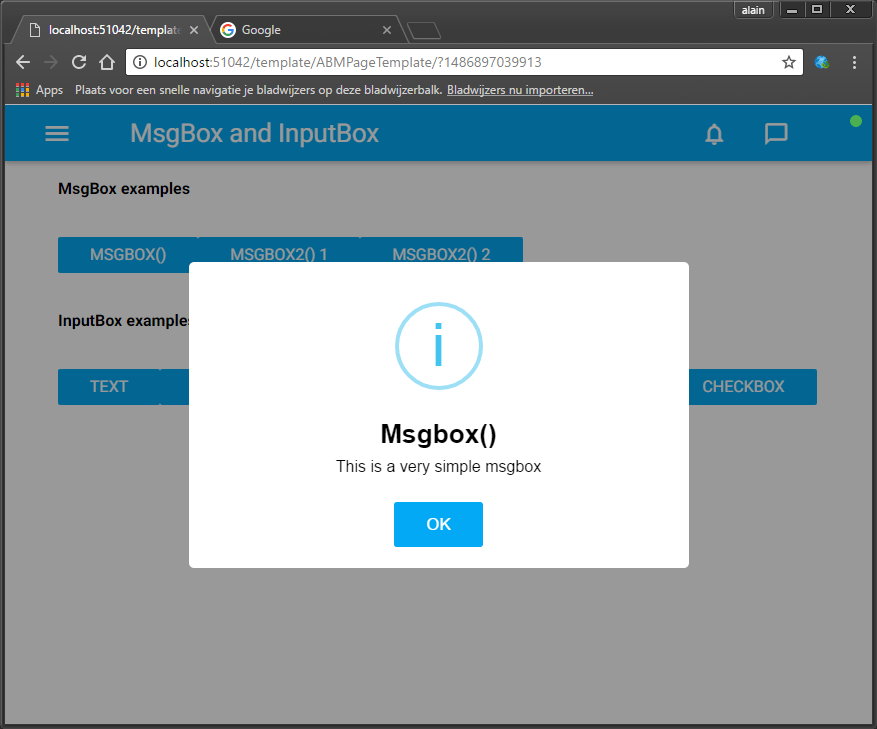
Sometimes you just need to show a quick Msgbox or a single-field Inputbox to the user. In ABMaterial for B4J you have probably, just like me, already made a couple of modal sheets to do this.

But in 2.51 I’ve integrated the possibility for such cases just to do it in one line of code (like a normal msgbox/inputbox).

It replaces the default looking ‘alert’ box from JavaScript to a more modern looking box.  The SweetAlert2 library, which is build on the orginal SweetAlert one, has been extended for ABMaterial so you can ‘Theme’ about anything you want.

For example, to show the msgbox you see on top of this article, this is the code you need to write:

page.Msgbox("MSGBOX1", "This is a very simple msgbox", "Msgbox()", "OK", "")

Some more examples:

theme.AddMsgBoxTheme("image")
theme.MsgBox("image").ConfirmButtonColor = ABM.COLOR_GREEN
theme.MsgBox("image").CancelButtonColor = ABM.COLOR_RED
theme.MsgBox("image").SetImage("https://unsplash.it/400/200", 400, 200)
theme.MsgBox("image").BackColor = ABM.COLOR_BLUEGREY
theme.MsgBox("image").BackColorIntensity = ABM.INTENSITY_LIGHTEN5

page.Msgbox2("MSGBOX3", "This is an msgbox with an image using a {C:#00AA00}theme{/C}!", "Msgbox2() 2", "OK","CANCEL",True, ABM.MSGBOX_TYPE_WARNING, "image")

upload_2017-2-12_12-2-24

page.InputBox("INPUTBOX1", "This is an inputbox for text.","OK", "CANCEL", True, ABM.INPUTBOX_TYPE_QUESTION, ABM.INPUTBOX_QUESTIONTYPE_TEXT,"","Type some text...", "", "Please enter something!", "")

upload_2017-2-12_12-3-30

page.InputBox("INPUTBOX3", "This is an inputbox for a password.","OK", "CANCEL", True, ABM.INPUTBOX_TYPE_QUESTION, ABM.INPUTBOX_QUESTIONTYPE_PASSWORD,"","Type your password...", "", "Please enter a password", "")

upload_2017-2-12_12-3-43

page.InputBox("INPUTBOX6", "This is an inputbox with a radio selection.","OK", "CANCEL", True, ABM.INPUTBOX_TYPE_QUESTION, ABM.INPUTBOX_QUESTIONTYPE_RADIO,"#00ff00", "","{'#ff0000': 'Red','#00ff00': 'Green','#0000ff': 'Blue'}", "You must select a color", "")

upload_2017-2-12_12-4-43

page.InputBox("INPUTBOX7", "This is an inputbox with a checkbox.","OK", "CANCEL", True, ABM.INPUTBOX_TYPE_QUESTION, ABM.INPUTBOX_QUESTIONTYPE_CHECKBOX,"", "I agree with the terms and conditions","", "Please agree with the conditions", "")

upload_2017-2-12_12-5-51

Events:

Sub page_MsgboxResult(returnName As String, result As String)
   myToastId = myToastId + 1
   page.ShowToast("toast" & myToastId, "toastgreen", returnName & " " & result, 5000)
End Sub

Sub page_InputboxResult(returnName As String, result As String)
   myToastId = myToastId + 1
   page.ShowToast("toast" & myToastId, "toastred", returnName & " " & result, 5000)
End Sub

ABMaterial Mainenance Release 2.51 will be available for the donators in the following days.

Alwaysbusy

Click here to Donation and get the latest ABMaterial first!

B4J: Custom component ABMGridTable (Team Project)

One of the most asked for components in ABMaterial is an editable Grid.  We already have ABMTable and ABMTableMutable, but they have their limitations when it comes to being editable. So, as this kind of object is huge, I suggest we make it a Team Effort to build one.

I did have a look around and found a nice one jsGrid which is feature rich, easy to use and fits rather well with the ABMaterial look and feel.

I already did the first part: modified the default CSS so it works with ABMaterial (checkboxes and combos did not work), created a basic class template and a sample on how to use it in a webapp.

Copy the CSS and JS files from the zip the css/custom/ and /js/custom/ folders of the ABMaterial www folder.
Start with localhost:51042/GridDemo

My current result looks like this (allows adding, deleting, changing, sorting and filtering):

upload_2017-2-6_12-34-40

Creating even such a complex component is very easy in B4J with ABMaterial.  Lets dive into some code:

The ABMTableGrid class

'Class module
Sub Class_Globals
	Public ABMComp As ABMCustomComponent
	Private cmbCountries As String
	Private DBdata As String
End Sub

'Initializes the object. Countries and data are Json Strings
Public Sub Initialize(InternalPage As ABMPage, ID As String, Countries As String, data As String)
	ABMComp.Initialize("ABMComp", Me, InternalPage, ID)
	cmbCountries = Countries
	DBdata = data
End Sub

Sub ABMComp_Build(internalID As String) As String
	Return $"
<div id="${internalID}"></div>
<script>var _${internalID};</script>"$
End Sub

Sub ABMComp_FirstRun(InternalPage As ABMPage, internalID As String)
	Dim script As String = $"_${internalID} = $("#${internalID}").jsGrid({
		height: "100%",
		width: "100%",
		filtering: true,
		inserting: true,
		editing: true,
		sorting: true,
		paging: true,
		autoload: true,
		pageSize: 10,
		pageButtonCount: 5,
		deleteConfirm: "Do you really want to delete the client?",
		controller: {
			loadData: function(filter) {
				return $.grep(${DBdata}, function(client) {
					var fName = filter.Name.toUpperCase();
					var fAddress = filter.Address.toUpperCase();
					return (!filter.Name || client.Name.toUpperCase().indexOf(fName) > -1)
						&& (!filter.Age || client.Age === filter.Age)
						&& (!filter.Address || client.Address.toUpperCase().indexOf(fAddress) > -1)
						&& (!filter.Country || client.Country === filter.Country)
						&& (filter.Married === undefined || client.Married === filter.Married);
					});
			},
			insertItem: function(insertingClient) {
				var json = JSON.stringify(insertingClient);
				b4j_raiseEvent('${ABMComp.ID}_inserted', {'value':json});
			},
			updateItem: function(updatingClient) {
				var json = JSON.stringify(updatingClient);
				b4j_raiseEvent('${ABMComp.ID}_updated', {'value':json});
			},
			deleteItem: function(deletingClient) {
				var json = JSON.stringify(deletingClient);
				b4j_raiseEvent('${ABMComp.ID}_deleted', {'value':json});
			}
		},
		fields: [
			{ name: "Name", type: "text", width: 150 },
			{ name: "Age", type: "number", width: 50 },
			{ name: "Address", type: "text", width: 200 },
			{ name: "Country", type: "select", items: ${cmbCountries}, valueField: "Id", textField: "Name" },
			{ name: "Married", type: "checkbox", title: "Is Married", sorting: false},
			{ type: "control" }
		]
	});"$

	InternalPage.ws.Eval(script, Array As Object(ABMComp.ID))
	' flush not needed, it's done in the refresh method in the lib
End Sub

public Sub SetDBData(data As String)
	DBdata = data
End Sub

Sub ABMComp_Refresh(InternalPage As ABMPage, internalID As String)
	Dim script As String = $"$("#${internalID}").jsGrid("refresh");"$
	InternalPage.ws.Eval(script, Null)
End Sub

Usage in a WebApp:

Sub Class_Globals
	...
	Dim myTableGrid As ABMTableGrid
	' fake database for demo purposes
	Dim database As Map
End Sub

' make sure you copied the files from the .zip in the right folders
public Sub BuildPage()
	...
	page.AddExtraCSSFile("custom/jsgrid.min.css")
	page.AddExtraCSSFile("custom/jsgrid-theme.min.css")
	page.AddExtraJavaScriptFile("custom/jsgrid.min.js")
	...
End Sub

public Sub ConnectPage()
	...
	' as for the demo, we fake a real database here
	LoadFakeData

	page.Cell(2,1).SetFixedHeight(500)

	' for our combo, we add a Json string counting the countries
	myTableGrid.Initialize(page, "myTableGrid", $"[
		{ Name: "", Id: 0 },
		{ Name: "United States", Id: 1 },
		{ Name: "Canada", Id: 2 },
		{ Name: "United Kingdom", Id: 3 },
		{ Name: "France", Id: 4 },
		{ Name: "Brazil", Id: 5 },
		{ Name: "China", Id: 6 },
		{ Name: "Russia", Id: 7 }
	]"$, LoadData)
    page.Cell(2,1).AddComponent(myTableGrid.ABMComp)
	...
End Sub

Sub LoadData() As String
	' we have to return a Json string
	Dim data As StringBuilder
	data.Initialize
	data.Append("[")
	For i = 0 To database.size - 1
		If i > 0 Then
			data.Append(",")
		End If
		data.Append(database.get(i))
	Next
	data.Append("]")
	Return data.ToString
End Sub

Sub myTableGrid_Inserted(value As Map)
	log(value.get("ID")
End Sub

Sub myTableGrid_Updated(value As Map)
	log(value.get("ID")
End Sub

Sub myTableGrid_Deleted(value As Map)
	log(value.get("ID")
End Sub

Sub LoadFakeData()
	database.Initialize
	database.Put(0,$"{"ID": 0,"Name": "Otto Clay","Age": 61,"Country": 6,"Address": "Ap #897-1459 Quam Avenue","Married": false}"$)
	database.Put(1,$"{"ID": 1,"Name": "Connor Johnston","Age": 73,"Country": 7,"Address": "Ap #370-4647 Dis Av.","Married": false}"$)
	...
End Sub

As you can see, adding this rather complex component took me about 10 minutes to make, literally the time to put on a pot of Java. (pun intended!)

So this is were you guys can come in!

Some suggestions:
1. Adapt my class so the fields are generic (maybe by passing a Map with field definitions in initialize and then ‘build’ the correct JavaScript string in FirstRun?).
2. I only have set some basic parameters (like sorting, filtering etc), but this component has a lot more to offer. They can become properties of the class. See the jsGrid link at the top of this article.

Download the full source code and share your changes in this B4J Forum topic, so everyone can benefit from your creation.

Alwaysbusy

Click here to Donation if you like my work