1. GetViewFromLayoutArray() and GetAllViewsFromLayoutArray() has now an extra first parameter to allow adding the B4J class where the layout was loaded.
2. New params to config the paths for a build:
SCRIPTS_FOLDER
ASSETS_FOLDER
STYLES_FOLDER
3. BANanoSkeletonCSS added some properties. You will need to copy the new Library to your Additional Libraries folder if you have already used it. The CSS file was also changed.
4. New example Website with multiple pages. I made two versions, one using a Router, one without a Router.
IMPORTANT: they need to run on a real server (or e.g. the Chrome Server plugin!)
It is a real world example I wrote for a friend of mine who owns a B&B.
Demonstrates:
multi-pages
multilingual supports
browsers Back/Forward buttons support.
floating navigation bar
It is ridiculous how little programming I had to do to make his site. Finished the whole thing in a morning. 🙂
Both examples are heavily commented.
5. The following JavaScript DOM objects have been wrapped:
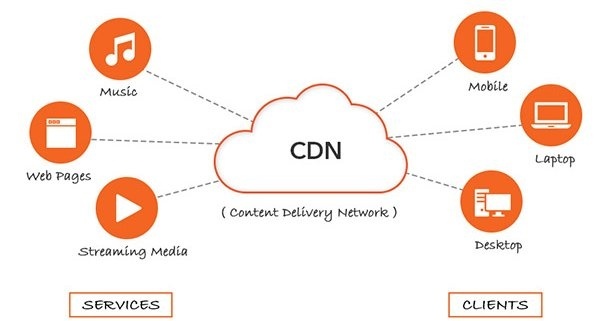
Cloudinary has a great free plan which can cover a great deal of the webapps you make without any additional cost:
Total images and videos: 300,000
Managed storage: 10 GB
Monthly net viewing bandwidth: 20 GB
In ABM, it can be used for two things:
1. Automatic upload/update of the generated CSS/JS files (the ones you find next to each index.html).
2. Your own assets, like images, videos or outer ‘RAW’ files (xls, doc, …)
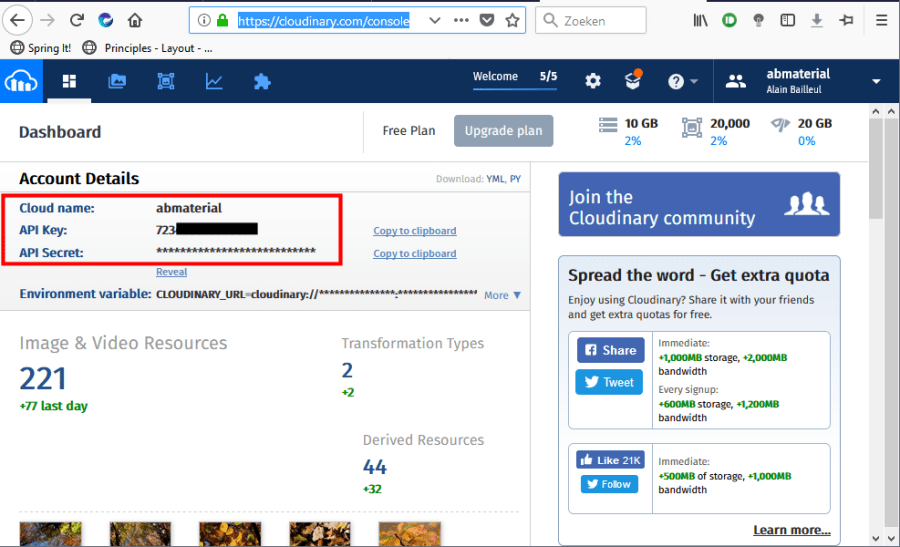
Creating a free account on Cloudinary is pretty straight forward. You make a login and give your ‘cloud’ a name. You will then be able to get your API_KEY and API_SECRET from the management console: https://cloudinary.com/console:
1. Automatic upload/update when starting the .jar file.
Activate it in the main class:
' just some clear consts to explain the parameters
Dim UPLOAD_GENERATED_JSCSS As Boolean = True
Dim DO_NOT_UPLOAD_GENERATED_JSCSS As Boolean = False
Dim SHOW_DEBUG As Boolean = True
Dim DO_NOT_SHOW_DEBUG As Boolean = False
Dim CLEAR As Boolean = True
Dim DO_NOT_CLEAR As Boolean = False

#If RELEASE
       ABM.ActivateCloudinary("DONATOR_KEY","CLOUD_NAME", "API_KEY", "API_SECRET",UPLOAD_GENERATED_JSCSS, "APPNAME", DO_NOT_SHOW_DEBUG)
#else
       ABM.ActivateCloudinary("DONATOR_KEY","CLOUD_NAME", "API_KEY", "API_SECRET",DO_NOT_UPLOAD_GENERATED_JSCSS, "APPNAME", SHOW_DEBUG)
#end if
' this is for 2, your own assets
ABM.CloudinaryLoadImages(CLEAR)
ABM.CloudinaryLoadAudioVideos(DO_NOT_CLEAR)
ABM.CloudinaryLoadRawFiles(DO_NOT_CLEAR)
What will this code do?
It will create a folder structure in you Cloudinary cloud:
APPNAME/css
APPNAME/js
Every time you start your jar, both these folders will be emptied (so do not put anything else in it!) and the most recent generated .js/.css files will be uploaded. Note: depending on the size of your app, this can take quite some time. e.g. for the demo app it takes about 3 minutes.
There is nothing more you have to do, ABM will have changed all the calls in the HTML from your local drive to the CDN.
2. Your own Assests:
As you can see in (1), we pre-load all the urls of the images/videos and other files. That way it is pretty simple to use the e.g. if we want to use an image using the ABM.CloudinaryGet() command:
Dim img4 As ABMImage
img4.Initialize(page, "img4", ABM.CloudinaryGet("demo/images/sample-1"), 1)
page.Cell(6,1).AddComponent(img4)
As parameter it takes the ‘publicId’ of the asset. In my case my APPNAME was demo, I created a folder images in it in the Cloudinary console and uploaded a file called sample-1.jpg so the public id becomes:
demo/images/sample-1
Note: I’ve noticed when uploading images via the cloudinary console, the public id cuts of the file extension.
The result of the ABM.CloudinaryGet command will be something like:
It is very easy to upload and organize you assets through the Cloudinary console app:
but sometimes you will want to upload it through B4X code.
So the following API methods do exist:
' using these 3 methods will automatically add them the the internal Cloudinary map
' so you can use them with the ABM.CloudinaryGet() method without reloading.
' The next time you restart your .jar, they will also be loaded.
ABM.CloudinaryUploadImage("publicId", fullFilePath)
ABM.CloudinaryUploadVideo("publicId", fullFilePath)
ABM.CloudinaryUploadRawFile("publicId", fullFilePath)

ABM.CloudinaryDeleteImage("publicId")
ABM.CloudinaryDeleteVideo("publicId")
ABM.CloudinaryDeleteRawFile("publicId")

ABM.CloudinaryDeleteAllImagesWithPrefix("prefix")
ABM.CloudinaryDeleteAllVideosWithPrefix("prefix")
ABM.CloudinaryDeleteAllRawFilesWithPrefix("prefix")
For the last 3 methods, you use a ‘prefix’ to delete files in bulk:
e.g. if I want to delete all images from my images folder, I would do:
Cloudinary has a wide range of API methods (e.g. for image manipulation etc), and maybe I will expand the B4X API to support it too, but for the moment using it as a CDN only, it suffices.
Note that this is a Donator only feature. ABM 4.35 will be available in a couple of weeks.
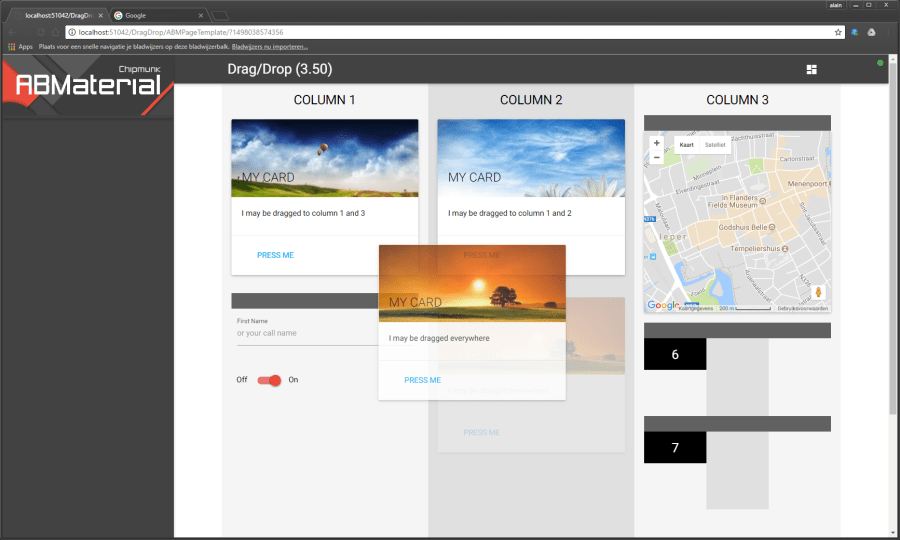
ABMaterial 3.50 for B4J introduces Drag & Drop of ABMContainers between Cells! This new feature took a couple of weeks to implement, but I’m proud of the result.
It opens up a whole new range of possibilities for Web Apps.
Not many bug fixing needed in this release. Proves ABMaterial is really stable and truly production ready! (Happy face)
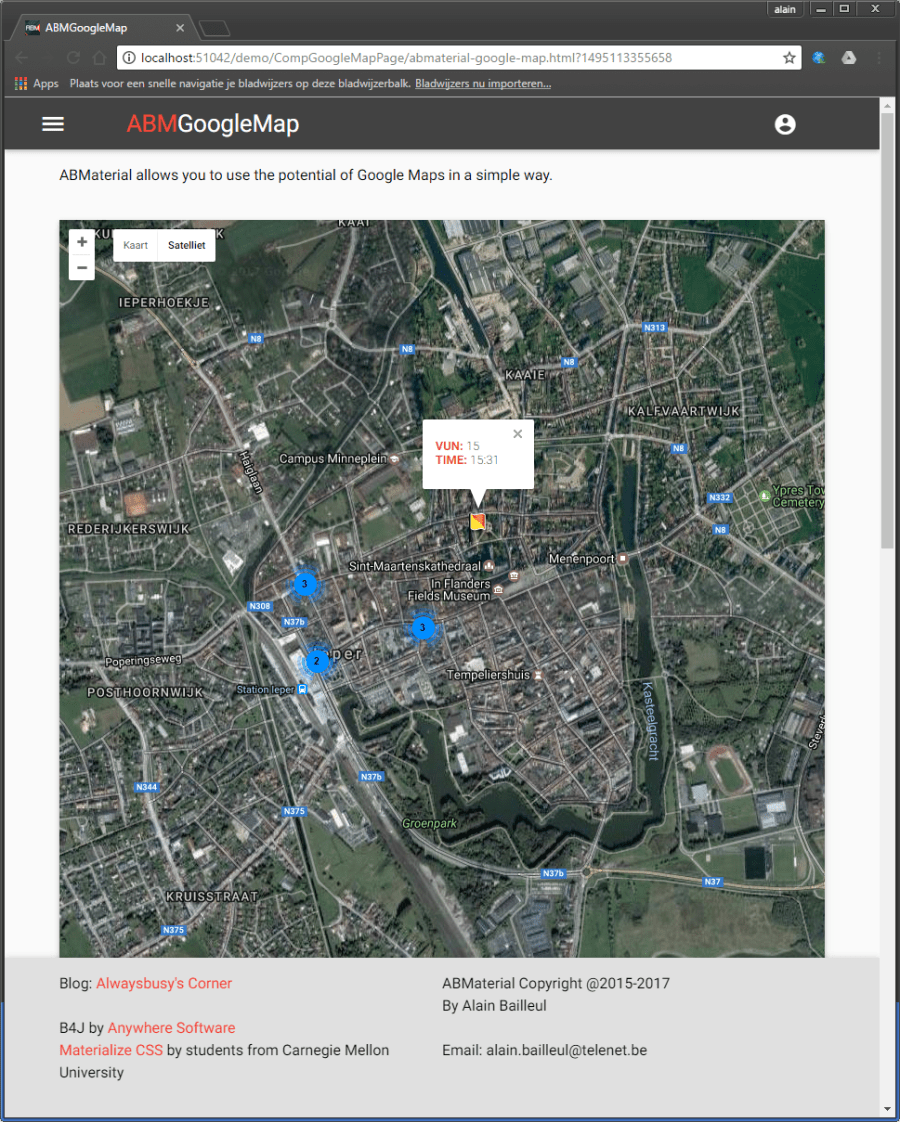
ABMGoogleMap also adds the possibility to use marker clusters, which cleans up your google map if you have many markers in one map.
Head to the ABMaterial section on this blog to get your free copy of 3.20, or make a small donation to support the development and get the latest 3.50 version + 9 extra libraries and tools to use in your own projects!
It may have been a bit silent the last few weeks around ABMaterial, but behind the scenes I have been working nights and weekends on maybe the biggest new feature since Chipmunk was introduced: Drag & Drop!
In 3.50, it will be possible to drag ABMContainers (and hence about anything in it) from one cell to another.
Let’s watch a video demonstration first:
Pretty cool hè!
How it works in B4J:
I explain the basics here, the DragDrop demo project included in the ABMaterial 3.50 download will show all tricks shown in the demo video.
1. Page_ParseEvent() gets a little bit of extra code to sync the moves made in the browser with our server
...
If SubExists(Me, eventName) Then
     Params.Remove("eventname")
     Params.Remove("eventparams")
     ' BEGIN NEW DRAGDROP
     If eventName = "page_dropped" Then
       page.ProcessDroppedEvent(Params)
     End If
     ' END NEW DRAGDROP
     Select Case Params.Size
     ...
2. Next we define a ‘DRAG’ group:
' name, minimum height of a cell
page.DragDropCreateGroup("DRAG", 150)
3. We add cells to this ‘DRAG’ group we want to drag & drop between. The last ‘null’ parameter can be any ABMComponent you want to use a title of the cell (e.g. the COLUMN X ABMLabel in the demo).
4. We add our draggable ABMContainers to the cells. Note: they MUST be added with AddArrayComponent!
Here we also enable them to be draggable with cont.EnableDragDropZone(). There is also a shortcut method to enable/disable all ‘Zones/Cells’ in a group with cont.EnableDragDropAllZonesFromGroup() in one go.
page.Cell(3,1).AddArrayComponent(CreateCard("1", True, True, True, "I may be dragged everywhere", "../images/list1.jpg"), "Cards")
...

Sub CreateCard(ID As String, AllowInCell1 As Boolean, AllowInCell2 As Boolean, AllowInCell3 As Boolean, Title As String, image As String) As ABMContainer
  Dim cont As ABMContainer
  cont.Initialize(page, ID, "")
  cont.AddRows(1,True,"").AddCells12(1, "")
  cont.BuildGrid

  cont.IsTextSelectable = False

  If AllowInCell1 Then
    ' can be dragged to zone 1 of 'DRAG'
    cont.EnableDragDropZone("DRAG","DRAGCELL1",True)
  End If
  If AllowInCell2 Then
    ' can be dragged to zone 2 of 'DRAG'
    cont.EnableDragDropZone("DRAG","DRAGCELL2",True)
  End If
  If AllowInCell3 Then
    ' can be dragged to zone 3 of 'DRAG'
    cont.EnableDragDropZone("DRAG","DRAGCELL3",True)
  End If
  cont.EnableDragDropZone("DRAG","DRAGCELL4",True) ' for the sidebar

  Dim card As ABMCard
  card.InitializeAsCard(page, "card", "MY CARD", Title, ABM.CARD_SMALL, "")
  card.Image = image
  card.AddAction("Press me")

  ' add the card to the page
  cont.Cell(1,1).AddComponent(card)
  Return cont
End Sub
5. There are three events you will receive (all on Page level):
Sub Page_DragStart(component As String, source As String)
  Log("Drag start: " & component)
End Sub

Sub Page_DragCancelled(component As String, source As String)
  Log("Drag cancelled: " & component)
End Sub

' there are four parameters: component, source , target, before
Sub Page_Dropped(Params As Map)
  Log("Dropped: " & Params.Get("component"))
End Sub
And this is basically it! Very simple without having to write any HTML, CSS, PHP or Javascript. All done in pure B4J!
I’m finishing up ABMaterial 3.50, ABMonitor (an upcoming article on this for B4J and B4A soon on the blog) and ABTreeTableView now and early next week I think I may be able to release it to the donators.
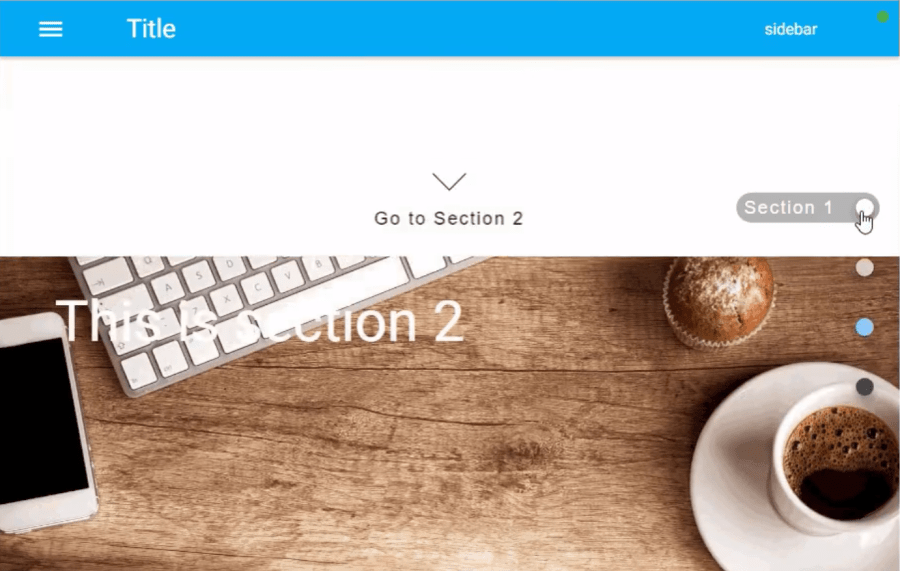
ABMaterial 3.02 Maintenance Release will have a new feature, especially useful for ‘one page’ apps/websites to navigate. It intruduces ‘sections‘ within a page. A section is a logical grouping of rows, which can have its own background and a new extra navigation method/menu.
Sections must be declared at the BuildPage() stage, and are typically created right after the page.BuildGrid() method.
First, let me show you how it works and then I’ll explain how this is archieved with just 12 lines of B4J code!
The tricky part are the minHeight and scrollTop params. In the above examples, I’ve set the minHeight to the browsers height, minus the height of the TopBar: “calc(100vh – 56px)”.
For scrollTop, I’ve set it the the height of the TopBar so the top of the section is right under the navigation bar: 56
ABMaterial 3.02 Maintenance Release will go out in acouple of days to the donators with 25 bug fixes and implemented wishes!


 or
or and support BANano & ABMaterial