B4X: ABMaterial 3.75 Public/4.00 Donators released

ABMDragonfly4.00

ABMaterial Dragonfly (4.00) for B4X is available. Yes, it has a new name! What started as version 3.81 got upgraded to a new major version, especially since it uses a new cache control system.

ABMaterial has always been one of the fastest RADs from its start, now over 2 years ago.  But with 4.00, we’ll take it to a whole new level!

Mindful and I have spend 5 days (and nights) checking out how we could cache ABMaterial to the extreme without losing any of its functionality.  The results are just ridiculous…

Finish times are less than 10% of the time on the second and next loads. So on 3G, on the users next visit(s), the WebApp is almost just as fast as on high speed cable!

And this system not only works with the same page. Once one page has been loaded, all the other pages can take gain of this system. Even when the user revisits your app much later.

Furthermore there is the new debug feature to check how your apps work on different device sizes.  See it at work here:

Add this snippet to you main module, AFTER starting the server:

#If DEBUG
' in debug mode, start the browser and open the app on all devices (DOES NOT WORK IF EDGE IS YOUR DEFAULT BROWSER!)
ABM.ViewerOpenAllDevices("http://localhost:" & port & "/" & ABMShared.AppName & "/", 100)

' or open a specific device as default (DOES NOT WORK IF EDGE IS YOUR DEFAULT BROWSER!)
'ABM.ViewerOpenDevice("http://localhost:" & port & "/" & ABMShared.AppName & "/", 300, ABM.VIEWER_TABLET)

' or just open de browser, no multiple devices (should work in Edge)
'ABM.ViewerOpen("http://localhost:" & port & "/" & ABMShared.AppName & "/")
#End If

Lots of new theme properties! Check out the demo on how to use  them in the new Dragonfly theme.  As winter is coming and days are getting shorter (at least here in the northern hemisphere), I went for a ‘Night’ theme this time.

ABMaterial DragonFly is now available on 750+ locations worldwide on CDN!  If you use the CDN, you do not need to upload the css/js/fonts folders to your own server anymore!

This means only your own assets (images etc) from the www folder have to be available on your server. De demo running on abmaterial.com for example is working like this.

Usage:

ABM.ActivateUseCDN("DONATORKEY", "https://cdn.jsdelivr.net/gh/RealAlwaysbusy/ABMaterial@v4.03/")

The over 20 new fixes and fulfilled wishes make ABMaterial 4.00 very stable, just like its ‘parent’ programming language: B4X.  It is a real joy knowing one can depend on a strong, bug free environment.  Erel from Anywhere Software rulez!

Happy programming!

Alwaysbusy

Click here to Donation and support ABMaterial

Advertisement

B4XHelp: An ABMaterial WebApp for B4X Library documentation

b4xhelpI’ve created an ABMaterial (3.75) WebApp to show the documentation for the B4X libraries. Everyone who created a library for B4A, B4i or B4J can upload their .xml file to the WebApp and everyone can consult it. You can re-upload a new version for a library if needed.

NOTE: not online anymore! In the zip is the source code of the webapp so you can run it yourself.

b4xhelp

Notes:

  • This WebApp is open for everyone, but please try to keep it clean. Thank you!
  • B4XHelp is running on my personal Raspberry Pi with not a super-duper internet connection, so it also may give some indication how it handles a lot of users.
  • The libraries itself are NOT uploaded to the WebApp! Only the .xml files to parse them.
  • The WebApp also runs on a HTTP/2 server, but I do not have a verified certificate. If you use this link, you will get a warning that it may not be safe. You normally only need to accept this once:

priv

ABMaterial may be overwhelming at first with all its features at your disposal, but once you get the hang of it, creating such a WebApp as this, in pure B4J, can go very fast.

Alwaysbusy

Click here to Donation and support ABMaterial


B4J: ABMaterial 3.20 Public/3.50 Donators Released!

ABMB4JABMaterial 3.50 for B4J introduces Drag & Drop of ABMContainers between Cells! This new feature took a couple of weeks to implement, but I’m proud of the result.
It opens up a whole new range of possibilities for Web Apps.

Not many bug fixing needed in this release. Proves ABMaterial is really stable and truly production ready! (Happy face)

ABMGoogleMap also adds the possibility to use marker clusters, which cleans up your google map if you have many markers in one map.

GM2

Head to the ABMaterial section on this blog to get your free copy of 3.20, or make a small donation to support the development and get the latest 3.50 version + 9 extra libraries and tools to use in your own projects!

Have a great summer!

Alwaysbusy

Click here to Donation and support ABMaterial


B4A + B4J: Profile your apps ‘live’ with ABMonitor

ABMonitor2

It has been some time since I could give my donators a new goodie;), and this time it is a library/tool to profile and monitor your B4J + B4A (7.01+) apps (not limited to ABMaterial WebApps!) I’ve been needing something like this for some time for my own projects, but couldn’t find one that suited me.  This can be a very good asset to find Memory Leaks or to track which method takes up to much time.

Using a very simple API, you can track how long the code execution time is, the times hit, average time, memory usage etc for any block of code you want to investigate.  I deliberately gave you this API freedom, as profiling ALL your code (as most programming languages do) is just drowning you in to much information so you don’t see the wood for the trees anymore.

QUICK NOTE: Do not forget to set your DONATORKEY and the port in the Viewer params.txt . The same port and the IP of your Viewer have to be used in the apps you are monitoring!

How it works:
ABMonitor uses the Jamon library, which has a extremely low overhead on your code. Just by disabling it (using the SetActive method), you can actually leave it in your production apps if you want (or use B4Js conditional compiling if you want to get rid of it all together in a production app).

ABMonitor consists of two main parts:
1. The ‘live’ ABMonitor Viewer.

Instructions: Simply start the Viewer in a command prompt using: java -jar ABMonitor.jar

This Viewer shows all the stuff you are monitoring with the API. It shows e.g. how many times some part of your code was hit, how long it took, what the average time was, when it was last accessed, memory consumption etc… It is presented in a TreeView Table, so you can check every detail (depending on how deep you’ve coded your profiling).  At the bottom, the last 50 runs are presented in some line charts.

Because the IDE of B4X is ‘live’, so is the Viewer! Thanks to this unique feature of the B4X products, you can update your code and see the results in the Viewer immediately.

Little side note: This ‘live’ IDE part is a little-known/promoted feature (except within the B4X community of course, as for us this is normal), but it has a HUGE advantage over any other tool out there.  In similar market aimed tools, like Xojo for example, you have to compile and re-compile every single time you make the smallest of changes to your code (on bigger projects it takes up to 20 minutes, some users reported). In B4X, just change the code, and continue running.  Not happy with it? Change it again and see what gives. BIG production time-saver! Some of you who used to program in VB6 know what I mean…

2. The ABMonitorB4X libraries (ABMonitorB4A.jar/ABMonitorB4J.jar).

Install instructions: Copy the xml and jars (dont’t forget jamon-2.81.jar), to your B4A or B4J libraries folder. In the IDE select the ABMonitorB4X library, the RandomAccessFile library and the Network library.

This API connects your own apps with the monitor. It basically consists of a Start and a Stop method.

First, we have to make the connection with the Viewer. Thanks to Erels new Resumable Subs, doing this is a breeze:

In Main make some declarations:

Sub Process_Globals
   Public Monitor As ABMonitor

   Private port As Int = 10090 ' <-- Set your Viewers Port!
   Private ip As String = "127.0.0.1" ' <-- Set your Viewers IP!
   Private abmonitor As AsyncStreams
   Private client As Socket

   ' Useful to quickly activate/deactivate the monitoring
   Public TRACKMONITOR As Boolean = True
End Sub

Next add the following resumable sub:

Sub ConnectMonitor()
   Dim c As Socket
   c.Initialize("client")
   c.Connect(ip, port, 5000)
   Wait For Client_Connected (Successful As Boolean)
   If Successful Then
     client = c
     abmonitor.InitializePrefix(client.InputStream, False, client.OutputStream, "abmonitor")
     Log("ABMonitor connected")
     Monitor.SetActive("Template", True,abmonitor, 5)
   Else
     Log("ABMonitor disconnected")
   End If
End Sub

Sub abmonitor_Error
   Monitor.SetActive("Template", False,Null, 0)
   Log("ABMonitor disconnected")
End Sub

You can set the interval the data should be send to the Viewer, in seconds, with the last parameter in ‘Monitor.SetActive(“Template”, True,abmonitor, 5)’.  In this example, it is every 5 seconds.  Note: This does not mean it is tracked every 5 seconds! The library will continue tracking everything, but it will only send all the info over to the Viewer every 5 seconds.

Finally, Initialize the monitor and call the resumable sub when your app starts (a good place is e.g. before StartMessageLoop in a Server app):

...
Monitor.Initialize("YOURDONATORKEY")

ConnectMonitor

StartMessageLoop

Ready to do some monitoring!

As I said, there are basically only two commands: Start and Stop.

There are two ways to monitor/profile your code (you can mix the use of them):

a. Monitor some code:
You want to monitor a query, or a whole sub, … In general this is a complete block of code.

Good practice is using the class/module name as the Group parameter, and the method name as the Label, but you can put whatever you want. This will later be used in the Viewer to group stuff. (Group and Label are the first and second parameters in the calls).

Example:

Private Sub WebSocket_Connected (WebSocket1 As WebSocket)
   If Main.TRACKMONITOR Then Main.Monitor.Start("ABMPageTemplate", "WebSocket_Connected", "")

   '   ... the code you want to monitor

   If Main.TRACKMONITOR Then Main.Monitor.Stop("ABMPageTemplate", "WebSocket_Connected", "")
End Sub

Or tracking a query:

..
If Main.TRACKMONITOR Then Main.Monitor.Start("ABMPageTemplate", "MySlowQuery", "")

Dim SQL_str As String
SQL_str = "SELECT cases.CaseID, cases.CaseUserID, cases.CaseType, cases.CaseSummary FROM tCases WHERE cases.CaseStatus=1;"
Dim cases As List = DBM.SQLSelect(SQL, SQL_str, Null)

If Main.TRACKMONITOR Then Main.Monitor.Stop("ABMPageTemplate", "MySlowQuery", "")
...

b. Monitor methods which are used in multiple places, and you want to know where it was called.
You have for example a page.Refresh method, which is called in multiple places. You can use the third parameter to set the ‘caller’. In general there will only be one line of code between the start() and stop().

This caller will later be used in the Viewer to build a call tree (or stack trace)

Example:

Private Sub WebSocket_Connected (WebSocket1 As WebSocket)
     ...
     If Main.TRACKMONITOR Then Main.Monitor.Start("ABMPageTemplate", "page.Refresh", "WebSocket_Connected")
     page.Refresh
     If Main.TRACKMONITOR Then Main.Monitor.Stop("ABMPageTemplate", "page.Refresh", "WebSocket_Connected")
     ...
End Sub

public Sub ConnectPage()
   ...
   ' refresh the page
   If Main.TRACKMONITOR Then Main.Monitor.Start("ABMPageTemplate", "page.Refresh", "ConnectPage")
   page.Refresh
   If Main.TRACKMONITOR Then Main.Monitor.Stop("ABMPageTemplate", "page.Refresh", "ConnectPage")
   ...
End Sub

As you can see, you are totally free to monitor anything you want.

Call for action: if anyone out there is a guru in making B4i libraries, please PM me!  The java library code is quite simple and it shouldn’t be to hard for an experienced B4i library coder to write one which can connect to the same Viewer.  If we got this one too, then we’ve covered all major platforms in B4X!

ABMonitor is part of a multi-pack on libraries, frameworks and tools all Donators to this blog receive.

Included are currently:

ABMaterial (B4J) A very powerful framework combining a tuned Materialize CSS with the free programming tool B4J. It allows creating Web Apps that not only look great thanks to Googles Material Design, but can be programmed with the powerful free tool from Anywhere Software without having to write a single line of HTML, CSS or Javascript code!

ABExchange (B4J) It can be used to sync the ABMCalendar control with your exchange server and outlook. It can also send a mail.

ABJasperReports (B4J) his is a little library that allows you to export reports created in Jasper Reports in your B4J applications. They can be exported to pdf, html and xls. You can use parameters defined in JasperReports.

ABPDFBox (B4J) With this library you can print PDF files (either by showing a dialogbox or directly to a specified printer). Works in UI and NON-UI apps.

ABMonitor (B4J + B4A) Tool to monitor/profile your B4A (7.01+) and B4J code! Includes the libraries for both platform + the ABMonitor Viewer. See the tutorial for more info.

ABCron (B4J + B4A) A more advanced timer library that can schedule more intelligently tasks using Cron expressions. You can also set a start and end datetime. I’ve added a method RestartApplicationNONUI() that should restart you .jar file when the Cron expression is met.

ABEvaluator (B4J + B4A) Evaluate mathematical expressions. You can also write your own functions in B4J/B4A.

ABPlugin (B4J) Create Live plugins for you own apps. This means you can create plugins that can be added/removed while your app is running. Note it is a little experiment that shows the power of B4J. The ‘compile to library’ feature of B4J is very handy to create plugins.

ABZXCVBN (B4J + B4A) Realistic password strength estimation.

ABTreeTableView (B4J) Custom B4J component which combines a TreeView with a TableView.

Until next time!

Alwaysbusy

Click here to Donation and support ABMaterial

B4J: New in ABMaterial 3.50: Drag and Drop about anything

ABMDragDrop

It may have been a bit silent the last few weeks around ABMaterial, but behind the scenes I have been working nights and weekends on maybe the biggest new feature since Chipmunk was introduced: Drag & Drop!

In 3.50, it will be possible to drag ABMContainers (and hence about anything in it) from one cell to another.

Let’s watch a video demonstration first:

Pretty cool hè!

How it works in B4J:
I explain the basics here, the DragDrop demo project included in the ABMaterial 3.50 download will show all tricks shown in the demo video.

1. Page_ParseEvent() gets a little bit of extra code to sync the moves made in the browser with our server

...
If SubExists(Me, eventName) Then
     Params.Remove("eventname")
     Params.Remove("eventparams")
     ' BEGIN NEW DRAGDROP
     If eventName = "page_dropped" Then
       page.ProcessDroppedEvent(Params)
     End If
     ' END NEW DRAGDROP
     Select Case Params.Size
     ...

2. Next we define a ‘DRAG’ group:

' name, minimum height of a cell
page.DragDropCreateGroup("DRAG", 150)

3. We add cells to this ‘DRAG’ group we want to drag & drop between. The last ‘null’ parameter can be any ABMComponent you want to use a title of the cell (e.g. the COLUMN X ABMLabel in the demo).

page.DragDropAddZone("DRAG", "DRAGCELL1", page.Cell(3,1),null)
page.DragDropAddZone("DRAG", "DRAGCELL2", page.Cell(3,2),null)
page.DragDropAddZone("DRAG", "DRAGCELL3", page.Cell(3,3),null)

4. We add our draggable ABMContainers to the cells. Note: they MUST be added with AddArrayComponent!

Here we also enable them to be draggable with cont.EnableDragDropZone().  There is also a shortcut method to enable/disable all ‘Zones/Cells’ in a group with cont.EnableDragDropAllZonesFromGroup() in one go.

page.Cell(3,1).AddArrayComponent(CreateCard("1", True, True, True, "I may be dragged everywhere", "../images/list1.jpg"), "Cards")
...

Sub CreateCard(ID As String, AllowInCell1 As Boolean, AllowInCell2 As Boolean, AllowInCell3 As Boolean, Title As String, image As String) As ABMContainer
  Dim cont As ABMContainer
  cont.Initialize(page, ID, "")
  cont.AddRows(1,True,"").AddCells12(1, "")
  cont.BuildGrid

  cont.IsTextSelectable = False

  If AllowInCell1 Then
    ' can be dragged to zone 1 of 'DRAG'
    cont.EnableDragDropZone("DRAG","DRAGCELL1",True)
  End If
  If AllowInCell2 Then
    ' can be dragged to zone 2 of 'DRAG'
    cont.EnableDragDropZone("DRAG","DRAGCELL2",True)
  End If
  If AllowInCell3 Then
    ' can be dragged to zone 3 of 'DRAG'
    cont.EnableDragDropZone("DRAG","DRAGCELL3",True)
  End If
  cont.EnableDragDropZone("DRAG","DRAGCELL4",True) ' for the sidebar

  Dim card As ABMCard
  card.InitializeAsCard(page, "card", "MY CARD", Title, ABM.CARD_SMALL, "")
  card.Image = image
  card.AddAction("Press me")

  ' add the card to the page
  cont.Cell(1,1).AddComponent(card)
  Return cont
End Sub

5. There are three events you will receive (all on Page level):

Sub Page_DragStart(component As String, source As String)
  Log("Drag start: " & component)
End Sub

Sub Page_DragCancelled(component As String, source As String)
  Log("Drag cancelled: " & component)
End Sub

' there are four parameters: component, source , target, before
Sub Page_Dropped(Params As Map)
  Log("Dropped: " & Params.Get("component"))
End Sub

And this is basically it! Very simple without having to write any HTML, CSS, PHP or Javascript. All done in pure B4J!

I’m finishing up ABMaterial 3.50, ABMonitor (an upcoming article on this for B4J and B4A soon on the blog) and ABTreeTableView now and early next week I think I may be able to release it to the donators.

Cheers,

Alwaysbusy

Click here to Donation and support ABMaterial

B4X: ABMaterial 3.03 Public/3.20 Donators released

A lot of internal changes were made in the ABMaterial 3.20 ‘Chipmunk’ release.  For example, ABMContainer has been rewritten from the ground-up, but with minimal impact to your existing projects.  It allows adding them as array components, and has much shorter ID tags in the generated HTML.

Mindful and Stanmiller had another go on the cache issues.  They came up with a very nice solution (I had tears in my eyes) and both have done extensive testing on this subject. A big thanks again!  ABM 3.20 is backwards compatible with the previous 3.0.3 Cache System, but I would advice you to make the changes whenever you have the chance.

A nice new feature for mobile devices is the New Debug feature using a modified version of Conzole!

New Debug at work:

Using this new feature is very simple in B4J:

First, you have to enable the console in BuildPage():

' params are: open on load, width
page.DebugConsoleEnable(True, 300)

Two methods can be used to show or hide the console programmaticaly. Can be handy as a buid-in tool in your apps where the user enters a code on his device and you can then check the console.

page.DebugConsoleShow
page.DebugConsoleHide

Now you can start doing some cool stuff 🙂 Some examples:

Show some text, or a server value (note: strings must be between single quotes!)

page.DebugConsoleLog("'Server click at: " & DateTime.Time(DateTime.Now) & "'") ' shows the text

Now I generated an error on purpose, so the demo can show it catches the error:

page.DebugConsoleLog("'value: ' + $('#pi002-r2c1').html();") ' generates an error, the ; at the end is wrong

Same code, but with the correct javascript syntax, showing the html() value of the tag:

page.DebugConsoleLog("'value: ' + $('#pi002-r2c1').html()") ' generates the html value of the pi002-r2c1 tag

It works also on the desktop, although you probably will use the Chrome console as you can do more.

But there is more. You can also redirect all browser console message directly into the B4J log window!  You can use the following commands anywhere in your own code to start/stop receiving the browser console messages.

page.DebugConsoleB4JStart
page.DebugConsoleB4JStop

This is a very powerful feature if you develop Webapps for mobile devices.  It can be done otherwise, but it is a pain in the a$$ to set it up. Now, you can easily debug it on your iPhone, iPad, Android or any other device.

ABMaterial 3.20 has over 20 new features and bug fixes.  Following the same philosophy as B4X, the quick release cycle has proven to work very well for ABMaterial and its many users.  Donators will receive their download mail shortly.  The public version 3.03 can be downloaded from this blog too.

I’m also glad that with these releases, now everyone can work with ‘Chipmunk‘, and this does also mean the development cycle for ‘Butterfly‘  has ended.

I would like to take this opportunity to thank everyone for the support, hourless testing and inventive ideas you came up with in the last few years. You’ve made ABMaterial one hell of a WebApp Development Tool!

ThankYou

But we are not at the end! Far from it as I already have big ideas for the next releases.

Until then, happy programming!

Alwaysbusy

Click here to Donation and support ABMaterial

B4X: An experiment for practical use of IoT on the shop floor

Beacons

At OneTwo, we are always searching for ways to make things easier on the workfloor.  For nearly a decade, we introduced barcode scanners everywhere! From architects and accountants, over carpenters and contractors, to farmers and gardeners are now using our small barcode scanners to record times, jobs and used materials.

The last couple of weeks, I’ve been investigating how we could tackle another common issue, but now on the factory shop floor.  Working on a specific step in the development of a product demands the constant focus of the operator so using a barcode scanner to get the instructions is, well, just not practical if you have your hands full.

Time to get to the lab! Provided with heaps of coffee, some unhealthy snacks and an open mind we started putting some ideas together on the whiteboard.  We wanted to give as much feedback to the operator as possible using monitors,  beamer projections at the workstation and personal instructions on phones and tablets.

The key to deliver hyper-contextual content to the users is knowing the location of every chess piece in the game: the workstation, the machine that is going to be build and the operator(s).  The underlying communication technology was going to be Bluetooth Low Energy (BLE). The Raspberry Pi has it and so does almost any phone or tablet. By attaching a cheap BLE Beacon to the machine we could understand the location of all the players.

Using B4X for this project was a no-brainer, as Erels toolbox is just made to build stuff like this! One important link in the chain was missing:  the BLE reader in B4J for the Raspberry Pi.  However, writing some small scripts and calling it using jShell and a couple of timers did the job just fine.

Scripts code:

Two scripts to discover BLE devices around the Raspberry Pi.  Each one runs in its own jShell in B4J. First one scans for devices, second one reads whatever they broadcast.

#!/bin/bash
# Beacon Scan by Alain Bailleul 2017
sudo timeout -s SIGINT 5s hcitool lescan

#!/bin/bash
# Beacon Scan by Alain Bailleul 2017
sudo timeout -s SIGINT 5s hcidump -X > scan.txt

Also, as the Raspberry Pi has to be a BLE beacon itself (so the Android Native app can discover it), I had to write another little script:

#!/bin/bash
# Beacon Scan by Alain Bailleul 2017

sudo hciconfig hci0 leadv 3
sudo hcitool -i hci0 cmd 0x08 0x0008 19 02 01 06 03 03 aa fe 11 16 aa fe 10 00 02 6f 6e 65 2d 74 77 6f 07 $1 $2 $3 00 00 00 00 00 00
sudo hciconfig

IPN=$(ip addr show eth0 | awk ‘/inet / {print $2}’ | cut -d/ -f 1)
IPW=$(ip addr show wlan0 | awk ‘/inet / {print $2}’ | cut -d/ -f 1)
MACN=$(ip link show eth0 | awk ‘/ether/ {print $2}’)
MACW=$(ip link show wlan0 | awk ‘/ether/ {print $2}’)

echo “$MACW;$IPW;$MACN;$IPN;END” > macip.txt

For anything related to presenting the instructions, we could use ABMaterial.

Alright! We’ve got everything we needed to set up a test scenario for a workstation so time to bring out the cool slide:

How it works

Although there are a lot of physical components and different OS’s in play, B4X has all the tools to make them seamlessly talk to each other using one language.  For the native Android part, I wrote my own BLE discovery library based on the altbeacons library. (Note, there is a library available in B4A to discover BLE devices).

For the video demonstration, things you have to keep in mind:

INPUT:

  1. OneTwo box + BLE beacon: represents a machine arriving on the workstation
  2. Raspberry Pi (under the table): represents the workstation
  3. Android Phone: represents an operator/visitor at the workstation

OUTPUT:

  1. On the monitor, for each ‘machine’ some info is presented (e.g. a serial number, to what country it has to be shipped, etc)
  2. On the phone: specific instructions for the operator(s) for this ‘machine’, or a greeting to a visitor.
  3. On the workstation, projected global instructions for the operator(s) for this ‘machine’ with a beamer.

Let’s have a look how all of this plays out:

This turned out to work all very well for a first trial! For real world usage, the project will need some more work (like improving the algorithms to discover the BLE devices, setting thresholds or calculating them without calibration, etc…).  But we are very excited with the possibilities this low-cost solution can already show in such a short time.

Next step will be setting this up on a real workstation on the shop floor in a real factory later this month.

Until next time,

Alwaysbusy

Click here to Donation and get the latest ABMaterial first!


B4A: ABFlicB4A library for Flic buttons

cute-as-a-button-1

You probably have seen these nifty little IoT Flic buttons around. They are a fun and relative cheap BLE button that allows you to do something when the button is clicked, doubleclicked or hold.

I decided to write a wrapper for the Android SDK to use with B4A.

How to use:
1. Install the Flic app from the Google Play.
2. On their developer page, create a new app: you get a key and a secret.
3. Copy the ABFlicB4A library jar and xml to your library folder and select it in B4A

Here is a small video demonstrating the library.  You can the use the full power of B4A to do about, well, everything…

Example usage code:

Sub Process_Globals

End Sub

Sub Globals
   Private flic As ABFlic
   Private Button2 As Button
   Private Button3 As Button
   Private Button4 As Button
   Private Label1 As Label
   Private Button1 As Button

   Private MyFlicID As String

   Private FlicResults As List
End Sub

Sub Activity_Create(FirstTime As Boolean)
   Activity.LoadLayout("1")
   FlicResults.Initialize
   FlicResults.Add("RESULTACTION_HOLD")
   FlicResults.Add("RESULTACTION_SINGLECLICK")
   FlicResults.Add("RESULTACTION_DOUBLECLICK")
End Sub

Sub Activity_Resume
   ' your key and secret
   flic.Initialize("Flic", "d60d36a0-XXXXXXXXXXXXXXXXXXXXXXXXXXXXXXXXX", "db5c2b3d-XXXXXXXXXXXXXXXXXXXXXXXXXXXXXXXXX", "ABFlicTest")
End Sub

Sub Button1_Click
   flic.ForgetButton(MyFlicID)
End Sub

Sub Button2_Click
   flic.GrabButton
End Sub

Sub Button3_Click
   flic.StartListening
End Sub

Sub Button4_Click
   flic.StopListening
End Sub

Sub flic_Added(buttonID As String, Name As String)
   MyFlicID = buttonID
   Log("Added: " & buttonID)
   Label1.Text = "Added: " & buttonID & CRLF & Label1.Text
End Sub

Sub flic_Clicked(buttonID As String, wasQueued As Boolean, timeDiff As Int)
   MyFlicID = buttonID
   Log("Clicked: " & buttonID)
   Label1.Text = "Clicked: " & buttonID & CRLF & Label1.Text
End Sub

Sub flic_DoubleClicked(buttonID As String, wasQueued As Boolean, timeDiff As Int)
   MyFlicID = buttonID
   Log("DoubleClicked: " & buttonID)
   Label1.Text = "DoubleClicked: " & buttonID & CRLF & Label1.Text
End Sub

Sub flic_Holded(buttonID As String, wasQueued As Boolean, timeDiff As Int)
   MyFlicID = buttonID
   Log("Holded: " & buttonID)
   Label1.Text = "Holded: " & buttonID & CRLF & Label1.Text
End Sub

Sub flic_Removed(buttonID As String)
   MyFlicID = ""
   Log("Removed: " & buttonID)
   Label1.Text = "Removed: " & buttonID & CRLF & Label1.Text
End Sub

Sub flic_Error(err As Int)
   Log("Error: " & err)
   Label1.Text = "Error: " & err & CRLF & Label1.Text
End Sub

I’m currently working on a Desktop/Raspberry Pi version of this library, which I will share in the B4J forum later.

The library can be found at the B4A forum.

Happy programming!

Alwaysbusy

B4J: Msgbox and Inputbox in ABMaterial 2.51

upload_2017-2-12_12-0-6
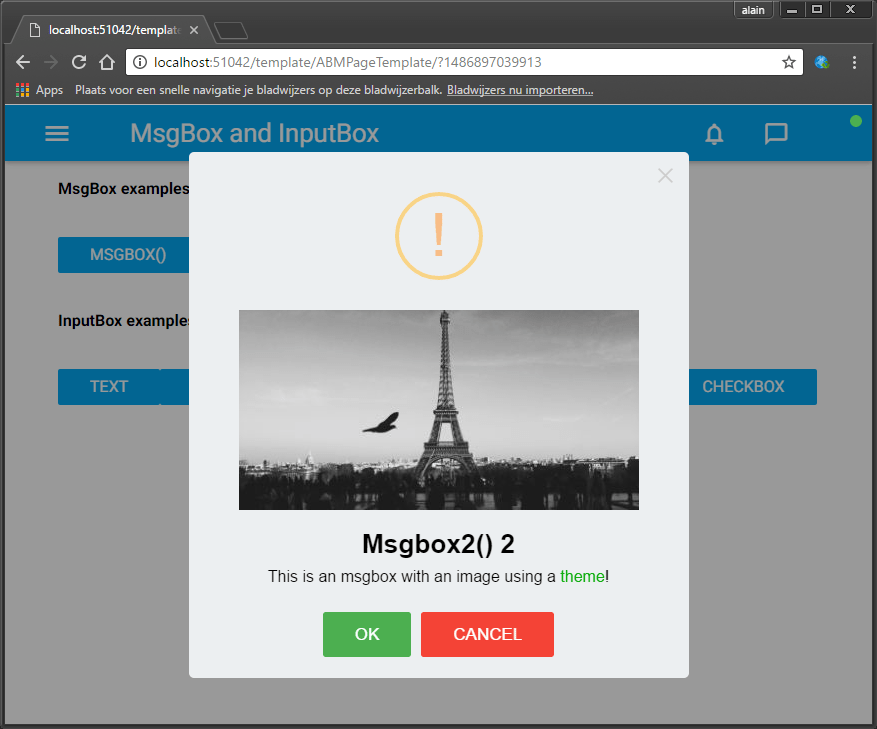
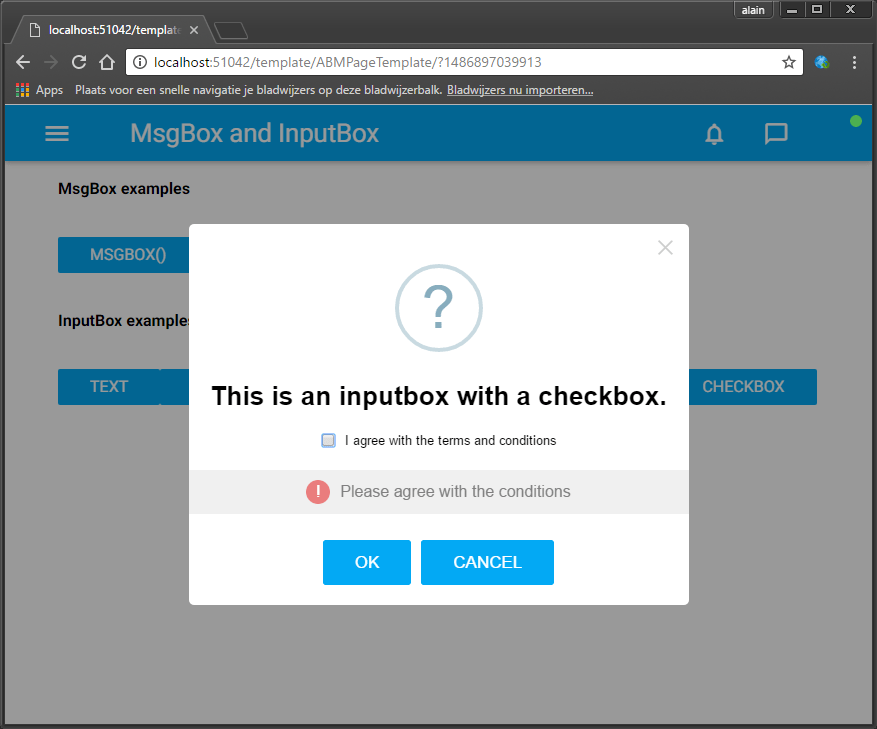
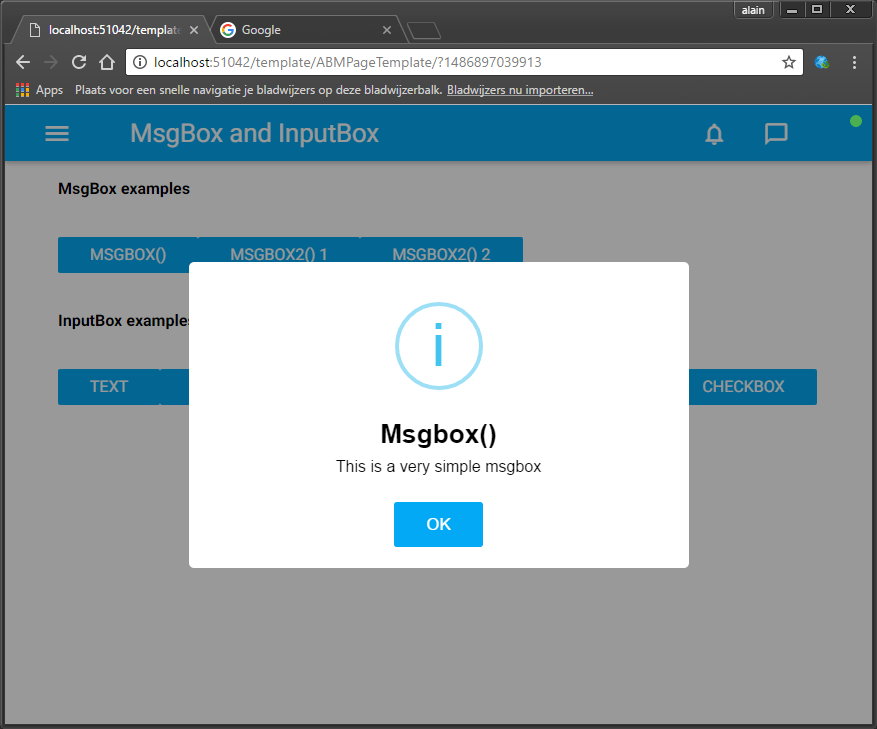
Sometimes you just need to show a quick Msgbox or a single-field Inputbox to the user. In ABMaterial for B4J you have probably, just like me, already made a couple of modal sheets to do this.

But in 2.51 I’ve integrated the possibility for such cases just to do it in one line of code (like a normal msgbox/inputbox).

It replaces the default looking ‘alert’ box from JavaScript to a more modern looking box.  The SweetAlert2 library, which is build on the orginal SweetAlert one, has been extended for ABMaterial so you can ‘Theme’ about anything you want.

For example, to show the msgbox you see on top of this article, this is the code you need to write:

page.Msgbox("MSGBOX1", "This is a very simple msgbox", "Msgbox()", "OK", "")

Some more examples:

theme.AddMsgBoxTheme("image")
theme.MsgBox("image").ConfirmButtonColor = ABM.COLOR_GREEN
theme.MsgBox("image").CancelButtonColor = ABM.COLOR_RED
theme.MsgBox("image").SetImage("https://unsplash.it/400/200", 400, 200)
theme.MsgBox("image").BackColor = ABM.COLOR_BLUEGREY
theme.MsgBox("image").BackColorIntensity = ABM.INTENSITY_LIGHTEN5

page.Msgbox2("MSGBOX3", "This is an msgbox with an image using a {C:#00AA00}theme{/C}!", "Msgbox2() 2", "OK","CANCEL",True, ABM.MSGBOX_TYPE_WARNING, "image")

upload_2017-2-12_12-2-24

page.InputBox("INPUTBOX1", "This is an inputbox for text.","OK", "CANCEL", True, ABM.INPUTBOX_TYPE_QUESTION, ABM.INPUTBOX_QUESTIONTYPE_TEXT,"","Type some text...", "", "Please enter something!", "")

upload_2017-2-12_12-3-30

page.InputBox("INPUTBOX3", "This is an inputbox for a password.","OK", "CANCEL", True, ABM.INPUTBOX_TYPE_QUESTION, ABM.INPUTBOX_QUESTIONTYPE_PASSWORD,"","Type your password...", "", "Please enter a password", "")

upload_2017-2-12_12-3-43

page.InputBox("INPUTBOX6", "This is an inputbox with a radio selection.","OK", "CANCEL", True, ABM.INPUTBOX_TYPE_QUESTION, ABM.INPUTBOX_QUESTIONTYPE_RADIO,"#00ff00", "","{'#ff0000': 'Red','#00ff00': 'Green','#0000ff': 'Blue'}", "You must select a color", "")

upload_2017-2-12_12-4-43

page.InputBox("INPUTBOX7", "This is an inputbox with a checkbox.","OK", "CANCEL", True, ABM.INPUTBOX_TYPE_QUESTION, ABM.INPUTBOX_QUESTIONTYPE_CHECKBOX,"", "I agree with the terms and conditions","", "Please agree with the conditions", "")

upload_2017-2-12_12-5-51

Events:

Sub page_MsgboxResult(returnName As String, result As String)
   myToastId = myToastId + 1
   page.ShowToast("toast" & myToastId, "toastgreen", returnName & " " & result, 5000)
End Sub

Sub page_InputboxResult(returnName As String, result As String)
   myToastId = myToastId + 1
   page.ShowToast("toast" & myToastId, "toastred", returnName & " " & result, 5000)
End Sub

ABMaterial Mainenance Release 2.51 will be available for the donators in the following days.

Alwaysbusy

Click here to Donation and get the latest ABMaterial first!

B4J: New ABMChat component for ABMaterial 2.50

abmchat

ABMChat is a new cool looking ABMaterial component to create a Web based chat program. The inner workings are very much like Erels ChatRoom, but with a slick interface. This can be a useful control if for example you want to give chat-like support within you own B4J webapp.

Some features:
– Balloon/Bubble-like chat
– Support for some ASCII emoji
– IsTyping ballon

Coding this with B4J and ABMaterial is very easy:

Code ChatShared module:

Sub Process_Globals
   Public AvoidDuplicates As Map
   Private connections As Map
   Public LastMessages As List
   Private IsTypingMap As Map
End Sub

public Sub Init
   AvoidDuplicates = Main.srvr.CreateThreadSafeMap
   connections.Initialize
   LastMessages.Initialize
   IsTypingMap.Initialize
End Sub

public Sub NewConnection(page As ChatPage, pageID As String)
   DateTime.TimeFormat = "HH:mm"

   Dim IdentifyBubble As ABMChatBubble
   IdentifyBubble.Initialize("Server", page.ChatName & " has joined the chat...", "Server " & DateTime.Time(DateTime.Now), "server", "server")
   JoinLeftMessage(pageID, IdentifyBubble)
   connections.Put(pageID, page)
   CallSubDelayed2(page, "CurrentConversation", LastMessages)
End Sub

public Sub NewMessage(pageID As String, Message As ABMChatBubble)
   LastMessages.Add(Message)
   For Each page As ChatPage In connections.Values
     CallSubDelayed2(page, "NewMessage", Message)
   Next
End Sub

public Sub JoinLeftMessage(pageID As String, Message As ABMChatBubble)
   For Each page As ChatPage In connections.Values
     CallSubDelayed2(page, "NewMessage", Message)
   Next
End Sub

public Sub IsTyping(pageID As String, Value As String)
   Dim typeBool As Boolean
   If Value = "" Then
     IsTypingMap.Remove(pageID.ToLowerCase)
   Else
     IsTypingMap.put(pageID.ToLowerCase, "true")
   End If
   If IsTypingMap.Size > 0 Then
     typeBool = True
   End If
   For Each page As ChatPage In connections.Values
     CallSubDelayed3(page, "IsTyping", pageID, typeBool)
   Next
End Sub

public Sub Disconnected(page As ChatPage, pageID As String)
   If connections.ContainsKey(pageID) = False Or connections.Get(pageID) <> page Then Return
   Dim LeaveBubble As ABMChatBubble
   LeaveBubble.Initialize("Server", page.ChatName & " has left the chat...", "Server " & DateTime.Time(DateTime.Now), "server","server")
   JoinLeftMessage(pageID, LeaveBubble)
   connections.Remove(pageID)
   AvoidDuplicates.Remove(pageID.ToLowerCase)
End Sub

Public Sub HasIdentified(pageID As String) As Boolean
   Return connections.ContainsKey(pageID)
End Sub

Relevant Code ChatPage class:

Private Sub WebSocket_Disconnected
   Log("Disconnected")
   If ABMPageId <> "" Then CallSubDelayed3(ChatShared, "Disconnected", Me, ABMPageId)
End Sub

public Sub BuildTheme()
   ' start with the base theme defined in ABMShared
   theme.Initialize("pagetheme")
   theme.AddABMTheme(ABMShared.MyTheme)

   ' add additional themes specific for this page
   theme.AddChatTheme("myChat")
   theme.Chat("myChat").AddBubble("server")
   theme.Chat("myChat").Bubble("server").Color = ABM.COLOR_BLACK
   theme.Chat("myChat").Bubble("server").TextColor = ABM.COLOR_WHITE

   theme.Chat("myChat").AddBubble("me")
   theme.Chat("myChat").Bubble("me").Color = ABM.COLOR_LIGHTBLUE
   theme.Chat("myChat").Bubble("me").TextColor = ABM.COLOR_WHITE

   theme.Chat("myChat").AddBubble("them")
   theme.Chat("myChat").Bubble("them").Color = ABM.COLOR_GREY
   theme.Chat("myChat").Bubble("them").ColorIntensity = ABM.INTENSITY_LIGHTEN2
   theme.Chat("myChat").Bubble("them").TextColor = ABM.COLOR_BLACK
End Sub

public Sub ConnectPage()
'   connecting the navigation bar    

'   init all your own variables (like a List, Map) and add your components
   Dim chat As ABMChat
   chat.Initialize(page, "conversation",600, 450, 255, "mychat")
   chat.AddBubble("Server", "I'm Server, what is your name?", "The Server", "server", "server")

   page.Cell(1,1).AddComponent(chat)

   Dim ChatInput As ABMInput
   ChatInput.Initialize(page, "ChatInput", ABM.INPUT_TEXT, "", False, "")
   ChatInput.PlaceHolderText = "Type your message here...."
   ChatInput.RaiseChangedEvent = True
   page.Cell(2,1).AddComponent(ChatInput)

   ' refresh the page
   page.Refresh
   ' Tell the browser we finished loading
   page.FinishedLoading
   ' restoring the navigation bar position
   page.RestoreNavigationBarPosition
End Sub

Sub ChatInput_Changed(value As String)
   If ChatShared.HasIdentified(ABMPageId) Then
     CallSubDelayed3(ChatShared, "IsTyping", ABMPageId, value)
   End If
End Sub

Sub ChatInput_EnterPressed(value As String)
   DateTime.TimeFormat = "HH:mm"

   If ChatShared.HasIdentified(ABMPageId) Then
     Dim bubble As ABMChatBubble
     bubble.Initialize(ChatName, value, ChatName & " " & DateTime.Time(DateTime.Now), "me", "them")
     CallSubDelayed3(ChatShared, "NewMessage", ABMPageId, bubble)
     CallSubDelayed3(ChatShared, "IsTyping", ABMPageId, "")
   Else
     If value = "" Then Return
     If ChatShared.AvoidDuplicates.ContainsKey(value.ToLowerCase) Then
       Dim chat As ABMChat = page.Component("conversation")
       chat.AddBubble("Server", "Sorry, but " & value & " is already taken!", "The Server", "server", "server")
       chat.Refresh
     Else
       ChatName = value
       ChatShared.AvoidDuplicates.Put(value.ToLowerCase, value)
       Dim chat As ABMChat = page.Component("conversation")
       chat.SetMyFrom(ChatName)
       chat.AddBubble("Server", "Welcome to ABMChat " & ChatName & "!", "The Server", "server", "server")
       chat.Refresh
       CallSubDelayed3(ChatShared, "NewConnection", Me, ABMPageId)
     End If
   End If

   Dim ChatInput As ABMInput = page.Component("ChatInput")
   ChatInput.Text = ""
   ChatInput.Refresh
End Sub

public Sub NewMessage(bubble As ABMChatBubble)
   Dim chat As ABMChat = page.Component("conversation")
   chat.AddBubble2(bubble)
   chat.Refresh
   chat.ScrollToBottom   ' scroll to the end of the chat
End Sub

public Sub IsTyping(pageID As String, typeBool As Boolean)
   Dim chat As ABMChat = page.Component("conversation")
   If pageID <> ABMPageId Then
     If typeBool = False Then
       chat.ThemAreTyping(False, "") 'hide the 'is typing' bubble
     Else
       chat.ThemAreTyping(True, "") ' show the 'is typing' bubble if not yet shown
     End If
     chat.Refresh
     chat.ScrollToBottom   ' scroll to the end of the chat
   End If
End Sub

public Sub CurrentConversation(LastMessages As List)
   If LastMessages.Size > 0 Then
     Dim chat As ABMChat = page.Component("conversation")
     chat.SetConversation(LastMessages)
     chat.Refresh
     chat.ScrollToBottom   ' scroll to the end of the chat
   End If
End Sub

So, there you have it. A complete modern looking multichat webapp that runs on all platforms in just about 150 lines of code!

Alwaysbusy

Click here to Donation and support ABMaterial

B4J: ABMaterial 2.20 with ABMGridBuilder

gridbuilder1

Responsive design is great, but at the same time something that is not so easy to grasp as it works over different levels.  ABMaterial has been using this concept from the very beginning using Materialize CSS and to make it easier, I created a builder for it.

A great start was the implementation done for Bootstrap: Shoelace.io.  I liked the idea of ‘drawing’ your grid.  However, for ABMaterial, I did want more.

Objectives:

  1. Needed to generate B4J source code, not html
  2. I wanted a way to return B4J code back to the builder
  3. Some extra functionalities to insert cells before/after another
  4. Save/Load to re-use designs.
  5. The generated code should include a ‘description’ of the grid.
  6. A ‘light’ and a ‘dark’ theme for night owls like me

Here is a little demonstration on how to work with it:

It generates code something like this:

'PHONE
'╔═══════════════════════════════════════════════════════════════════════════════════╗
'║ 1,1                                                                               ║
'╠═══════════════════════════════════════════════════════════════════════════════════╣
'║ 2,1                       | 2,2                       | 2,3                       ║
'║-----------------------------------------------------------------------------------║
'║ 2,4                       | 2,5                       | 2,6                       ║
'║-----------------------------------------------------------------------------------║
'║ 2,7                       | 2,8                       | 2,9                       ║
'║-----------------------------------------------------------------------------------║
'║ 2,10                      | 2,11                      | 2,12                      ║
'╠═══════════════════════════════════════════════════════════════════════════════════╣
'║ 3,1                                                                               ║
'╠═══════════════════════════════════════════════════════════════════════════════════╣
'║ 4,1                                                                               ║
'╚═══════════════════════════════════════════════════════════════════════════════════╝

'TABLET
'╔═══════════════════════════════════════════════════════════════════════════════════════════════════════════╗
'║ 1,1                                                                                                       ║
'╠═══════════════════════════════════════════════════════════════════════════════════════════════════════════╣
'║ 2,1                      | 2,2                      | 2,3                      | 2,4                      ║
'║-----------------------------------------------------------------------------------------------------------║
'║ 2,5                      | 2,6                      | 2,7                      | 2,8                      ║
'║-----------------------------------------------------------------------------------------------------------║
'║ 2,9                      | 2,10                     | 2,11                     | 2,12                     ║
'╠═══════════════════════════════════════════════════════════════════════════════════════════════════════════╣
'║ 3,1                                                                                                       ║
'╠═══════════════════════════════════════════════════════════════════════════════════════════════════════════╣
'║ 4,1                                                                                                       ║
'╚═══════════════════════════════════════════════════════════════════════════════════════════════════════════╝

'DESKTOP
'╔═══════════════════════════════════════════════════════════════════════════════════════════════════════════════════════════════════╗
'║ 1,1                                                                                                                               ║
'╠═══════════════════════════════════════════════════════════════════════════════════════════════════════════════════════════════════╣
'║ 2,1      | 2,2      | 2,3      | 2,4      | 2,5      | 2,6      | 2,7      | 2,8      | 2,9      | 2,10     | 2,11     | 2,12     ║
'╠═══════════════════════════════════════════════════════════════════════════════════════════════════════════════════════════════════╣
'║ 3,1                                                                                                                               ║
'╠═══════════════════════════════════════════════════════════════════════════════════════════════════════════════════════════════════╣
'║ 4,1                                                                                                                               ║
'╚═══════════════════════════════════════════════════════════════════════════════════════════════════════════════════════════════════╝

cont1.AddRows(1, True,"").AddCells12(1,"")
cont1.AddRows(1, True,"").AddCellsOS(12,0,0,0,4,3,1,"")
cont1.AddRows(2, True,"").AddCells12(1,"")
cont1.BuildGrid ' IMPORTANT!

This description of the grid is very handy when you start adding your components. As you can see in the video, copying the AddRows lines and parsing them back into the builder makes it easy to make changes.

The functionalities are all in the grid itself so you can work fast:

gridbuilder2

ABMGridBuilder is completely written in B4J, so it runs on all desktop platforms (Windows, OSX, Linux).

Tools like this make creating WebApps with ABMaterial and B4J even easier.  It is astonishing how versatile the B4X programming suite from Anywhere Software really is.  It is unique, fast, super stable and full of features nowhere else to be found. I’m so glad I discovered this great tool!

Donators will receive their mail with the download link shortly.

See ya!

Alwaysbusy

Click here to Donation and support ABMaterial


B4J: Future steps for ABMaterial

evolution

As ABMaterial has grown to a production ready framework for WebApps using B4J, I recently started a poll on the B4X forum to find out what could be the next steps in its evolution.

I came up with 3 things to do. They would require about the same develop time, but it could be useful to see what the actual users of ABMaterial would like me to work on next.

The possible choices were:

1. ABMXPlay
This is the component you have seen some demos of and will be more for game developers. It still needs a lot of attention before it can be released.

2. B4JS
The Basic to Javascript transpiler is now in its very early stages. It is a tough one to write without finishing ABMXplay first, as the ABMXPlay component would be the first to really benefit from it. The B4J core functions have been covered, but big parts of all ABMComponents need to be refactored to start using B4JS.

3. ABMaterialAbstractDesigner
A full blown Abstract Visual Designer like the one in B4J. This is NOT a code generator but the real deal. Code generators may look nice at first sight, but  have a huge disadvantage: they go one way. ABMAbstractDesigner would work like the B4X ones: you create a layout, develop, change the layout, continue to develop and so on without losing what you have written in code. I’ll use the grid designer I’ve shown as a proof of concept in another post + the possibility to put ABMComponents on them. I’ve done some tests this weekend and it would work very similar as the other B4X tools.

4. Other (please specify)

The poll is now nearly ended and besides some interesting messages with excellent pointers, it was quite obvious from the beginning that the ABMaterialAbstractDesigner (will need a working title for this project, lets call it ABMAD for now…) would be the next part I’ll be working on. (Almost 75% in the poll at the time of writing).  This was also my preferred choice as one user did not really have the patience to wait for me and started to write some kind of code generator.  However, his limited knowledge of the ABMaterial framework has the potential of starting to reflect bad on ABMaterial itself so it is time for me to jump in.

Making ABMAD will happen in a couple of logical steps:

  1. Making the ABMaterial components ready for a designer.  This will ask for some (minor) changes to them so they can be serialized and expose their properties to the designer.
  2. Making a grid builder.  This is the biggest step new users have to overcome nowadays.
  3. Making a properties view for the components.
  4. Drag/Drop facilities to add components to specific cells
  5. Let the ABMaterial library communicate with the Designer output in a similar way as B4X does now.

This will not happen overnight, but the benefits for ABMaterial programmers will be substantial.  This will NOT be a simple code generator. ABMAD will work bidirectional.  And you’ll be able to make layouts in ABMAD and mix them with manually written code like you can do in B4X/ABMaterial now.

Note: To avoid future misunderstandings, the license of ABMaterial 2.0 will include the following statement:

4. YOU AGREE NOT TO DISTRIBUTE, FOR A FEE, AN APPLICATION USING THE LIBRARY THAT, AS ITS PRIMARY PURPOSE, IS DESIGNED TO BE AN AID IN THE DEVELOPMENT OF SOFTWARE FOR YOUR APPLICATION’S END USER. SUCH APPLICATION INCLUDES, BUT IS NOT LIMITED TO, A DEVELOPMENT IDE OR A B4J SOURCE CODE GENERATOR.

Let me explain. The philosophy of ABMaterial (and myself) is giving anyone the chance to easily build great WebApps without having to spend any money. One of the reasons I picked B4J was because it is free. Those who can spare something, donate to stimulate my continuation on the project and in so help giving other not so fortunate people an equal chance to grow. Any derived development tool or generator that uses ABMaterial must follow this philosophy so the tool must be available with 100% of its features for free (not even a ‘limited’ free version is acceptable).

This has no impact on whatever WebApp you make with ABMaterial, but is solely a protection against some ‘money-grubber’ who sees the potential of the ABMaterial framework and thinks of making some easy money using my engine by simply writing a layer above it. Just to be clear, ‘FEE’ here means ANY form of payment or compensation, donations included.

So now that this is out of the way, I think it’s time to step up to the drawing board and start to make some decisions on how ABMAD will look like.

Fun times ahead!

Alwaysbusy

Click here to Donation and support ABMaterial


B4J: Creating your own components in ABMaterial

abmcustgauge

Although ABMaterial has already a lot of components build-in, sometimes you just need a specific one.  I had a question on the B4J forum from CGP who needed a Gauge component.

So let’s build one! CGP had found a very nice library JustGage that would allow him to get the Gauge he wanted. Its value had to be updateable from within B4J, and this was a bit tricky. It looked like we have to be a bit creative because this javascript library did not connect its parent tag with the created JustGage.

We will have to keep track of the JustGage variable ourselves by adding a script tag in the build:

Sub ABMComp_Build(internalID As String) As String
  Return $"<div id="${internalID}"></div><script>var _${internalID};</script>"$
End Sub

The rest of the code is straight forward and we can just follow the javascript instructions and add them in our relative events.

An ABMaterial custom component has 4 important events:

ABMComp_Build(): This is where we have to add the html tag (anchor) for the new component.  In this particular case we also have to add a <script> tag that will hold our justGage variable.  We can then later use this variable to update the Gauge chart.

ABMComp_FirstRun(): Here we can add a script that will run, well, at first run. In most cases, this is where we add the libraries javascript initialization code. The B4J $””$ Smartstrings are in methods like this particulary handy. Use them!

ABMComp_Refresh(): The place where we can adjust properties of the javascript component.  Like for this component, we’ll adjust the value of the gauge.

ABMComp_CleanUp(): An event that is raised when the component is removed.  Could be useful to do some cleanup in the html of set javascript variables to null.

Here is the complete B4J code for our customGauge component:

Sub Class_Globals
   Public ABMComp As ABMCustomComponent
  Public myValue As Int
  Public myLabel As String
End Sub

'Initializes the object. You can add parameters to this method if needed.
Public Sub Initialize(InternalPage As ABMPage, ID As String, value As Int, name As String)
  ABMComp.Initialize("ABMComp", Me, InternalPage, ID)
  myValue = value
  myLabel = name
End Sub

Sub ABMComp_Build(internalID As String) As String
  Return $"<div id="${internalID}"></div><script>var _${internalID};</script>"$
End Sub

' Is useful to run some initalisation script.
Sub ABMComp_FirstRun(InternalPage As ABMPage, internalID As String)
  Dim script As String = $"_${internalID} = new JustGage({
  id: "${internalID}",
  value: ${myValue},
  Min: 0,
  Max: 100,
  relativeGaugeSize: true,
  title: "${myLabel}"
  });"$

  InternalPage.ws.Eval(script, Array As Object(ABMComp.ID))
  ' flush not needed, it's done in the refresh method in the lib
End Sub

' runs when a refresh is called
Sub ABMComp_Refresh(InternalPage As ABMPage, internalID As String)
  Dim script As String = $"_${internalID}.refresh(${myValue});"$
  InternalPage.ws.Eval(script, Null)
End Sub

' do the stuff needed when the object is removed
Sub ABMComp_CleanUp(InternalPage As ABMPage, internalID As String)

End Sub

Now, how do we use our new component in our B4J ABMaterial WebApp?

First, we’ll need to make our custGauge a global variable on the page:

Sub Class_Globals
  Dim custGauge As CustomGauge
  ...

Next, we add the justGauge libraries in the BuildPage().  We’ve placed them in \www\js\custom folder so we can add:

Sub BuildPage()
  ...
  page.AddExtraJavaScriptFile("custom/justgage.js")
  page.AddExtraJavaScriptFile("custom/raphael-2.1.4.min.js")
  ...

In the ConnectPage, we’ll create the actual Gauge and we add a button so we can change its value:

Sub ConnectPage()
  ...
  custGauge.Initialize(page, "custGauge", 25, "Test")
  page.Cell(7,1).AddComponent(custGauge.ABMComp)

  Dim custGaugebtn1 As ABMButton
  custGaugebtn1.InitializeRaised(page, "custGaugebtn1", "", "", "BUTTON", "")
   page.Cell(7,1).AddComponent(custGaugebtn1)
   ...

And finally we add out button code to adjust the value of the Gauge:

Sub custGaugebtn1_Clicked(Target As String)
   custGauge.myValue = Rnd(10,100)
   custGauge.ABMComp.Refresh
End Sub

And just like that, it looks like a fun new component we’ve got in B4J ABMaterial!

Until next time,

Alwaysbusy

Click here to Donation and support ABMaterial


B4J: ABTelegram bots library

Bots are the next hot thing in 2016! So in my spare-spare time I’ve been working on a wrapper for the Telegram API v2.0. It has a rather unconventional API but I’m reworking it to make it very easy to write bots in B4J.

Bots could be very useful as yet another way to ‘talk’ with IoT devices. You can control LEDs, temperatures, ask for stats etc right from within the Telegram Chat App (which runs on about every kind of platform, being the desktop, a browser, iOS, Android, etc…). Or you can, like I did to test the wrapper, write a little game:

ABTelegram

Note: this library is in very early stages so the wrapper is not available for download yet. Full source code of the game will also be available when released.

Some sample code to show you how easy it is to write a bot in B4J (this is not the game code, just some tests):

Code to initialize the library:

Sub Process_Globals
   Dim ABT As ABTelegram
End Sub

Sub AppStart (Args() As String)
   Dim b As MyBot
   b.Initialize
   ABT.RegisterLongPollingBot(b.Bot)

   StartMessageLoop
End Sub

Code for the Bot:

'Class module
Sub Class_Globals
Dim ABT As ABTelegram
Public Bot As ABTLongPollingBot
Private botToken As String = &quot;207189xxxx:yyyyyyyyyyyyyyyyyyyyyyyyyyyyyyyyyyyy&quot;
Private botUserName As String = &quot;zzzzzzzzzBot&quot;
'Private callbackCounter As Int
End Sub

'Initializes the object. You can add parameters to this method if needed.
Public Sub Initialize
Bot.Initialize(&quot;Bot&quot;, Me, botToken, botUserName)
Dim upds As List = Bot.botgetUpdates
For i = 0 To upds.Size - 1
Dim upd As ABTUpdate = upds.Get(i)
Log(&quot;Go update: &quot; &amp; upd.UpdateId)
Next
End Sub

Sub Bot_UpdateReceived(update As ABTUpdate)
Log(&quot;Got an update&quot;)
If update.hasMessage Then
Dim msg As ABTMessage = update.GetMessage
Log(&quot;Message: &quot; &amp; msg.Text)

'        Dim userPhotos As ABTUserProfilePhotos = Bot.BotGetUserProfilePhotos(msg.Chat.id)
'        Log(&quot;photos: &quot; &amp; userPhotos.TotalCount)
'        Dim Photos As List = userPhotos.Photos
'        For i = 0 To Photos.Size - 1
'            Dim photoSizes As ABTPhotoSizes = Photos.Get(i)
'            For j = 0 To photoSizes.Sizes.Size - 1
'                Dim photoSize As ABTPhotoSize = photoSizes.Sizes.Get(j)
'                Dim photoFile As ABTFile = Bot.BotGetFile(photoSize.FileId)
'                Log(photoFile.FilePath)
'
'                Dim job1 As HttpJob
'                job1.Initialize(&quot;Job&quot; &amp; j, Me)
'                job1.Tag = photoFile.FilePath.Replace(&quot;photo/&quot;, &quot;&quot;)
'
'                Dim url As String = &quot;https://api.telegram.org/file/bot&quot; &amp; botToken &amp; &quot;/&quot; &amp; photoFile.FilePath
'                   job1.Download(url)
'               Next
'        Next

'        callbackCounter = callbackCounter + 1
'        Bot.BotSendMessageAsync(callbackCounter, msg.ChatId, &quot;Alweer hallo &quot; &amp; msg.Chat.FirstName)

Bot.BotSendMessage(msg.ChatId, &quot;Using an Emoji &quot; &amp; &quot;:grinning: in the message!&quot;) ' see    https://github.com/vdurmont/emoji-java for a list of emojis

'        Bot.BotSendPhoto(True, msg.ChatId, File.DirApp &amp; &quot;/&quot; &amp; &quot;telegram.png&quot;)

'        callbackCounter = callbackCounter + 1
'        Bot.BotSendDocumentAsync(callbackCounter, True, msg.ChatId, File.DirApp &amp; &quot;/&quot; &amp; &quot;mydocument.pdf&quot;, &quot;mydocument.pdf&quot;)

'        Bot.BotSendDocument(True, msg.ChatId, File.DirApp &amp; &quot;/&quot; &amp; &quot;mydocument.pdf&quot;, &quot;mydocument.pdf&quot;)

Bot.BotSendAudio(True, msg.ChatId, File.DirApp &amp; &quot;/&quot; &amp; &quot;myaudio.mp3&quot;)

'        Bot.BotSendVideo(True, msg.ChatId, File.DirApp &amp; &quot;/&quot; &amp; &quot;myvideo.mp4&quot;)

'        Bot.BotSendSticker(True, msg.ChatId, File.DirApp &amp; &quot;/&quot; &amp; &quot;mysticker.webp&quot;)

'        Bot.BotSendContact(msg.ChatId, &quot;+32496000000&quot;, &quot;Alain&quot;)

'        Bot.BotSendChatAction(msg.ChatId, ABT.CHATACTIONTYPE_TYPING)

'        Bot.BotSendLocation(msg.ChatId, 50.8492, 2.8779)

'        Bot.BotSendVenue(msg.ChatId, 50.8492, 2.8779, &quot;my venue&quot;, &quot;Grote markt 1&quot;)

Bot.BotSendVoice(True, msg.ChatId, File.DirApp &amp; &quot;/&quot; &amp; &quot;telegram.ogg&quot;)

'        Dim keyb As ABTReplyKeyboard
'        Dim rows As List
'        rows.Initialize
'        Dim tmpRow As ABTInlineKeyboardRow
'        tmpRow.Initialize
'        tmpRow.AddButton(&quot;test button&quot;, &quot;http://one-two.com&quot;, &quot;&quot;, &quot;&quot;)
'        rows.Add(tmpRow)
'        keyb.InitializeAsInlineKeyboardMarkup(rows)
'        Bot.BotEditMessageTextEx(msg.ChatId, msg.MessageId, 0, &quot;Extended test&quot;, ABT.PARSEMODE_HTML, False, keyb)

Dim rkeyb As ABTReplyKeyboard
rkeyb.InitializeAsForceReplyKeyboard(False)
Bot.BotSendMessageEx(msg.ChatId, &quot;some test: reply please&quot;, ABT.PARSEMODE_HTML, False, False, 0, rkeyb)

'        Dim rkeyb2 As ABTReplyKeyboard
'        Dim rows2 As List
'        rows2.Initialize
'        For i = 1 To 100
'            Dim tmpRow2 As ABTKeyboardRow
'            tmpRow2.Initialize
'            tmpRow2.AddButton(&quot;Press me&quot;)
'            rows2.Add(tmpRow2)
'        Next
'        rkeyb2.InitializeAsReplyKeyboardMarkup(rows2,False, False, False)
'        Bot.BotSendMessageEx(msg.ChatId, &quot;some test: press the button&quot;, ABT.PARSEMODE_HTML, False, False, 0, rkeyb2)

'        Dim rkeyb3 As ABTReplyKeyboard
'        Dim rows3 As List
'        rows3.Initialize
'        Dim tmpRow3 As ABTInlineKeyboardRow
'        tmpRow3.Initialize
'        tmpRow3.AddButton(&quot;Show image&quot;, &quot;&quot;, &quot;showimage&quot;, &quot;&quot;)
'        rows3.Add(tmpRow3)
'
'        rkeyb3.InitializeAsInlineKeyboardMarkup(rows3)
'        Bot.BotSendMessageEx(msg.ChatId, &quot;some test: press the button&quot;, ABT.PARSEMODE_HTML, False, False, 0, rkeyb3)
End If
If update.hasCallbackQuery Then
Dim cquery As ABTCallbackQuery = update.GetCallbackQuery
Log(&quot;CallbackQuery: &quot; &amp; cquery.data)
Select Case cquery.Data
Case &quot;showimage&quot;
Dim msg As ABTMessage = cquery.Message

Bot.BotSendPhotoEx(True, msg.ChatId , File.DirApp &amp; &quot;/&quot; &amp; &quot;myphoto.jpg&quot;, &quot;A new photo of darth vader!&quot;,False, 0, Null )
Bot.BotSendLocation(msg.ChatId, 50.8492, 2.8779)
Bot.BotEditMessageText(msg.ChatId, msg.MessageId, &quot;&quot;, &quot;Shown&quot;)
End Select
End If
If update.hasInlineQuery Then
Dim ciquery As ABTInlineQuery = update.GetInlineQuery
Log(&quot;InlineQuery: &quot; &amp; ciquery.Query)
If ciquery.Query = &quot;loc&quot; Then
Dim lstResults As List
lstResults.Initialize
Dim myanswer As ABTInlineQueryResult
myanswer.InitializeAsLocation(&quot;1&quot;, 50.8492, 2.8779, &quot;Your location&quot;)
lstResults.Add(myanswer)
Bot.BotAnswerInlineQuery(ciquery.Id, lstResults)
End If
End If
If update.hasChosenInlineResult Then
Dim ccresult As ABTChosenInlineResult = update.GetChosenInlineResult
Log(&quot;ChosenInlineResult: &quot; &amp; ccresult.Query)
End If
End Sub

Sub Bot_AsyncSendReceived(methodType As String, callbackId As String, success As Boolean, asyncObject As ABTObject)
Log(&quot;Async method: &quot; &amp; callbackId &amp; &quot; &quot; &amp; methodType &amp; &quot; &quot; &amp; success)
If success And asyncObject &amp;lt;&amp;gt; Null Then
If asyncObject.objectType=&quot;ABTMessage&quot; Then
Dim message As ABTMessage = asyncObject
Log(&quot;Async callback: &quot; &amp; message.MessageId)
End If
End If
End Sub

Sub JobDone (Job As HttpJob)
Log(&quot;JobName = &quot; &amp; Job.JobName &amp; &quot;, Success = &quot; &amp; Job.Success)
If Job.Success = True Then
Dim fSave As OutputStream = File.OpenOutput(File.DirApp, Job.tag, False)
File.Copy2(Job.GetInputStream, fSave)
fSave.Close
Else
Log(&quot;Error: &quot; &amp; Job.ErrorMessage)
End If
Job.Release
End Sub

Alwaysbusy

Click here to Donation if you like my work


B4J: ABMaterial Public 1.06/Donators 1.07 now released

The public version 1.06 of ABMaterial is now available from the B4J website!

Some highlights on this public release:

Theme and controls have a Colorize() method to quickly change a theme
Getting more out of the Theme system. Just by using the one single line in B4J, theme.Colorize(myColor), you can change the base color of ABMaterial. You can of course still tune it manually.

Colorizing a theme in one line in ABMaterial

ABMDataTimeScroller
New component to let the user choose a date through a scroller.  Can be used to get the date, the time or both. See the demo for more.

The DateTime Scroller of ABMaterial

ABMDateTimePicker
Alternative component to let the user choose a date/time.  The date can be picked on a calendar, the time on a clock. See the demo for more.

The Date picker of ABMaterial

The Time picker of ABMaterial

Speed gain by using minified versions of the javascript/css files
This is just the first step in speeding up ABMaterial and the user experience both on a desktop and a mobile device. I continue searching for methods to make ABMaterial even faster!

Read the README1.06.TXT for the full release notes.

Download ABMaterial Public version 1.06

Donators will receive an email with the download link to ABMaterial 1.07 containing two new controls, ABMEditor and ABMSocialShare.  A optimized TreeView and Google Analytics support is also included!

Happy programming!

Alwaysbusy

Click here to Donation if you like my work


B4J: Using Google Analytics with ABMaterial

ABMaterial and Google Analytics

As ABMaterial is a hybrid website/webapp framework, you can use SEO (see previous article), and now even Google Analytics in the upcoming version 1.07. This article shows how you can use Google Analytics by adding just one extra line of B4J code on your page!

Note: This post is an ABMaterial adaptation of an excellent article for beginners on Google Analytics by Kristi Hines. Just to make it easier for you, I used and changed it just up to where ABMaterial comes in.  At the end of this post you can then continue reading the original one for more tips and tricks.

Why every website/webapp needs Google Analytics

Here are just a few of the many questions about your ABMaterial website/webapp that you can answer using Google Analytics.

  • How many people visit my website/webapp?
  • Where do my visitors live?
  • What websites send traffic to my website/webapp?
  • What marketing tactics drive the most traffic to my website/webapp?
  • Which pages on my website/webapp are the most popular?
  • How many visitors have I converted into leads or customers?
  • Where did my converting visitors come from and go on my website/webapp?
  • What content do my visitors like the most?

There are many, many additional questions that Google Analytics can answer, but these are the ones that are most important for most website/webapp owners. Now let’s look at how you can get Google Analytics on your ABMaterial website/webapp.

How to install Google Analytics

First, you need a Google Analytics account. If you have a primary Google account that you use for other services like Gmail, Google Drive, Google Calendar, Google+, or YouTube, then you should set up your Google Analytics using that Google account. Or you will need to create a new one.

This should be a Google account you plan to keep forever and that only you have access to. You can always grant access to your Google Analytics to other people down the road, but you don’t want someone else to have full control over it.

Big tip:

don’t let anyone (your web designer, web developer, web host, SEO person, etc.) create your website’s Google Analytics account under their own Google account so they can “manage” it for you. If you and this person part ways, they will take your Google Analytics data with them, and you will have to start all over.

Set up your account and property

Once you have a Google account, you can go to Google Analytics and click the Sign into Google Analytics button. You will then be greeted with the three steps you must take to set up Google Analytics.

google analytics setup

After you click the Sign Up button, you will fill out information for your website.

For the absolute beginner’s guide, we’re going to assume you have one website and only need one view (the default, all data view. The setup would look something like this.

new account information google analytics

Beneath this, you will have the option to configure where your Google Analytics data can be shared.

configuring shared info for google analytics

Our google account is setup and all we need now is get our Tracking ID and add it in ABMaterial.

Click the Get Tracking ID button. You will get a popup of the Google Analytics terms and conditions, which you have to agree to. Then you will get your Google Analytics Tracking ID.

Tracking ID in the Google Analytics Console

In our ABMaterial app, all we have to do is add this single line to each of our pages in the BuildPage() method:

page.Initialize(Name, “/ws/appName/Name, False)
page.UseGoogleAnalytics(“UA-64248213-1”, Null)

I guess it can’t get much easier, no?

If you want to go deeper into Google Analytics, I suggest reading the original article The Absolute Beginner’s Guide to Google Analytics.

ABMaterial 1.07 will be realeased in a couple of weeks for the donators. Addidtional to Google Analytics support, two new components ABMEditor and ABMSocialShare will be included, but more on this in a next article.

Happy programming!

Alwaysbusy


B4J: ABMaterial Public 1.05/Donators 1.06 now released

The public version 1.05 of ABMaterial is now available from the B4J website!  Three new controls:

ABMSlider: Add a slider for values with a wide range.

Range

ABMRange: Add a range slider for values with two handlers.

Slider

ABMCustomControl: add your own components to the ABMaterial framework.

CustomComponent

Some more highlights on this release:

  • Complete rewrite of the Refresh system
  • Material Icon Fonts are now loaded locally
  • Disable the back button in the browser
  • ABMModalSheet FULL size option
  • LocalStorage support
  • ABMPlatform object containing basic info on the users browser and device
  • Integrate variables for SEO-optimization
  • Responsive tables

Read the README1.05.TXT for the full release notes.

Download ABMaterial Public version 1.05

Donators will receive an email with the download link to ABMaterial 1.06 containing two new controls, ABMDataTimeScroller and ABMDateTimePicker.

Happy programming!

Alwaysbusy

Click here to Donation if you like my work

B4J: ABMaterial WebApps and SEO (Search Engine Optimization)

SEO

A feedback case I got from one of the users of ABMaterial, Herbert, was the question how ABMaterial for B4X coped with SEO-optimization. To be perfectly honest, I hadn’t really though about it. I  had a couple of things already, like headers, bold text, a page title and description.

As any good programmer,  if it looks nice, is user friendly and works as expected, my work is done and users will find and like it. No?

And it kept me thinking.  So this morning, lying awake at 4  o’clock (sleeping is highly overrated IMHO and an invention of the Bed Consortium, but I’m sidetracking), I decided to learn more about SEO and how it could be implemented in ABMaterial for B4X.

Herbert gave me some links, so I started reading up.

Looked like I had some things right already, but ABMaterial could use some polishing.

For starters, I added some extra properties to the ABMaterial page object that will be saved in the generated html file:

pageTitle: very important, pick good keywords
pageDescription: keep it around 140 to 160 chars
pageKeywords: a comma delimited string containing your page keywords
pageHTMLName: it is always index.html in ABMaterial, but it’s better to give it some name using keywords, like ‘abmaterial-custom-component.html’, use hyphens (-) between words to improve readability
pageSiteMapPriority: a value between 0.00 and 1.00, see further
pageSiteMapFrequency: how frequently the page is updated (never, none, always, hourly, weekly, yearly, …), see further

Headers:

Covered!  ABMaterials labels can have headers like <h1>, <h2> so we’re ok.  Tip: create only one <h1>!

<h1>Most Important</h1>
<h2>Second Most Important</h2>
<h3>Third Most Important</h3>

Bold:

Got it: You can use markers like {B}{/B} in labels to set text in bold/strong.

Use tag in a image:

Ah, needed some changes.  I misused it.  Thinking ‘who the #?@! can’t show images anymore these days‘, I used it as an image toggle property.  Changed it now so it can be used properly.

Hyperlinks:

Added some extra markers {AS}{/AS} in the ABMLabel Component so you can add a title.

{AL}http://www.website.com/page.html{AS}keyword{/AS}{AT}my visible text{/A}

will result in:

<a rel=”nofollow” target=”_black” href=”http://www.website.com/page.html” title=”keyword”>my visible text</a>

sitemap.xml and robots.txt:

The Sitemaps protocol allows a webmaster to inform search engines about URLs on a website that are available for crawling. ABMaterial has the possibility to generate a sitemap.xml file and a robots.txt file (for sites like Ask.com).

What does it look like Alwaysbusy, I hear you ask. Well, something like this:

<?xml version=”1.0″ encoding=”UTF-8″?>
</pre>
<urlset
xmlns=”http://www.sitemaps.org/schemas/sitemap/0.9”
xmlns:xsi=”http://www.w3.org/2001/XMLSchema-instance”
xsi:schemaLocation=”http://www.sitemaps.org/schemas/sitemap/0.9
http://www.sitemaps.org/schemas/sitemap/0.9/sitemap.xsd”&gt;
<!– created with ABMaterial and B4J –>
<url>
<loc>https://alwaysbusycorner.com/index.html</loc&gt;
<lastmod>2016-01-16T11:11:16+00:00</lastmod>
<changefreq>monthly</changefreq>
<priority>1.00</priority>
</url>
<url>
<loc>https://alwaysbusycorner.com/alwaysbusy-abmaterial-introduction.html</loc&gt;
<lastmod>2016-01-16T11:11:16+00:00</lastmod>
<changefreq>monthly</changefreq>
<priority>0.50</priority>
</url>
<url>
<loc>https://alwaysbusycorner.com/alwaysbusy-abmaterial-customcomponent.html</loc&gt;
<lastmod>2016-01-16T11:11:16+00:00</lastmod>
<changefreq>yearly</changefreq>
<priority>0.50</priority>
</url>
</urlset>

To generate this is easy in ABMaterial, and needs just a couple of things:

  1. In ABMShared, add a property  public AppPublishedStartUrl as String = “http://yoururl.com”.

  2. In the initalize() method of ABMApplication, add ‘ABM.AppPublishedStartUrl=ABMShared.AppPublishedStartUrl.

  3. In the BuildPage() method of each page, set page.PageHTMLName=”your-good-keywords.html”

  4. Also in BuildPage(), add page.PageSiteMapPriority = “0.50” (number between 0.00 and 1.00, and don’t set them all to 1.00, that makes them equally important)

  5. Also add page.PageSiteMapFrequency = ABM.SITEMAP_FREQ_MONTHLY (use one of the contstants)

  6. If you use a ABMNavigationBar, update the url of each sidebar item in ABMShared, e.g. page.NavigationBar.AddSideBarItem(“Contacten”, “Contacten”, “mdi-action-dashboard”, “../StartPage/your-good-keywords.html”)

  7. In ABMApplication, also change your InitialPage=”your-good-keywords.html”

  8. In ABMApplication, change ‘index.html’ in the AddPage() method to Page.PageHTMLName

When you start your app, the sitemap.xml and robots.txt files will be generated next to your apps html file. After publishing it to your final site, you let the search engines know you want to submit your site.

You should be able to use these sitemap-submission URLS. Put the full URL to your sitemap, including http://, after the = sign:

http://www.google.com/ping?sitemap=

http://www.google.com/webmasters/sitemaps/ping?sitemap=

http://www.bing.com/webmaster/ping.aspx?sitemap=

http://submissions.ask.com/ping?sitemap=

http://www.didikle.com/ping?sitemap=

So, you’re already one step ahead of many other tools when you use B4J and ABMaterial!

Of course, your content will be the most important part to atract users and get high rankings in the search engines, but it never hurts giving them some help.

If any SEO expert reading this article has some other ideas, please post them.

ABMaterial 1.05, supporting all this, will be send to the donators early next week. Quite some goodies included in this release!

Head to the B4X website, download your free copy of B4J and go to the forum to download the ABMaterial framework.

Alwaysbusy

Some good rerading on SEO:

https://moz.com/beginners-guide-to-seo

http://webdesign.about.com/od/seo/tp/seo_tips_and_tricks.htm

https://www.eebew.com/seo-tutorial/on-page-seo/basic-elements/seo-heading-tags/

https://www.eebew.com/seo-tutorial/on-page-seo/basic-elements/what-are-meta-descriptions/

Click here to Donation if you like my work