B4X: Custom Icons in ABMaterial 4.25

customicons

A much asked feature has been to integrate custom icons in ABMaterial for B4J. In version 4.25, this will be possible!

Couple of notes first:
1. The already build-in font icons (font awesome, google icons) are a lot faster to load, so consider them first
2. Some basic CSS knowledge will be needed (margins, padding, fill)
3. Custom icons MUST be named starting with abm-

There are three ways to load custom icons in ABM:

1. SVG
These type of icons MUST be loaded in BuildPage. This is because, when used, they link to the SVG tags (contrary to embedded SVG, see further). If used multiple times, it will make your HTML code smaller as the SVG code is only included once in the HTML.

page.AddSVGIcon("abm-si-maki-basketball-11", $"<svg xmlns="http://www.w3.org/2000/svg" xmlns:xlink="http://www.w3.org/1999/xlink" version="1.1" style="width:0;height:0;position:absolute;overflow:hidden;">
     <defs><symbol viewBox="0 0 11 10.54083251953125" aria-labelledby="basi-maki-basketball-11-title" id="abm-si-maki-basketball-11"><title id="basi-maki-basketball-11-title">icon basketball-11</title><path d="M11 1a1 1 0 1 1-2 0 1 1 0 0 1 2 0zM4.5 3a1.5 1.5 0 1 0 0-3 1.5 1.5 0 0 0 0 3zm3.89 6.69L6 6.59V4.5h.5a.49.49 0 0 0 .41-.23l1.5-2A.49.49 0 0 0 8.5 2a.5.5 0 0 0-.86-.34L6.25 3.5H2.5a.5.5 0 0 0-.36.16l-2 2.54a.49.49 0 0 0-.14.3.5.5 0 0 0 .5.5.49.49 0 0 0 .41-.23L2.74 4.5H3v2.09L.61 9.69a.5.5 0 0 0 .39.81.49.49 0 0 0 .41-.23L3.94 7h1.12l2.52 3.27A.5.5 0 0 0 8.5 10a.49.49 0 0 0-.11-.3v-.01z"/></symbol> </defs>
   </svg>"$, 24,24,"margin-top: 12px;fill: black")

As you can see, in here we have also to declare a margin-top and a fill color in CSS. The name for our icon is ‘abm-si-maki-basketball-11′.

Icons like this typically have an SVG tag looking like this (hidden, width & height = 0, ALL properties are required!):

<svg xmlns="http://www.w3.org/2000/svg" xmlns:xlink="http://www.w3.org/1999/xlink" version="1.1" style="width:0;height:0;position:absolute;overflow:hidden;">...</svg>

10000+ icopns of this type can be found here: https://leungwensen.github.io/svg-icon/

2. Embedded SVG
These type of icons can be loaded at runtime (e.g. in ConnectPage) as the SVG tag code will be included in the html. This also means if you use the same icon multiple times, the full SVG code will be added multiple times too!

page.AddEmbeddedSVGIcon("abm-aardbei", $"<svg xmlns="http://www.w3.org/2000/svg" height="32" width="26" viewBox="0 0 116.76708 149.28999" style="margin-top: 8px;fill: red">
  <defs id="defs3749" />
  <g transform="translate(-129.2905,-77.659)" id="g3744">
  <g id="g3728">
  <path style="stroke:#000000;stroke-miterlimit:10" id="path3726" d="m 243.873,168.241 c -9.344,35.617 -43.232,58.208 -56.131,58.208 -13.155,0 -45.451,-28.357 -56.387,-63.353 -7.225,-23.113 12.081,-42.038 26.423,-42.112 21.474,-0.11 23.813,12.248 32.681,9.449 9.898,-3.125 8.874,-12.884 28.954,-12.606 12.542,0.171 31.997,21.688 24.46,50.414 z" stroke-miterlimit="10" />
  </g>
  <path style="fill:#ffffff" id="path3730" d="m 156.34,148.723 c 0,5.688 -1.251,10.304 -2.801,10.304 -1.55,0 -2.801,-4.615 -2.801,-10.304 0,-5.689 1.251,-10.3 2.801,-10.3 1.55,0 2.801,4.611 2.801,10.3 z" />
  <path style="fill:#ffffff" id="path3732" d="m 170.818,175.338 c 0,5.688 -1.251,10.296 -2.802,10.296 -1.55,0 -2.802,-4.607 -2.802,-10.296 0,-5.689 1.252,-10.304 2.802,-10.304 1.55,0 2.802,4.615 2.802,10.304 z" />
  <path style="fill:#ffffff" id="path3734" d="m 190.6,203.347 c 0,5.695 -1.251,10.304 -2.801,10.304 -1.55,0 -2.802,-4.608 -2.802,-10.304 0,-5.688 1.251,-10.296 2.802,-10.296 1.549,0 2.801,4.607 2.801,10.296 z" />
  <path style="fill:#ffffff" id="path3736" d="m 211.903,175.338 c 0,5.688 -1.251,10.296 -2.801,10.296 -1.55,0 -2.801,-4.607 -2.801,-10.296 0,-5.689 1.251,-10.304 2.801,-10.304 1.55,0 2.801,4.615 2.801,10.304 z" />
  <path style="fill:#ffffff" id="path3738" d="m 192.462,160.498 c 0,5.688 -1.251,10.303 -2.794,10.303 -1.55,0 -2.802,-4.614 -2.802,-10.303 0,-5.692 1.251,-10.3 2.802,-10.3 1.543,0 2.794,4.608 2.794,10.3 z" />
  <path style="fill:#ffffff" id="path3740" d="m 226.324,148.723 c 0,5.688 -1.252,10.304 -2.802,10.304 -1.55,0 -2.802,-4.615 -2.802,-10.304 0,-5.689 1.251,-10.3 2.802,-10.3 1.55,0 2.802,4.611 2.802,10.3 z" />
  <path id="path3742" d="m 153.539,77.659 24.503,24.531 c 0,0 4.202,2.784 6.954,0.68 4.366,-3.328 32.268,-25.211 32.268,-25.211 l -12.842,21.712 c 0,0 -3.015,4.604 1.878,5.22 4.892,0.618 27.148,-6.854 32.126,19.917 0,0 -2.297,-15.409 -29.325,-11.513 0,0 -9.421,1.721 -14.719,6.841 0,0 -4.714,6.891 -12.138,1.244 0,0 -27.077,-15.366 -46.219,5.646 0,0 13.304,-25.724 34.792,-22.136 z" />
  </g>
</svg>"$)

Here too, some CSS has to be used + setting the width & height too.

A typical svg tag looks like this:

<svg xmlns="http://www.w3.org/2000/svg" width="32" height="32" viewBox="0 0 1024 1024" style="margin-top: 14px;fill: black">...</svg>

Such svg tags are e.g. created when exporting it from Illustrator.

3. Images
These type of icons are just plain png/jpg images. Make sure you use the appropriate size of the image to load. e.g. if your icon is going to be 32×32, do not load a 1024×1024 image!

page.AddImageIcon("abm-batman", "../images/batman.png", 32, 32, "margin-top: 8px", "Batman")

In this case, width, height and the CSS are part of the load method.

You can find 65000+ of these icons here: https://icons8.com/

USAGE
Now you can use your loaded icons like you would load font based icons:
e.g.

Dim lblTest As ABMLabel
lblTest.Initialize(page, "lblTest", "This is some test {IC:#000000}abm-si-maki-basketball-11{/IC} with {IC:#000000}abm-aardbei{/IC} special icons {IC:#000000}abm-gmail{/IC} or {IC:#000000}abm-gmail2{/IC}.", ABM.SIZE_H6, True, "")
page.Cell(9,1).AddComponent(lblTest)

Note that the color in the {IC} tag must be set for compatibility reasons, but is ignored.

Another example is in the sidebar menu:

page.NavigationBar.AddSideBarItem("MDL4", "Batmans layer", "abm-batman", "")
page.NavigationBar.AddSideBarDivider
page.NavigationBar.AddSideBarItem("MDL5", "From icons8.com", "abm-facebook", "")
page.NavigationBar.AddSideBarDivider

Or on the action button:

Dim actionB As ABMActionButton
actionB.Initialize(page, "ActionB", "abm-aardbei-action", "", "")
page.AddActionButton(actionB)<span 				data-mce-type="bookmark" 				id="mce_SELREST_start" 				data-mce-style="overflow:hidden;line-height:0" 				style="overflow:hidden;line-height:0" 			></span>

Alwaysbusy

Click here to Donation and support ABMaterial

Advertisement

B4X: Important upgrade to ABMaterial 4.03 for everyone!

ABMDragonfly4.00

As you probably already have noticed, the B4J IDE Project Explorer has received a major upgrade. And it is GREAT! However, ABMaterial had some trouble with the new file format, so last night I’ve been working non-stop on a fix to be compatible.

If you are using B4J 6.00+, you MUST download 4.03 or higher.  For that reason, EVERYONE (donator or not), can upgrade to the new version.

You can download the latest version of ABMaterial Dragonfly here.

Until next time!

Alwaysbusy

Click here to Donation and support ABMaterial


B4X: Lightweight charts in ABMaterial

Frappe3a

The official charts library inABMaterial is Chartist, but because of its many features it is also a rather slow rendering js/css library and not always that easy to implement. On the B4X forum, Mashiane has created a nice ABMCustomComponent wrapper for the JQPlot plugin and there are many examples in the forum on how to implement Google Charts in ABM, like this post from Harris.

So why yet another one? Well the main focus on this wrapper is being fast AND easy to implement. Of course this also means less tunable features but I have found that maybe for 95% of our needs having some basic stuff like a tooltip and being clickable is actually enough.

I came accross the Frappé charts javascript library. It has tooltips, some interactions and animations. And it is bloody fast! 🙂

I only had to make a couple of CSS changes to make it ABM compatible and the ABMCustomComponent wrapper was very easy to write.

Usage:

Create your chart variables in Class_globals:

Dim FrappeChart1 As FrappeChart
Dim FrappeChart2 As FrappeChart
Dim FrappeChart3 As FrappeChart
Dim FrappeChart4 As FrappeChart
Dim FrappeChart5 As FrappeChart
Dim FrappeChart6 As FrappeChart
Dim FrappeChart7 As FrappeChart

In Page_Connect(), make your charts (you immidately can see the simplicity of the code):

FrappeChart1.Initialize(page, "FrappeChart1", "bar", "My Awesome Chart", 250)
FrappeChart1.FrappeLabels.AddAll(Array As String("12am-3am", "3am-6am", "6am-9am", "9am-12pm","12pm-3pm", "3pm-6pm", "6pm-9pm", "9pm-12am"))
FrappeChart1.AddDataSet("Some data", "light-blue", Array As Int(25, 40, 30, 35, 8, 52, 17, -4), Array As String())
FrappeChart1.AddDataSet("Another set", "violet", Array As Int(25, 50, -10, 15, 18, 32, 27, 14), Array As String())
FrappeChart1.AddDataSet("Yet Another", "blue", Array As Int(15, 20, -3, -15, 58, 12, -17, 37), Array As String())
page.Cell(1,1).AddComponent(FrappeChart1.ABMComp)

FrappeChart2.Initialize(page, "FrappeChart2", "line", "My Awesome Chart", 250)
FrappeChart2.FrappeLabels.AddAll(Array As String("12am-3am", "3am-6am", "6am-9am", "9am-12pm","12pm-3pm", "3pm-6pm", "6pm-9pm", "9pm-12am"))
FrappeChart2.AddDataSet("Some data", "light-blue", Array As Int(25, 40, 30, 35, 8, 52, 17, -4), Array As String())
FrappeChart2.AddDataSet("Another set", "violet", Array As Int(25, 50, -10, 15, 18, 32, 27, 14), Array As String())
FrappeChart2.AddDataSet("Yet Another", "blue", Array As Int(15, 20, -3, -15, 58, 12, -17, 37), Array As String())
page.Cell(1,1).AddComponent(FrappeChart2.ABMComp)

FrappeChart3.Initialize(page, "FrappeChart3", "scatter", "My Awesome Chart", 250)
FrappeChart3.FrappeLabels.AddAll(Array As String("12am-3am", "3am-6am", "6am-9am", "9am-12pm","12pm-3pm", "3pm-6pm", "6pm-9pm", "9pm-12am"))
FrappeChart3.AddDataSet("Some data", "light-blue", Array As Int(25, 40, 30, 35, 8, 52, 17, -4), Array As String())
FrappeChart3.AddDataSet("Another set", "violet", Array As Int(25, 50, -10, 15, 18, 32, 27, 14), Array As String())
FrappeChart3.AddDataSet("Yet Another", "blue", Array As Int(15, 20, -3, -15, 58, 12, -17, 37), Array As String())
page.Cell(1,1).AddComponent(FrappeChart3.ABMComp)

FrappeChart4.Initialize(page, "FrappeChart4", "pie", "My Awesome Chart", 250)
FrappeChart4.FrappeLabels.AddAll(Array As String("12am-3am", "3am-6am", "6am-9am", "9am-12pm","12pm-3pm", "3pm-6pm", "6pm-9pm", "9pm-12am"))
FrappeChart4.AddDataSet("Some data", "light-blue", Array As Int(25, 40, 30, 35, 8, 52, 17, -4), Array As String())
FrappeChart4.AddDataSet("Another set", "violet", Array As Int(25, 50, -10, 15, 18, 32, 27, 14), Array As String())
FrappeChart4.AddDataSet("Yet Another", "blue", Array As Int(15, 20, -3, -15, 58, 12, -17, 37), Array As String())
page.Cell(1,1).AddComponent(FrappeChart4.ABMComp)

FrappeChart5.Initialize(page, "FrappeChart5", "percentage", "My Awesome Chart", 250)
FrappeChart5.FrappeLabels.AddAll(Array As String("12am-3am", "3am-6am", "6am-9am", "9am-12pm","12pm-3pm", "3pm-6pm", "6pm-9pm", "9pm-12am"))
FrappeChart5.AddDataSet("Some data", "light-blue", Array As Int(25, 40, 30, 35, 8, 52, 17, -4), Array As String())
FrappeChart5.AddDataSet("Another set", "violet", Array As Int(25, 50, -10, 15, 18, 32, 27, 14), Array As String())
FrappeChart5.AddDataSet("Yet Another", "blue", Array As Int(15, 20, -3, -15, 58, 12, -17, 37), Array As String())
page.Cell(1,1).AddComponent(FrappeChart5.ABMComp)

FrappeChart6.Initialize(page, "FrappeChart6", "bar", "My Awesome Chart", 250)
FrappeChart6.FrappeLabels.AddAll(Array As String("Sun", "Mon", "Tue", "Wed", "Thu", "Fri", "Sat"))
FrappeChart6.AddDataSet("Some data", "purple", Array As Int(25, 40, 30, 35, 8, 52, 17), Array As String())
FrappeChart6.AddDataSet("Another set", "orange", Array As Int(25, 50, -10, 15, 18, 32, 27), Array As String())
FrappeChart6.FrappeShowSums = True
FrappeChart6.FrappeShowAverages = True
page.Cell(1,1).AddComponent(FrappeChart6.ABMComp)

FrappeChart7.Initialize(page, "FrappeChart7", "bar", "My Awesome Chart", 300)
FrappeChart7.FrappeLabels.AddAll(Array As String("Ganymede", "Callisto", "Io", "Europa"))
FrappeChart7.AddDataSet("Distances", "grey", Array As Int(1070.412, 1882.709, 421.700, 671.034), Array As String("1.070.412km", "1.882.709km", "421.700km", "671.034km"))
FrappeChart7.FrappeIsNavigable = True
FrappeChart7.FrappeRaiseEventOnClick = True
page.Cell(2,1).AddComponent(FrappeChart7.ABMComp)

An example of the Click event on Chart7:

Sub FrappeChart7_Clicked(index As Int)
   Dim img As ABMImage = page.Component("img")
   Dim lbl As ABMLabel = page.Component("lbl")
   Select Case index
     Case 0
       img.Source = "../images/ganymede.jpg"
       lbl.Text = "{B}Ganymede{/B}{BR}{BR}Semi-major-axis: 1070412 km{BR}{BR}Mass: 14819000 x 10^16 kg{BR}Diameter: 5262.4 km"
     Case 1
       img.Source = "../images/callisto.jpg"
       lbl.Text = "{B}Callisto{/B}{BR}{BR}Semi-major-axis: 1882709 km{BR}{BR}Mass: 10759000 x 10^16 kg{BR}Diameter: 4820.6 km"
     Case 2
       img.Source = "../images/io.jpg"
       lbl.Text = "{B}Io{/B}{BR}{BR}Semi-major-axis: 421700 km{BR}{BR}Mass: 8931900 x 10^16 kg{BR}Diameter: 3637.4 km"
     Case 3
       img.Source = "../images/europa.jpg"
       lbl.Text = "{B}Europa{/B}{BR}{BR}Semi-major-axis: 671034 km{BR}{BR}Mass: 4800000 x 10^16 kg{BR}Diameter: 3121.6 km"
   End Select
   img.Refresh
   lbl.Refresh
End Sub

Some more examples of charts generated with this code:

Frappe1Frappe2a

Attached are the FrappeChart.bas and the frappe-charts.min.iife.js files. Copy the .js file to the /www/js/custom/ folder and import the .bas file.

http://gorgeousapps.com/FrappeChart.zip

Alwaysbusy

Click here to Donation and support ABMaterial


B4X: ABMaterial 3.75 Public/4.00 Donators released

ABMDragonfly4.00

ABMaterial Dragonfly (4.00) for B4X is available. Yes, it has a new name! What started as version 3.81 got upgraded to a new major version, especially since it uses a new cache control system.

ABMaterial has always been one of the fastest RADs from its start, now over 2 years ago.  But with 4.00, we’ll take it to a whole new level!

Mindful and I have spend 5 days (and nights) checking out how we could cache ABMaterial to the extreme without losing any of its functionality.  The results are just ridiculous…

Finish times are less than 10% of the time on the second and next loads. So on 3G, on the users next visit(s), the WebApp is almost just as fast as on high speed cable!

And this system not only works with the same page. Once one page has been loaded, all the other pages can take gain of this system. Even when the user revisits your app much later.

Furthermore there is the new debug feature to check how your apps work on different device sizes.  See it at work here:

Add this snippet to you main module, AFTER starting the server:

#If DEBUG
' in debug mode, start the browser and open the app on all devices (DOES NOT WORK IF EDGE IS YOUR DEFAULT BROWSER!)
ABM.ViewerOpenAllDevices("http://localhost:" & port & "/" & ABMShared.AppName & "/", 100)

' or open a specific device as default (DOES NOT WORK IF EDGE IS YOUR DEFAULT BROWSER!)
'ABM.ViewerOpenDevice("http://localhost:" & port & "/" & ABMShared.AppName & "/", 300, ABM.VIEWER_TABLET)

' or just open de browser, no multiple devices (should work in Edge)
'ABM.ViewerOpen("http://localhost:" & port & "/" & ABMShared.AppName & "/")
#End If

Lots of new theme properties! Check out the demo on how to use  them in the new Dragonfly theme.  As winter is coming and days are getting shorter (at least here in the northern hemisphere), I went for a ‘Night’ theme this time.

ABMaterial DragonFly is now available on 750+ locations worldwide on CDN!  If you use the CDN, you do not need to upload the css/js/fonts folders to your own server anymore!

This means only your own assets (images etc) from the www folder have to be available on your server. De demo running on abmaterial.com for example is working like this.

Usage:

ABM.ActivateUseCDN("DONATORKEY", "https://cdn.jsdelivr.net/gh/RealAlwaysbusy/ABMaterial@v4.03/")

The over 20 new fixes and fulfilled wishes make ABMaterial 4.00 very stable, just like its ‘parent’ programming language: B4X.  It is a real joy knowing one can depend on a strong, bug free environment.  Erel from Anywhere Software rulez!

Happy programming!

Alwaysbusy

Click here to Donation and support ABMaterial

B4J: Creating a Star Rating component in ABMaterial

StarRating

Michał asked me in the feedback app to implement some kind of Star Rating component. As this is not so commonly needed, I thought this could be another good example of an ABMCustomComponent. One can ‘hover’ over the stars to set its value or it can be set and retrieved by code.

I show you how to do it in ABMaterial 3.75 first with the new features (released soon), and will then explain what needs to be changed for previous versions.

So let’s get started!

1. We create a new standard class CompStarRating:

'Class module
Sub Class_Globals
Public ABMComp As ABMCustomComponent
Dim myInternalName As String
End Sub

'Initializes the object. You can add parameters to this method if needed.
Public Sub Initialize(InternalPage As ABMPage, ID As String, radioName As String)
myInternalName = radioName
Dim CSS As String = $"
#half-stars-example .rating-group {
display: inline-flex;
}
#half-stars-example .rating__icon {
pointer-events: none;
}
/* This is an important part: we MUST override the Materialize CSS implementation of the the radio button! */
#half-stars-example .rating__input + label:before,
#half-stars-example .rating__input + label:after {
position: absolute !important;
left: -9999px !important;
}
#half-stars-example .rating__label {
cursor: pointer;
padding: 0 0.1em;
font-size: 2rem;
margin-top: 1rem;
}
#half-stars-example .rating__label--half {
padding-right: 0;
margin-right: -0.6em;
z-index: 2;
}
#half-stars-example .rating__icon--star {
color: orange;
}
#half-stars-example .rating__icon--none {
color: #eee;
}
#half-stars-example .rating__input--none:checked + .rating__label .rating__icon--none {
color: red;
}
#half-stars-example .rating__input:checked ~ .rating__label .rating__icon--star {
color: #ddd;
}
#half-stars-example .rating-group:hover .rating__label .rating__icon--star,
#half-stars-example .rating-group:hover .rating__label--half .rating__icon--star {
color: orange;
}
#half-stars-example .rating__input:hover ~ .rating__label .rating__icon--star,
#half-stars-example .rating__input:hover ~ .rating__label--half .rating__icon--star {
color: #ddd;
}
#half-stars-example .rating-group:hover .rating__input--none:not(:hover) + .rating__label .rating__icon--none {
color: #eee;
}
#half-stars-example .rating__input--none:hover + .rating__label .rating__icon--none {
color: red;
}"$
ABMComp.Initialize("ABMComp", Me, InternalPage, ID, CSS)
End Sub

Sub ABMComp_Build(InternalPage As ABMPage, internalID As String) As String
Return $"
<div id="half-stars-example">
<div id="${internalID}" class="rating-group"><input id="rating-0" class="rating__input rating__input--none" checked="checked" name="${myInternalName}" type="radio" value="0" />
<label class="rating__label" title="0 stars" for="rating-0"> </label>
<input id="rating-00" class="rating__input" type="radio" value="-1" />
<label class="rating__label rating__label--half" title="0.5 stars" for="rating-05"><i class="rating__icon rating__icon--star fa fa-star-half"></i></label>
<input id="rating-05" class="rating__input" name="${myInternalName}" type="radio" value="0.5" />
<label class="rating__label" title="1 star" for="rating-10"><i class="rating__icon rating__icon--star fa fa-star"></i></label>
<input id="rating-10" class="rating__input" name="${myInternalName}" type="radio" value="1" />
<label class="rating__label rating__label--half" title="1.5 stars" for="rating-15"><i class="rating__icon rating__icon--star fa fa-star-half"></i></label>
<input id="rating-15" class="rating__input" name="${myInternalName}" type="radio" value="1.5" />
<label class="rating__label" title="2 stars" for="rating-20"><i class="rating__icon rating__icon--star fa fa-star"></i></label>
<input id="rating-20" class="rating__input" name="${myInternalName}" type="radio" value="2" />
<label class="rating__label rating__label--half" title="2.5 stars" for="rating-25"><i class="rating__icon rating__icon--star fa fa-star-half"></i></label>
<input id="rating-25" class="rating__input" name="${myInternalName}" type="radio" value="2.5" />
<label class="rating__label" title="3 stars" for="rating-30"><i class="rating__icon rating__icon--star fa fa-star"></i></label>
<input id="rating-30" class="rating__input" name="${myInternalName}" type="radio" value="3" />
<label class="rating__label rating__label--half" title="3.5 stars" for="rating-35"><i class="rating__icon rating__icon--star fa fa-star-half"></i></label>
<input id="rating-35" class="rating__input" name="${myInternalName}" type="radio" value="3.5" />
<label class="rating__label" title="4 stars" for="rating-40"><i class="rating__icon rating__icon--star fa fa-star"></i></label>
<input id="rating-40" class="rating__input" name="${myInternalName}" type="radio" value="4" />
<label class="rating__label rating__label--half" title="4.5 stars" for="rating-45"><i class="rating__icon rating__icon--star fa fa-star-half"></i></label>
<input id="rating-45" class="rating__input" name="${myInternalName}" type="radio" value="4.5" />
<label class="rating__label" title="5 stars" for="rating-50"><i class="rating__icon rating__icon--star fa fa-star"></i></label>
<input id="rating-50" class="rating__input" name="${myInternalName}" type="radio" value="5" /></div>
</div>
"$
End Sub

public Sub GetCurrentRating(InternalPage As ABMPage) As Double
Dim script As String = $"return $('input[name=${myInternalName}]:checked').val();"$
Dim ret As Future = InternalPage.ws.EvalWithResult(script, Null)
InternalPage.ws.Flush

Return ret.Value
End Sub

public Sub SetCurrentRating(InternalPage As ABMPage, value As Double) {
Dim script As String = $" $('input[name=${myInternalName}][value="${value}"]').prop('checked', 'checked');"$
InternalPage.ws.Eval(script, Null)
InternalPage.ws.Flush
End Sub

' Is useful to run some initalisation script.
Sub ABMComp_FirstRun(InternalPage As ABMPage, internalID As String)
Dim script As String = $""$
InternalPage.ws.Eval(script, Array As Object(ABMComp.ID))
' flush not needed, it's done in the refresh method in the lib
End Sub
' runs when a refresh is called
Sub ABMComp_Refresh(InternalPage As ABMPage, internalID As String)
Dim script As String = $""$
InternalPage.ws.Eval(script, Array As Object(ABMComp.ID))
End Sub
' do the stuff needed when the object is removed
Sub ABMComp_CleanUp(InternalPage As ABMPage, internalID As String)
End Sub

ABMaterial users will notice I have added the CSS directly into the component. By doing so, we do not need to use the page.AddExtraCSSFile method in the Page_Build() method. (you can still do it this way, and in some cases it may be better as this part can be big. And in the final version, compress it!). In ABMaterial before version 3.75, using AddExtraCSSFile is the only way possible.

The only difficult part in the CSS was I had to override Materialize CSS’s implementation of a radio button (the ‘circle’). So we had to get rid of it.

2. Now we can make a variable for our StarComponent in the page Class_Globals, as we want to be able to Set and Get the value:

Dim myRating As CompStarRating

3. In Page_Connect() we add our component and a couple of buttons:

...
myRating.Initialize(page, "myRating", "rating")
page.Cell(1,1).AddComponent(myRating.ABMComp)

Dim btn As ABMButton
btn.InitializeFlat(page, "btn", "", "", "Get value", "")
page.Cell(2,1).AddComponent(btn)

Dim btn2 As ABMButton
btn2.InitializeFlat(page, "btn2", "", "", "Set 2.5 stars value", "")
page.Cell(3,1).AddComponent(btn2)
...
page.Refresh
...

4. And our Get and Set code in the buttons:

Sub btn_Clicked(Target As String)
Dim value As Double = myRating.GetCurrentRating(page)
Log(value)
End Sub

Sub btn2_Clicked(Target As String)
myRating.SetCurrentRating(page, 2.5)
End Sub

That is all! :)

Changes for versions of ABMaterial before 3.75

1. Save the CSS string into a text file (e.g. star.rating.css) and copy it to the /css/custom folder.
2. Remove the CSS param from ABMComp.Initialize(“ABMComp”, Me, InternalPage, ID, CSS)

ABMComp.Initialize("ABMComp", Me, InternalPage, ID) '<-- CSS param deleted

3. In Sub ABMComp_Build(InternalPage As ABMPage, internalID As String) As String remove the InteranlPage param:

Sub ABMComp_Build(internalID As String) As String

4. In Page_Build(), load the css file you created:

page.AddExtraCSSFile("custom/star.rating.css")

Alwaysbusy

Click here to Donation and support ABMaterial

B4XHelp: An ABMaterial WebApp for B4X Library documentation

b4xhelpI’ve created an ABMaterial (3.75) WebApp to show the documentation for the B4X libraries. Everyone who created a library for B4A, B4i or B4J can upload their .xml file to the WebApp and everyone can consult it. You can re-upload a new version for a library if needed.

NOTE: not online anymore! In the zip is the source code of the webapp so you can run it yourself.

b4xhelp

Notes:

  • This WebApp is open for everyone, but please try to keep it clean. Thank you!
  • B4XHelp is running on my personal Raspberry Pi with not a super-duper internet connection, so it also may give some indication how it handles a lot of users.
  • The libraries itself are NOT uploaded to the WebApp! Only the .xml files to parse them.
  • The WebApp also runs on a HTTP/2 server, but I do not have a verified certificate. If you use this link, you will get a warning that it may not be safe. You normally only need to accept this once:

priv

ABMaterial may be overwhelming at first with all its features at your disposal, but once you get the hang of it, creating such a WebApp as this, in pure B4J, can go very fast.

Alwaysbusy

Click here to Donation and support ABMaterial


B4J: creating a reCAPTCHA component in ABMaterial

reCAPTCHA is a free service that protects your website from spam and abuse. reCAPTCHA uses an advanced risk analysis engine and adaptive CAPTCHAs to keep automated software from engaging in abusive activities on your site. It does this while letting your valid users pass through with ease.

First, we do have to register a Google API key for our WebApp here.

After registering, we receive our API key:
For this demo, I’m using the developer API key (which works with localhost) so it will show a warning that this is not the real key in red.
NOTE: this code is for ABMaterial 3.75. For earilier versions, see below what needs to be changed in the code.

Create a new class CompReCAPTCHA:

'Class module
Sub Class_Globals
   Public ABMComp As ABMCustomComponent
   Dim mAPIKey As String
End Sub

'Initializes the object. You can add parameters to this method if needed.
Public Sub Initialize(InternalPage As ABMPage, ID As String, APIKey As String)
   ABMComp.Initialize("ABMComp", Me, InternalPage, ID, "")
   mAPIKey = APIKey
End Sub
Sub ABMComp_Build(InternalPage As ABMPage, internalID As String) As String
   Return $"
<div id="${internalID}render" class="g-recaptcha" data-sitekey="${mAPIKey}"></div>
"$
End Sub
' Is useful to run some initalisation script.
Sub ABMComp_FirstRun(InternalPage As ABMPage, internalID As String)
   Dim script As String = $"grecaptcha.render(
"${internalID}render",
{"sitekey": "${mAPIKey}", "theme": "light"}
) "$
   InternalPage.ws.Eval(script, Array As Object(ABMComp.ID))
   ' flush not needed, it's done in the refresh method in the lib
End Sub

public Sub Reset(InternalPage As ABMPage)
   Dim script As String = $"grecaptcha.reset()"$
   InternalPage.ws.Eval(script, Null)
   InternalPage.ws.Flush
End Sub

public Sub CheckValidation(InternalPage As ABMPage) As Boolean
   Dim script As String = $"return (grecaptcha && grecaptcha.getResponse().length !== 0);"$
   Dim ret As Future = InternalPage.ws.EvalWithResult(script, Null)
   InternalPage.ws.Flush

   Return ret.Value
End Sub
' runs when a refresh is called
Sub ABMComp_Refresh(InternalPage As ABMPage, internalID As String)
   Dim script As String = $""$
   InternalPage.ws.Eval(script, Array As Object(ABMComp.ID))
End Sub
' do the stuff needed when the object is removed
Sub ABMComp_CleanUp(InternalPage As ABMPage, internalID As String)
End Sub

In BuildPage(), add the Google api:

page.AddExtraJavaScriptFile("<a class="linkification-ext" title="Linkification: https://www.google.com/recaptcha/api.js" href="https://www.google.com/recaptcha/api.js">https://www.google.com/recaptcha/api.js</a>")

In Class_Globals make a variable:

Dim myReCAPTCHA As CompReCAPTCHA

In ConnectPage create the component (and a couple of buttons):

...
' note that this is Googles demo API key.  Use your own!
myReCAPTCHA.Initialize(page, "myReCAPTCHA", "6LeIxAcTAAAAAJcZVRqyHh71UMIEGNQ_MXjiZKhI")
page.Cell(1,1).AddComponent(myReCAPTCHA.ABMComp)

Dim btn As ABMButton
btn.InitializeFlat(page, "btn", "", "", "Submit", "")
page.Cell(1,1).AddComponent(btn)

Dim btn2 As ABMButton
btn2.InitializeFlat(page, "btn2", "", "", "Reset", "")
page.Cell(1,1).AddComponent(btn2)

' refresh the page
page.Refresh
...

The code in the buttons to check its validation and to reset the captcha.

Sub btn_Clicked(Target As String)
   Dim bool As Boolean = myReCAPTCHA.CheckValidation(page)
   Log(bool)
End Sub

Sub btn2_Clicked(Target As String)
   myReCAPTCHA.Reset(page)
End Sub

Et voila, we do have a new reCAPTCHA component at our disposal in ABMaterial!

For ABMaterial pre 3.75, make these changes in the code:

Public Sub Initialize(InternalPage As ABMPage, ID As String, APIKey As String)
   ABMComp.Initialize("ABMComp", Me, InternalPage, ID) ' last param removed
   mAPIKey = APIKey
End Sub
...
Sub ABMComp_Build( internalID As String) As String ' InternalPage param removed
   Return $"
<div id="${internalID}render" class="g-recaptcha" data-sitekey="${mAPIKey}"></div>
"$
End Sub

Until next Time!

Alwaysbusy

Click here to Donation and support ABMaterial

B4J: Printing/Reporting with upcoming ABMaterial 3.75

2
A sneak peek on a new feature of ABMaterial for B4J I’m working on: Printing/Reporting.

This is an example of a report in ABMaterial. You build it right into your other pages and just by setting a couple of parameters, you control what will be shown on screen and what will be printed.

1
The block your see above ‘INVOICE’ will not be printed, just my setting lbl.IsPrintable = false.  What is shown on screen you control by using the normal ABM.VISIBLE_ constants. For example there are some additional notes with a chart that you can’t see here on screen, but will be printed.

You can use almost every ABM component in your report. Good examples are the ABMChart, the ABMChronologyList or even like in this example you can let your client sign the document using an ABMSignaturePad and print it right out.

The ABM components avoid being split over two pages (e.g. an image will be printed on the next page if it does not fit). Browsers let you control very little on how things are printed, but I’ve added some things like ReportFooter.row(3).PrintPageBreak = ABM.PRINT_PAGEBREAK_BEFORE_ALWAYS to give you some control.

Note that the navigation bar is not printed either. All of this is taken care for you automatically by ABMaterial!

3
Some example pdf prints from the demo app (without making any modification to the source code!). Try printing the same pages with ABMaterial 3.50 or before and you’ll see the difference.

http://gorgeousapps.com/PrintExamples.zip

Making the above ‘invoice report’ is really simple and in the spirit of ABMaterial. I’ve created a new component ABMReport (and ABMReportBlock) which you can use just like you would make an ABMCustomComponent.

Relevant source code snippet of the above report (the Build event is where the magic happens, the rest are more helper methods):

Sub Class_Globals
   Dim ABM As ABMaterial
   Dim Report As ABMReport

   ' some CSS to format the 'body' of the report
   Dim ReportCSS As String = $"
   .repheader, .repfooter, .repheaderright, .repfooterright {
     background-color: lightgray;
     font-size: 1.8rem;
   }
   .repheaderright, .repbodyright, .repfooterright {
     text-align: right;
   }
   .repbody, .repbodyright {
     font-size: 1.5rem;
   }

   @media only print {
     html { font-size: 60%}
   }"$

   Dim mSQL As SQL 'ignore
   Dim mInvoiceID As Int 'ignore
End Sub

Public Sub Initialize(InternalPage As ABMPage, ID As String)
   Report.Initialize("Report", Me, InternalPage, ID, ReportCSS, "")
End Sub

Sub Report_Build(InternalPage As ABMPage, internalID As String)
   ' the report header
   Dim ReportHeader As ABMContainer = Report.Header.InitializeAsContainer(InternalPage, "reportheader", "", ABM.PRINT_PAGEBREAK_INSIDE_AVOID)
   ReportHeader.AddRows(1,False, "border").AddCells12(1,"")
   ReportHeader.AddRows(1,False, "").AddCellsOS(1,0,0,0,9,9,9,"").AddCellsOSMP(1,0,0,0,3,3,3,20,0,0,0,"right")
   ReportHeader.AddRows(1,False, "").AddCellsOS(1,0,0,0,7,7,7,"").AddCellsOS(1,0,0,0,5,5,5,"")
   ReportHeader.BuildGrid

   ReportHeader.CellR(0,1).AddComponent(BuildLabel(InternalPage, "repTitle", "{B}I N V O I C E{/B}", ABM.SIZE_H4, "center", True, ABM.VISIBILITY_ALL))
   ReportHeader.CellR(1,1).AddComponent(BuildLabel(InternalPage, "repAddress", "Jonathan Neal{BR}{BR}101 E. Chapman Ave{BR}Orange, CA 92866{BR}{BR}(800) 555-1234",ABM.SIZE_H5, "", True, ABM.VISIBILITY_ALL))
   ReportHeader.CellR(0,2).AddComponent(BuildImage(InternalPage, "repImg", "../images/logo2.png", True, ABM.VISIBILITY_ALL))
   ReportHeader.CellR(1,1).AddComponent(BuildLabel(InternalPage, "repCompany", "{B}Some Company{/B}{BR}{B}c/o Some Guy{/B}", ABM.SIZE_H4, "", True, ABM.VISIBILITY_ALL))
   ReportHeader.CellR(0,2).AddComponent(Build3Block(InternalPage, "repInvoiceData", "{B}Invoice #{/B}", "101138", "{B}Date{/B}", "Januari 1, 2017","{B}Amount Due{/B}","$ 600.00", True, ABM.VISIBILITY_ALL)   )

   ' the report body
   Dim Body As ABMReport
   Body.Initialize("Body", Me, InternalPage, internalID & "body", "", ABM.PRINT_PAGEBREAK_INSIDE_AVOID)
   ' header of the body
   Body.Header.InitializeAsTexts(Array As String("Year(s) Overview", "Q1", "Q2", "Q3", "Q4"), Array As Int(40,15,15,15,15), Array As String("repheader","repheaderright","repheaderright","repheaderright","repheaderright"), "")

   ' detail lines: here you can e.g. run queries but for demo purposes let's do everything manual
   Dim sums(5) As Int
   For i = 1 To 9
     ' change the class of the last column on the second row
     Dim ColorClass As String = "repbodyright"
     If i = 2 Then
       ColorClass = "repbodyright red-text"
     End If

     ' create a text block
     Dim block As ABMReportBlock
     block.InitializeAsTexts(Array As String("Year 200" & i, 200*i, 300*i, 400*i, 500*i), Array As Int(40,15,15,15,15), Array As String("repbody","repbodyright",ColorClass, "repbodyright","repbodyright"), "")
     Body.AddBodyBlock(block)

     ' dirty way to make the sums
     For k = 1 To 4
       sums(k) = sums(k) + (20 + (k-1)*100) * i
     Next
   Next

   ' footer of the body
   Body.Footer.InitializeAsTexts(Array As String("{NBSP}", sums(1) , sums(2), "{B}" & sums(3) & "{/B}", sums(4)), Array As Int(40,15,15,15, 15), Array As String("repfooter", "repfooterright","repfooterright","repfooterright","repfooterright"), "")
   ' add the subreport 'body' to the body of the main report
   Report.AddBodySubReport(Body)

   ' the report footer
   Dim ReportFooter As ABMContainer = Report.Footer.InitializeAsContainer(InternalPage, "reportfooter", "", "")

   ReportFooter.AddRows(1,False, "").AddCells12(1,"")
   ReportFooter.AddRows(1,False, "").AddCellsOS(1,0,0,0,2,2,2,"").AddCellsOSMP(1,0,0,0,5,5,5,0,0,10,40,"").AddCellsOS(1,0,0,0,5,5,5,"")
   ReportFooter.AddRows(1,False, "").AddCells12(1,"")
   ReportFooter.AddRows(1,False, "").AddCells12(1,"")
   ReportFooter.AddRows(1,False, "").AddCellsOSMP(1,4,4,4,4,4,4,0,0,0,0,"")
   ReportFooter.AddRows(2,False, "").AddCells12(1,"")
   ReportFooter.BuildGrid

   ReportFooter.CellR(1,1).AddComponent(BuildLabel(InternalPage, "RepSignatureLbl", "Please sign this document", ABM.SIZE_H5, "", True, ABM.VISIBILITY_ALL))
   ReportFooter.CellR(0,2).AddComponent(BuildSignature(InternalPage, "repSignature", True, ABM.VISIBILITY_ALL))
   ReportFooter.CellR(0,3).AddComponent(Build3Block(InternalPage, "repTotalData", "{B}Total{/B}","$ 600.00","{B}Amount Paid{/B}","$ 0.00","{B}Balance Due{/B}","$ 600.00", True, ABM.VISIBILITY_ALL))

   ' avoid row 2 to be broken (can give weird results, depends on browser support!)
   ReportFooter.row(2).PrintPageBreak = ABM.PRINT_PAGEBREAK_INSIDE_AVOID

   ' alaways break before printing row 3
   ReportFooter.row(3).PrintPageBreak = ABM.PRINT_PAGEBREAK_BEFORE_ALWAYS

   ' all the rest is only visible on the print, not on the screen
   ReportFooter.CellR(1,1).AddComponent(BuildLabel(InternalPage, "AdditionalNotes", "{B}A D D I T I O N A L {NBSP}  N O T E S{/B}", ABM.SIZE_H4, "center", True, ABM.VISIBILITY_HIDE_ALL))
   ReportFooter.CellR(0,1).AddComponent(BuildDivider(InternalPage, "divider", True, ABM.VISIBILITY_HIDE_ALL))
   ReportFooter.CellR(0,1).AddComponent(BuildLabel(InternalPage, "note1", "Note 1: A finance charge of 1.5% will be made on unpaid balances after 30 days.", ABM.SIZE_H6, "", True, ABM.VISIBILITY_HIDE_ALL))
   ReportFooter.CellR(1,1).AddComponent(BuildLabel(InternalPage, "note2", "Note 2: Your current purchase chart.", ABM.SIZE_H6, "", True, ABM.VISIBILITY_HIDE_ALL))

   ' create a pie chart
   Dim chart5 As ABMChart
   chart5.Initialize(InternalPage, "chart5", ABM.CHART_TYPEPIE, ABM.CHART_RATIO_SQUARE, "chart5theme")
   chart5.Visibility = ABM.VISIBILITY_HIDE_ALL
   ' Something special, Label interpolation.  the value will transformed into a percentage format (This is Javascript!)
   Dim SumValues As Int = 30+50+70+80+100+140+170
   chart5.OptionsPie.LabelInterpolation = "Math.round(value / " & SumValues  & " * 100) + '%'"
   ' add ONE serie
   Dim Serie5A As ABMChartSerie
   Serie5A.InitializeForPie
   Serie5A.SetValues(Array As Int(30,50,70,80,100,140,170))
   chart5.AddSerie(Serie5A)
   ' add the chart to the cell
   ReportFooter.CellR(1,1).AddComponent(chart5)
End Sub

' Helper Methods
Sub BuildLabel(internalPage As ABMPage, ID As String, Text As String, Size As String, theme As String, isPrintable As Boolean, Visibility As String) As ABMLabel
   Dim tmpLbl As ABMLabel
   tmpLbl.Initialize(internalPage, ID, Text, Size, False, theme)
   tmpLbl.IsPrintable = isPrintable
   tmpLbl.Visibility = Visibility
   Return tmpLbl
End Sub
...

It will never be able to print everything of course (e.g. scrolling components), but I’m pretty happy with the things it will be able to do.  Browser support for report printing is still in its infancy I’m afraid and it will take some time before all browsers are lined up supporting all HTML printing features.

But, together with the new ABMreport component, you will already be able to create reports with very little effort using ABMaterial and B4J!

ABMaterial 3.75 will be available for donators in a couple of weeks.

Alwaysbusy

Click here to Donation and support ABMaterial

B4J: IMPORTANT change in ABMaterial for B4J 5.80+

As B4J 5.80 has been updated to Jetty 9.4.6 (which contains an important change in the internal Session framework), you will need to update some code in StartServer() and StartServerHTTP2() in the ABMApplication module.

In pre B4J 5.80 with Jetty 9.3.x it was:

Dim joServer As JavaObject = srvr
joServer.GetFieldJO("server").RunMethod("stop", Null)
joServer.GetFieldJO("context").RunMethodJO("getSessionHandler", Null).RunMethodJO("getSessionManager", Null).RunMethodJO("getSessionCookieConfig", Null).RunMethod("setMaxAge", Array(31536000)) ' 1 year

'NEW FEATURE! Each App has its own Session Cookie
joServer.GetFieldJO("context").RunMethodJO("getSessionHandler", Null).RunMethodJO("getSessionManager", Null).RunMethodJO("getSessionCookieConfig", Null).RunMethod("setName", Array(ABMShared.AppName.ToUpperCase))
joServer.GetFieldJO("server").RunMethod("start", Null)

must be changed to this in B4J 5.80+ with Jetty 9.4.6:

Dim joServer As JavaObject = srvr
joServer.GetFieldJO("server").RunMethod("stop", Null)
joServer.GetFieldJO("context").RunMethodJO("getSessionHandler", Null).RunMethodJO("getSessionCookieConfig", Null).RunMethod("setMaxAge", Array(31536000)) ' 1 year

' NEW FEATURE! Each App has its own Session Cookie
joServer.GetFieldJO("context").RunMethodJO("getSessionHandler", Null).RunMethodJO("getSessionCookieConfig", Null).RunMethod("setName", Array(ABMShared.AppName.ToUpperCase))
joServer.GetFieldJO("server").RunMethod("start", Null)

' + This setting is with reservation until confirmation
Dim secs As Long = ABMShared.CacheScavengePeriodSeconds ' must be defined as a long, else you get a 'java.lang.RuntimeException: Method: setIntervalSec not matched.' error
joServer.GetFieldJO("context").RunMethodJO("getSessionHandler", Null).RunMethodJO("getSessionIdManager", Null).RunMethodJO("getSessionHouseKeeper", Null).RunMethod("setIntervalSec", Array As Object(secs))

This will be corrected in the next upcoming release 3.75 of ABMaterial.

Alwaysbusy

Click here to Donation and support ABMaterial

B4J: ABMaterial 3.20 Public/3.50 Donators Released!

ABMB4JABMaterial 3.50 for B4J introduces Drag & Drop of ABMContainers between Cells! This new feature took a couple of weeks to implement, but I’m proud of the result.
It opens up a whole new range of possibilities for Web Apps.

Not many bug fixing needed in this release. Proves ABMaterial is really stable and truly production ready! (Happy face)

ABMGoogleMap also adds the possibility to use marker clusters, which cleans up your google map if you have many markers in one map.

GM2

Head to the ABMaterial section on this blog to get your free copy of 3.20, or make a small donation to support the development and get the latest 3.50 version + 9 extra libraries and tools to use in your own projects!

Have a great summer!

Alwaysbusy

Click here to Donation and support ABMaterial


B4J: New in ABMaterial 3.50: Drag and Drop about anything

ABMDragDrop

It may have been a bit silent the last few weeks around ABMaterial, but behind the scenes I have been working nights and weekends on maybe the biggest new feature since Chipmunk was introduced: Drag & Drop!

In 3.50, it will be possible to drag ABMContainers (and hence about anything in it) from one cell to another.

Let’s watch a video demonstration first:

Pretty cool hè!

How it works in B4J:
I explain the basics here, the DragDrop demo project included in the ABMaterial 3.50 download will show all tricks shown in the demo video.

1. Page_ParseEvent() gets a little bit of extra code to sync the moves made in the browser with our server

...
If SubExists(Me, eventName) Then
     Params.Remove("eventname")
     Params.Remove("eventparams")
     ' BEGIN NEW DRAGDROP
     If eventName = "page_dropped" Then
       page.ProcessDroppedEvent(Params)
     End If
     ' END NEW DRAGDROP
     Select Case Params.Size
     ...

2. Next we define a ‘DRAG’ group:

' name, minimum height of a cell
page.DragDropCreateGroup("DRAG", 150)

3. We add cells to this ‘DRAG’ group we want to drag & drop between. The last ‘null’ parameter can be any ABMComponent you want to use a title of the cell (e.g. the COLUMN X ABMLabel in the demo).

page.DragDropAddZone("DRAG", "DRAGCELL1", page.Cell(3,1),null)
page.DragDropAddZone("DRAG", "DRAGCELL2", page.Cell(3,2),null)
page.DragDropAddZone("DRAG", "DRAGCELL3", page.Cell(3,3),null)

4. We add our draggable ABMContainers to the cells. Note: they MUST be added with AddArrayComponent!

Here we also enable them to be draggable with cont.EnableDragDropZone().  There is also a shortcut method to enable/disable all ‘Zones/Cells’ in a group with cont.EnableDragDropAllZonesFromGroup() in one go.

page.Cell(3,1).AddArrayComponent(CreateCard("1", True, True, True, "I may be dragged everywhere", "../images/list1.jpg"), "Cards")
...

Sub CreateCard(ID As String, AllowInCell1 As Boolean, AllowInCell2 As Boolean, AllowInCell3 As Boolean, Title As String, image As String) As ABMContainer
  Dim cont As ABMContainer
  cont.Initialize(page, ID, "")
  cont.AddRows(1,True,"").AddCells12(1, "")
  cont.BuildGrid

  cont.IsTextSelectable = False

  If AllowInCell1 Then
    ' can be dragged to zone 1 of 'DRAG'
    cont.EnableDragDropZone("DRAG","DRAGCELL1",True)
  End If
  If AllowInCell2 Then
    ' can be dragged to zone 2 of 'DRAG'
    cont.EnableDragDropZone("DRAG","DRAGCELL2",True)
  End If
  If AllowInCell3 Then
    ' can be dragged to zone 3 of 'DRAG'
    cont.EnableDragDropZone("DRAG","DRAGCELL3",True)
  End If
  cont.EnableDragDropZone("DRAG","DRAGCELL4",True) ' for the sidebar

  Dim card As ABMCard
  card.InitializeAsCard(page, "card", "MY CARD", Title, ABM.CARD_SMALL, "")
  card.Image = image
  card.AddAction("Press me")

  ' add the card to the page
  cont.Cell(1,1).AddComponent(card)
  Return cont
End Sub

5. There are three events you will receive (all on Page level):

Sub Page_DragStart(component As String, source As String)
  Log("Drag start: " & component)
End Sub

Sub Page_DragCancelled(component As String, source As String)
  Log("Drag cancelled: " & component)
End Sub

' there are four parameters: component, source , target, before
Sub Page_Dropped(Params As Map)
  Log("Dropped: " & Params.Get("component"))
End Sub

And this is basically it! Very simple without having to write any HTML, CSS, PHP or Javascript. All done in pure B4J!

I’m finishing up ABMaterial 3.50, ABMonitor (an upcoming article on this for B4J and B4A soon on the blog) and ABTreeTableView now and early next week I think I may be able to release it to the donators.

Cheers,

Alwaysbusy

Click here to Donation and support ABMaterial

B4X: ABMaterial 3.03 Public/3.20 Donators released

A lot of internal changes were made in the ABMaterial 3.20 ‘Chipmunk’ release.  For example, ABMContainer has been rewritten from the ground-up, but with minimal impact to your existing projects.  It allows adding them as array components, and has much shorter ID tags in the generated HTML.

Mindful and Stanmiller had another go on the cache issues.  They came up with a very nice solution (I had tears in my eyes) and both have done extensive testing on this subject. A big thanks again!  ABM 3.20 is backwards compatible with the previous 3.0.3 Cache System, but I would advice you to make the changes whenever you have the chance.

A nice new feature for mobile devices is the New Debug feature using a modified version of Conzole!

New Debug at work:

Using this new feature is very simple in B4J:

First, you have to enable the console in BuildPage():

' params are: open on load, width
page.DebugConsoleEnable(True, 300)

Two methods can be used to show or hide the console programmaticaly. Can be handy as a buid-in tool in your apps where the user enters a code on his device and you can then check the console.

page.DebugConsoleShow
page.DebugConsoleHide

Now you can start doing some cool stuff 🙂 Some examples:

Show some text, or a server value (note: strings must be between single quotes!)

page.DebugConsoleLog("'Server click at: " & DateTime.Time(DateTime.Now) & "'") ' shows the text

Now I generated an error on purpose, so the demo can show it catches the error:

page.DebugConsoleLog("'value: ' + $('#pi002-r2c1').html();") ' generates an error, the ; at the end is wrong

Same code, but with the correct javascript syntax, showing the html() value of the tag:

page.DebugConsoleLog("'value: ' + $('#pi002-r2c1').html()") ' generates the html value of the pi002-r2c1 tag

It works also on the desktop, although you probably will use the Chrome console as you can do more.

But there is more. You can also redirect all browser console message directly into the B4J log window!  You can use the following commands anywhere in your own code to start/stop receiving the browser console messages.

page.DebugConsoleB4JStart
page.DebugConsoleB4JStop

This is a very powerful feature if you develop Webapps for mobile devices.  It can be done otherwise, but it is a pain in the a$$ to set it up. Now, you can easily debug it on your iPhone, iPad, Android or any other device.

ABMaterial 3.20 has over 20 new features and bug fixes.  Following the same philosophy as B4X, the quick release cycle has proven to work very well for ABMaterial and its many users.  Donators will receive their download mail shortly.  The public version 3.03 can be downloaded from this blog too.

I’m also glad that with these releases, now everyone can work with ‘Chipmunk‘, and this does also mean the development cycle for ‘Butterfly‘  has ended.

I would like to take this opportunity to thank everyone for the support, hourless testing and inventive ideas you came up with in the last few years. You’ve made ABMaterial one hell of a WebApp Development Tool!

ThankYou

But we are not at the end! Far from it as I already have big ideas for the next releases.

Until then, happy programming!

Alwaysbusy

Click here to Donation and support ABMaterial

B4X: An experiment for practical use of IoT on the shop floor

Beacons

At OneTwo, we are always searching for ways to make things easier on the workfloor.  For nearly a decade, we introduced barcode scanners everywhere! From architects and accountants, over carpenters and contractors, to farmers and gardeners are now using our small barcode scanners to record times, jobs and used materials.

The last couple of weeks, I’ve been investigating how we could tackle another common issue, but now on the factory shop floor.  Working on a specific step in the development of a product demands the constant focus of the operator so using a barcode scanner to get the instructions is, well, just not practical if you have your hands full.

Time to get to the lab! Provided with heaps of coffee, some unhealthy snacks and an open mind we started putting some ideas together on the whiteboard.  We wanted to give as much feedback to the operator as possible using monitors,  beamer projections at the workstation and personal instructions on phones and tablets.

The key to deliver hyper-contextual content to the users is knowing the location of every chess piece in the game: the workstation, the machine that is going to be build and the operator(s).  The underlying communication technology was going to be Bluetooth Low Energy (BLE). The Raspberry Pi has it and so does almost any phone or tablet. By attaching a cheap BLE Beacon to the machine we could understand the location of all the players.

Using B4X for this project was a no-brainer, as Erels toolbox is just made to build stuff like this! One important link in the chain was missing:  the BLE reader in B4J for the Raspberry Pi.  However, writing some small scripts and calling it using jShell and a couple of timers did the job just fine.

Scripts code:

Two scripts to discover BLE devices around the Raspberry Pi.  Each one runs in its own jShell in B4J. First one scans for devices, second one reads whatever they broadcast.

#!/bin/bash
# Beacon Scan by Alain Bailleul 2017
sudo timeout -s SIGINT 5s hcitool lescan

#!/bin/bash
# Beacon Scan by Alain Bailleul 2017
sudo timeout -s SIGINT 5s hcidump -X > scan.txt

Also, as the Raspberry Pi has to be a BLE beacon itself (so the Android Native app can discover it), I had to write another little script:

#!/bin/bash
# Beacon Scan by Alain Bailleul 2017

sudo hciconfig hci0 leadv 3
sudo hcitool -i hci0 cmd 0x08 0x0008 19 02 01 06 03 03 aa fe 11 16 aa fe 10 00 02 6f 6e 65 2d 74 77 6f 07 $1 $2 $3 00 00 00 00 00 00
sudo hciconfig

IPN=$(ip addr show eth0 | awk ‘/inet / {print $2}’ | cut -d/ -f 1)
IPW=$(ip addr show wlan0 | awk ‘/inet / {print $2}’ | cut -d/ -f 1)
MACN=$(ip link show eth0 | awk ‘/ether/ {print $2}’)
MACW=$(ip link show wlan0 | awk ‘/ether/ {print $2}’)

echo “$MACW;$IPW;$MACN;$IPN;END” > macip.txt

For anything related to presenting the instructions, we could use ABMaterial.

Alright! We’ve got everything we needed to set up a test scenario for a workstation so time to bring out the cool slide:

How it works

Although there are a lot of physical components and different OS’s in play, B4X has all the tools to make them seamlessly talk to each other using one language.  For the native Android part, I wrote my own BLE discovery library based on the altbeacons library. (Note, there is a library available in B4A to discover BLE devices).

For the video demonstration, things you have to keep in mind:

INPUT:

  1. OneTwo box + BLE beacon: represents a machine arriving on the workstation
  2. Raspberry Pi (under the table): represents the workstation
  3. Android Phone: represents an operator/visitor at the workstation

OUTPUT:

  1. On the monitor, for each ‘machine’ some info is presented (e.g. a serial number, to what country it has to be shipped, etc)
  2. On the phone: specific instructions for the operator(s) for this ‘machine’, or a greeting to a visitor.
  3. On the workstation, projected global instructions for the operator(s) for this ‘machine’ with a beamer.

Let’s have a look how all of this plays out:

This turned out to work all very well for a first trial! For real world usage, the project will need some more work (like improving the algorithms to discover the BLE devices, setting thresholds or calculating them without calibration, etc…).  But we are very excited with the possibilities this low-cost solution can already show in such a short time.

Next step will be setting this up on a real workstation on the shop floor in a real factory later this month.

Until next time,

Alwaysbusy

Click here to Donation and get the latest ABMaterial first!


B4J: New section and page navigation feature in ABMaterial (3.02)

PageNav2

ABMaterial 3.02 Maintenance Release will have a new feature, especially useful for ‘one page’ apps/websites to navigate. It intruduces ‘sections‘ within a page. A section is a logical grouping of rows, which can have its own background and a new extra navigation method/menu.

Sections must be declared at the BuildPage() stage, and are typically created right after the page.BuildGrid() method.

First, let me show you how it works and then I’ll explain how this is archieved with just 12 lines of B4J code!

Video:

Code (creating the Theme):

theme.Page.AddSection("section1", ABM.COLOR_BLACK, "", ABM.COLOR_WHITE, "")
theme.Page.AddSection("section2", ABM.COLOR_BLACK, "", ABM.COLOR_BROWN, ABM.INTENSITY_LIGHTEN4)
theme.Page.AddSection("section3", ABM.COLOR_WHITE, "", ABM.COLOR_BLUE, ABM.INTENSITY_LIGHTEN3)
theme.Page.AddSection("section4", ABM.COLOR_WHITE, "", ABM.COLOR_GREY, ABM.INTENSITY_DARKEN3)

Code (Adding the sections & the navigation)

page.CreateSection("section1", 1,1,ABM.COLOR_WHITE, "", "", "", "","calc(100vh - 56px)", 56, 500, ABM.VISIBILITY_ALL,"Section1")
page.SetSectionNavigation("section1", "section2", "Go to Section 2", ABM.SECTION_BUTTONTYPE_DOWN, "section1", "Section 1" )
page.CreateSection("section2", 2,2,ABM.COLOR_GREEN, "", "../images/bg-1.jpg", ABM.CONTAINERIMAGE_REPEAT_NOREPEAT, ABM.CONTAINERIMAGE_POSITION_COVER, "calc(100vh - 56px)", 56, 500, ABM.VISIBILITY_ALL, "Section2")
page.SetSectionNavigation("section2", "section3", "Go to Section 3", ABM.SECTION_BUTTONTYPE_DOWN, "section2", "Section 2")
page.CreateSection("section3", 3,3,ABM.COLOR_BLUE, "", "", "", "", "calc(100vh - 56px)", 56, 500, ABM.VISIBILITY_ALL,"Section3")
page.SetSectionNavigation("section3", "section4", "Go to Section 4", ABM.SECTION_BUTTONTYPE_DOWN, "section3", "Section 3")
page.CreateSection("section4", 4,4,ABM.COLOR_BLACK, "", "", "", "", "calc(100vh - 56px)", 56, 500, ABM.VISIBILITY_ALL, "Section4")
page.SetSectionNavigation("section4", "section1", "Back to Section 1", ABM.SECTION_BUTTONTYPE_UP, "section4", "Section 4")

In this example each section has only a height of 1 row (hence the from row 1 to row 1, from row 2 to row 2,…)

But, this can be any size, e.g. from row 5 to row 25. Something like:

page.CreateSection("section5", 5,25,ABM.COLOR_BLACK, "", "", "", "", "calc(100vh - 56px)", 56, 500, ABM.VISIBILITY_ALL, "Section4")

NOTE: Sections cannot be nested or overlapping!

The tricky part are the minHeight and scrollTop params. In the above examples, I’ve set the minHeight to the browsers height, minus the height of the TopBar: “calc(100vh – 56px)”.
For scrollTop, I’ve set it the the height of the TopBar so the top of the section is right under the navigation bar: 56

ABMaterial 3.02 Maintenance Release will go out in acouple of days to the donators with 25 bug fixes and implemented wishes!

Alwaysbusy

Click here to Donation and get the latest ABMaterial first!

B4J: ABMaterial Facebook-like timeline in less than 200 lines!

ABMFacebook50

I recently had a question if it was possible to create a Facebook-like WebApp with ABMaterial for B4J. I had some time to spare tonight (yeah right):rolleyes: and decided to give it a go…

All I needed were a couple of ABMContainers and the new CloseContent/OpenContent feature introduced in 3.02. The existing NextContent system would provide the infinite page.

It also uses a ABMCustomComponent for the ‘Like’ feature (I based it on this project), and you can find the source code of the class under the video:

About an hour, and 200 lines of B4J code later, I had a working timeline!  A real project would of course need some way to add an article, save them in the database, user management, etc but this is out of scope of this article.

Note: This example will be included in the upcoming 3.02 Maintenance Update, but I would like to share the source source code for the ‘Like’ functionality beforehand.

Source code for the ‘Like’ custom component.
You’ll need this zip file for the images and js/css files. Put the images and css in the /www/css/custom folder, the js file in the /www/js/custom/ folder.

The class LikeComponent:

'Class module
Sub Class_Globals
   Public ABMComp As ABMCustomComponent
   Public Counter As Int
End Sub

'Initializes the object. Countries and data are Json Strings
Public Sub Initialize(InternalPage As ABMPage, ID As String, AlreadyLiked As Int)
   ABMComp.Initialize("ABMComp", Me, InternalPage, ID)
   Counter = AlreadyLiked
End Sub

Sub ABMComp_Build(internalID As String) As String
   Return $"
<div id="${internalID} class="facebook-reaction"><!-- container div for reaction system -->
        <span class="like-btn"> <!-- Default like button -->
          <span class="like-btn-emo like-btn-default"></span> <!-- Default like button emotion-->
           <span class="like-btn-text">Like</span> <!-- Default like button text,(Like, wow, sad..) default:Like  -->
<ul class="reactions-box"> <!-- Reaction buttons container-->
	<li class="reaction reaction-like" data-reaction="Like"></li>
	<li class="reaction reaction-love" data-reaction="Love"></li>
	<li class="reaction reaction-haha" data-reaction="HaHa"></li>
	<li class="reaction reaction-wow" data-reaction="Wow"></li>
	<li class="reaction reaction-sad" data-reaction="Sad"></li>
	<li class="reaction reaction-angry" data-reaction="Angry"></li>
</ul>
</span>
<div class="like-stat"> <!-- Like statistic container-->
           <span class="like-emo"> <!-- like emotions container -->
             <span class="like-btn-like"></span> <!-- given emotions like, wow, sad (default:Like) -->
           </span>
           <span class="like-details">${Counter} others</span></div>
</div>
"$
End Sub

Sub ABMComp_FirstRun(InternalPage As ABMPage, internalID As String)
   Dim script As String = $"$("#${internalID} .reaction").on("click",function(){  // like click
     var data_reaction = $(this).attr("data-reaction");
     $("#${internalID} .like-details").html("You and ${Counter} others");
     $("#${internalID} .like-btn-emo").removeClass().addClass('like-btn-emo').addClass('like-btn-'+data_reaction.toLowerCase());
     $("#${internalID} .like-btn-text").text(data_reaction).removeClass().addClass('like-btn-text').addClass('like-btn-text-'+data_reaction.toLowerCase()).addClass("active");;

     if(data_reaction == "Like") {
         $("#${internalID} .like-emo").html('<span class="like-btn-like"></span>');
     } else {
         $("#${internalID} .like-emo").html('<span class="like-btn-like"></span><span class="like-btn-'+data_reaction.toLowerCase()+'"></span>');
     }
     var json = {'target': '${internalID}', 'like': data_reaction};
     b4j_raiseEvent('likecomponent_liked', json);
     });    

     $("#${internalID} .like-btn-text").on("click",function(){ // undo like click
     if($(this).hasClass("active")){
       $("#${internalID} .like-btn-text").text("Like").removeClass().addClass('like-btn-text');
       $("#${internalID} .like-btn-emo").removeClass().addClass('like-btn-emo').addClass("like-btn-default");
       $("#${internalID} .like-emo").html('<span class="like-btn-like"></span>');
       $("#${internalID} .like-details").html("${Counter} others");
       var json = {'target':'${internalID}'};
         b4j_raiseEvent('likecomponent_unliked', json);
       }
     })"$

   InternalPage.ws.Eval(script, Array As Object(ABMComp.ID))
   ' flush not needed, it's done in the refresh method in the lib
End Sub

Sub ABMComp_Refresh(InternalPage As ABMPage, internalID As String)

End Sub

' do the stuff needed when the object is removed
Sub ABMComp_CleanUp(InternalPage As ABMPage, internalID As String)

End Sub

Usage:

Sub Class_Globals
   ...
   Dim myLike As LikeComponent
   ...
End Sub

' adding the component
myLike.initialize(page, ID & "Like", Rnd(20, 500))
myContainer.Cell(4,1).AddComponent(myLike.ABMComp)

Events (the name LikeComponent is set in the FirstRun() method of the class:

public Sub LikeComponent_Liked(value As Map)
   Log(value.Get("like") & " ----> " & value.Get("target"))
End Sub

public Sub LikeComponent_UnLiked(value As Map)
   Log("Unliked ----> " & value.Get("target"))
End Sub

Et voila,  a nice little demonstration of what you can make using B4J and ABMaterial.

I’ll end with a little word of advice:

If you only plan to learn one programming language this year, B4X is definitely the one you should pick!  With ABMaterial, I give you the power to write responsive, professional WebApps, and with the other B4X tools you write native Android, iOS, Desktop (Mac, Windows, Linux), Raspberry Pi and Arduino apps.  All with the same language!  You’ll wonder why you ever bothered looking at all those other pricy programming tools out there…

Happy programming!

Alwaysbusy

Click here to Donation and get the latest ABMaterial first!

B4J: ABMaterial 2.51 Public/3.00 ‘Chipmunk’ for Donators Released!

ABMaterial300Chipmunk

I’m very happy to release ABMaterial 3.00 “Chipmunk” for B4J with over 35 new features and bugfixes!  The most easy-to-use framework for developing professional responsive WebApps for all platforms is now at its third major release.

‘Chipmunk?’, I hear you think… Yes, from now on, every major version of ABMaterial will have a codename. Those names were already used internally and are animal names, matching the versions position in the alphabet. (FYI, version 1.x was “Albatros“, 2.x was “Butterfly“). For version 4.0, I’ll let you decide what it is called… :)

For the occasion, I also gave the demo app a new Theme. Make sure to check it out.

Please express your thanks to Mindful, who has done a remarkable effort to join me for a 3 day program-jam session to solve the reconnecting issues. The solution looks very clean and is easy to understand. A big thanks Mihai!

Chipmunk now also has the possibility to generate template projects for both B4J and B4A using a WebView wich makes it possible to use the Native functionalities (like accessing a camera, contacts, folders and much more) on your Android and Desktop/Raspberry Pi devices. An extra ABMController library makes it easy to communicate bidirectional between the WebView and the B4X code. The ABMController library for B4i is in the making.

The public version 2.51 with the Google Analytics bugfix is available to download here.

Donators will receive their download link for Chipmunk shortly.

Alwaysbusy

Click here to Donation and get the latest ABMaterial first!


B4J: Msgbox and Inputbox in ABMaterial 2.51

upload_2017-2-12_12-0-6
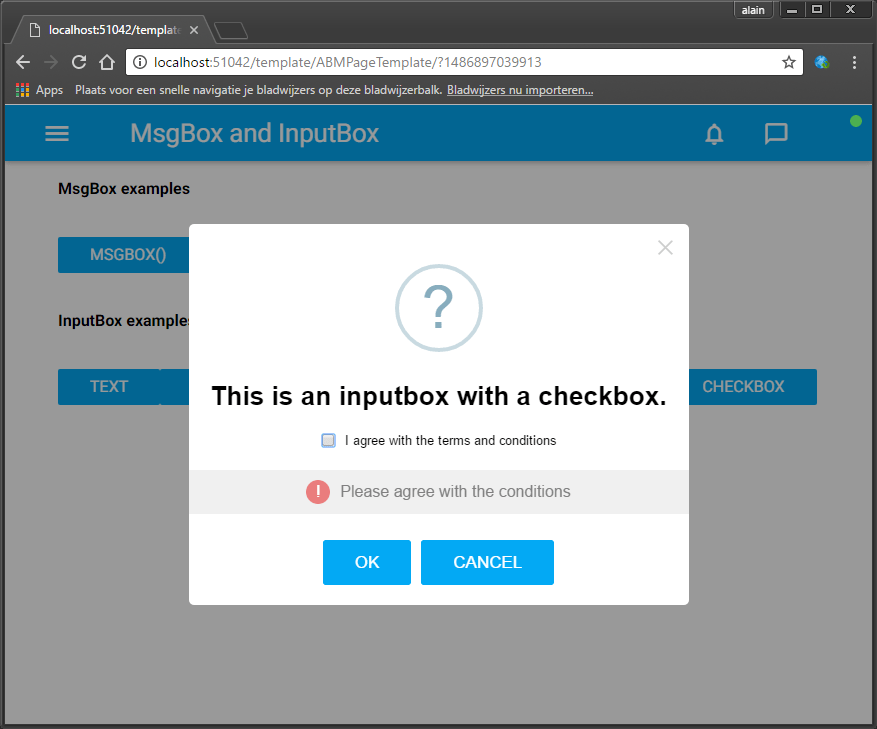
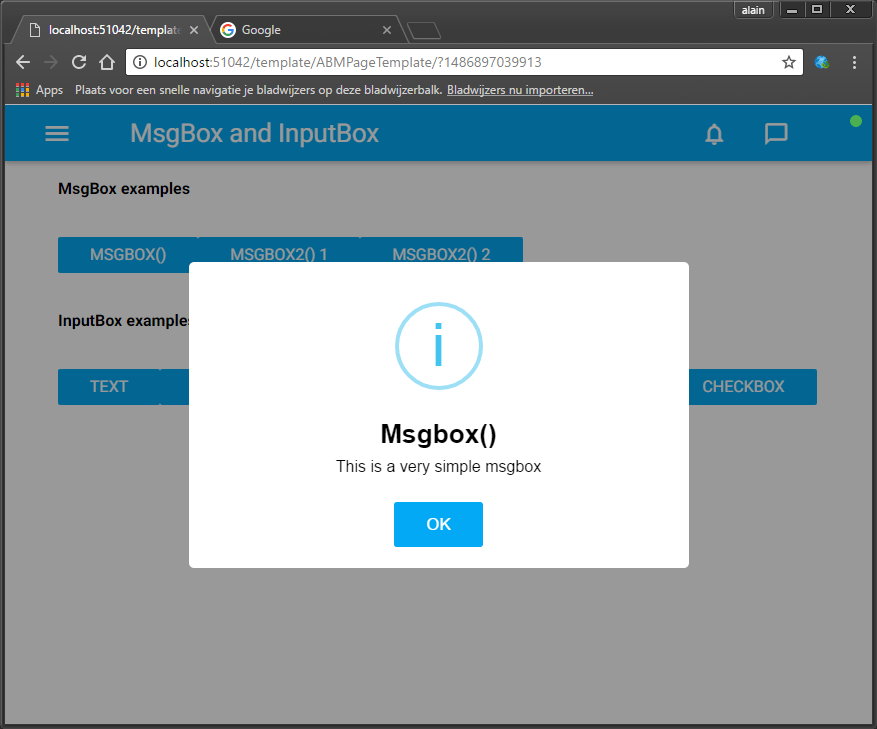
Sometimes you just need to show a quick Msgbox or a single-field Inputbox to the user. In ABMaterial for B4J you have probably, just like me, already made a couple of modal sheets to do this.

But in 2.51 I’ve integrated the possibility for such cases just to do it in one line of code (like a normal msgbox/inputbox).

It replaces the default looking ‘alert’ box from JavaScript to a more modern looking box.  The SweetAlert2 library, which is build on the orginal SweetAlert one, has been extended for ABMaterial so you can ‘Theme’ about anything you want.

For example, to show the msgbox you see on top of this article, this is the code you need to write:

page.Msgbox("MSGBOX1", "This is a very simple msgbox", "Msgbox()", "OK", "")

Some more examples:

theme.AddMsgBoxTheme("image")
theme.MsgBox("image").ConfirmButtonColor = ABM.COLOR_GREEN
theme.MsgBox("image").CancelButtonColor = ABM.COLOR_RED
theme.MsgBox("image").SetImage("https://unsplash.it/400/200", 400, 200)
theme.MsgBox("image").BackColor = ABM.COLOR_BLUEGREY
theme.MsgBox("image").BackColorIntensity = ABM.INTENSITY_LIGHTEN5

page.Msgbox2("MSGBOX3", "This is an msgbox with an image using a {C:#00AA00}theme{/C}!", "Msgbox2() 2", "OK","CANCEL",True, ABM.MSGBOX_TYPE_WARNING, "image")

upload_2017-2-12_12-2-24

page.InputBox("INPUTBOX1", "This is an inputbox for text.","OK", "CANCEL", True, ABM.INPUTBOX_TYPE_QUESTION, ABM.INPUTBOX_QUESTIONTYPE_TEXT,"","Type some text...", "", "Please enter something!", "")

upload_2017-2-12_12-3-30

page.InputBox("INPUTBOX3", "This is an inputbox for a password.","OK", "CANCEL", True, ABM.INPUTBOX_TYPE_QUESTION, ABM.INPUTBOX_QUESTIONTYPE_PASSWORD,"","Type your password...", "", "Please enter a password", "")

upload_2017-2-12_12-3-43

page.InputBox("INPUTBOX6", "This is an inputbox with a radio selection.","OK", "CANCEL", True, ABM.INPUTBOX_TYPE_QUESTION, ABM.INPUTBOX_QUESTIONTYPE_RADIO,"#00ff00", "","{'#ff0000': 'Red','#00ff00': 'Green','#0000ff': 'Blue'}", "You must select a color", "")

upload_2017-2-12_12-4-43

page.InputBox("INPUTBOX7", "This is an inputbox with a checkbox.","OK", "CANCEL", True, ABM.INPUTBOX_TYPE_QUESTION, ABM.INPUTBOX_QUESTIONTYPE_CHECKBOX,"", "I agree with the terms and conditions","", "Please agree with the conditions", "")

upload_2017-2-12_12-5-51

Events:

Sub page_MsgboxResult(returnName As String, result As String)
   myToastId = myToastId + 1
   page.ShowToast("toast" & myToastId, "toastgreen", returnName & " " & result, 5000)
End Sub

Sub page_InputboxResult(returnName As String, result As String)
   myToastId = myToastId + 1
   page.ShowToast("toast" & myToastId, "toastred", returnName & " " & result, 5000)
End Sub

ABMaterial Mainenance Release 2.51 will be available for the donators in the following days.

Alwaysbusy

Click here to Donation and get the latest ABMaterial first!

B4J: Custom component ABMGridTable (Team Project)

One of the most asked for components in ABMaterial is an editable Grid.  We already have ABMTable and ABMTableMutable, but they have their limitations when it comes to being editable. So, as this kind of object is huge, I suggest we make it a Team Effort to build one.

I did have a look around and found a nice one jsGrid which is feature rich, easy to use and fits rather well with the ABMaterial look and feel.

I already did the first part: modified the default CSS so it works with ABMaterial (checkboxes and combos did not work), created a basic class template and a sample on how to use it in a webapp.

Copy the CSS and JS files from the zip the css/custom/ and /js/custom/ folders of the ABMaterial www folder.
Start with localhost:51042/GridDemo

My current result looks like this (allows adding, deleting, changing, sorting and filtering):

upload_2017-2-6_12-34-40

Creating even such a complex component is very easy in B4J with ABMaterial.  Lets dive into some code:

The ABMTableGrid class

'Class module
Sub Class_Globals
	Public ABMComp As ABMCustomComponent
	Private cmbCountries As String
	Private DBdata As String
End Sub

'Initializes the object. Countries and data are Json Strings
Public Sub Initialize(InternalPage As ABMPage, ID As String, Countries As String, data As String)
	ABMComp.Initialize("ABMComp", Me, InternalPage, ID)
	cmbCountries = Countries
	DBdata = data
End Sub

Sub ABMComp_Build(internalID As String) As String
	Return $"
<div id="${internalID}"></div>
<script>var _${internalID};</script>"$
End Sub

Sub ABMComp_FirstRun(InternalPage As ABMPage, internalID As String)
	Dim script As String = $"_${internalID} = $("#${internalID}").jsGrid({
		height: "100%",
		width: "100%",
		filtering: true,
		inserting: true,
		editing: true,
		sorting: true,
		paging: true,
		autoload: true,
		pageSize: 10,
		pageButtonCount: 5,
		deleteConfirm: "Do you really want to delete the client?",
		controller: {
			loadData: function(filter) {
				return $.grep(${DBdata}, function(client) {
					var fName = filter.Name.toUpperCase();
					var fAddress = filter.Address.toUpperCase();
					return (!filter.Name || client.Name.toUpperCase().indexOf(fName) > -1)
						&& (!filter.Age || client.Age === filter.Age)
						&& (!filter.Address || client.Address.toUpperCase().indexOf(fAddress) > -1)
						&& (!filter.Country || client.Country === filter.Country)
						&& (filter.Married === undefined || client.Married === filter.Married);
					});
			},
			insertItem: function(insertingClient) {
				var json = JSON.stringify(insertingClient);
				b4j_raiseEvent('${ABMComp.ID}_inserted', {'value':json});
			},
			updateItem: function(updatingClient) {
				var json = JSON.stringify(updatingClient);
				b4j_raiseEvent('${ABMComp.ID}_updated', {'value':json});
			},
			deleteItem: function(deletingClient) {
				var json = JSON.stringify(deletingClient);
				b4j_raiseEvent('${ABMComp.ID}_deleted', {'value':json});
			}
		},
		fields: [
			{ name: "Name", type: "text", width: 150 },
			{ name: "Age", type: "number", width: 50 },
			{ name: "Address", type: "text", width: 200 },
			{ name: "Country", type: "select", items: ${cmbCountries}, valueField: "Id", textField: "Name" },
			{ name: "Married", type: "checkbox", title: "Is Married", sorting: false},
			{ type: "control" }
		]
	});"$

	InternalPage.ws.Eval(script, Array As Object(ABMComp.ID))
	' flush not needed, it's done in the refresh method in the lib
End Sub

public Sub SetDBData(data As String)
	DBdata = data
End Sub

Sub ABMComp_Refresh(InternalPage As ABMPage, internalID As String)
	Dim script As String = $"$("#${internalID}").jsGrid("refresh");"$
	InternalPage.ws.Eval(script, Null)
End Sub

Usage in a WebApp:

Sub Class_Globals
	...
	Dim myTableGrid As ABMTableGrid
	' fake database for demo purposes
	Dim database As Map
End Sub

' make sure you copied the files from the .zip in the right folders
public Sub BuildPage()
	...
	page.AddExtraCSSFile("custom/jsgrid.min.css")
	page.AddExtraCSSFile("custom/jsgrid-theme.min.css")
	page.AddExtraJavaScriptFile("custom/jsgrid.min.js")
	...
End Sub

public Sub ConnectPage()
	...
	' as for the demo, we fake a real database here
	LoadFakeData

	page.Cell(2,1).SetFixedHeight(500)

	' for our combo, we add a Json string counting the countries
	myTableGrid.Initialize(page, "myTableGrid", $"[
		{ Name: "", Id: 0 },
		{ Name: "United States", Id: 1 },
		{ Name: "Canada", Id: 2 },
		{ Name: "United Kingdom", Id: 3 },
		{ Name: "France", Id: 4 },
		{ Name: "Brazil", Id: 5 },
		{ Name: "China", Id: 6 },
		{ Name: "Russia", Id: 7 }
	]"$, LoadData)
    page.Cell(2,1).AddComponent(myTableGrid.ABMComp)
	...
End Sub

Sub LoadData() As String
	' we have to return a Json string
	Dim data As StringBuilder
	data.Initialize
	data.Append("[")
	For i = 0 To database.size - 1
		If i > 0 Then
			data.Append(",")
		End If
		data.Append(database.get(i))
	Next
	data.Append("]")
	Return data.ToString
End Sub

Sub myTableGrid_Inserted(value As Map)
	log(value.get("ID")
End Sub

Sub myTableGrid_Updated(value As Map)
	log(value.get("ID")
End Sub

Sub myTableGrid_Deleted(value As Map)
	log(value.get("ID")
End Sub

Sub LoadFakeData()
	database.Initialize
	database.Put(0,$"{"ID": 0,"Name": "Otto Clay","Age": 61,"Country": 6,"Address": "Ap #897-1459 Quam Avenue","Married": false}"$)
	database.Put(1,$"{"ID": 1,"Name": "Connor Johnston","Age": 73,"Country": 7,"Address": "Ap #370-4647 Dis Av.","Married": false}"$)
	...
End Sub

As you can see, adding this rather complex component took me about 10 minutes to make, literally the time to put on a pot of Java. (pun intended!)

So this is were you guys can come in!

Some suggestions:
1. Adapt my class so the fields are generic (maybe by passing a Map with field definitions in initialize and then ‘build’ the correct JavaScript string in FirstRun?).
2. I only have set some basic parameters (like sorting, filtering etc), but this component has a lot more to offer. They can become properties of the class. See the jsGrid link at the top of this article.

Download the full source code and share your changes in this B4J Forum topic, so everyone can benefit from your creation.

Alwaysbusy

Click here to Donation if you like my work

B4J: ABMaterial 2.20 Public/2.50 Donators released

abmaterial250

This is just an announcement for the new version(s) of ABMaterial for B4J! It has been a while since I’ve been able to release a new free (public) version, but it is worth the wait!

As the donators already know, 2.20 was a major release, as it tackled a whole new reconnecting system.  If you’re using the free version (pre 2.00), make sure you read the included documents to see how you need to upgrade to the new version!

It was also the first version that introduced the Grid Builder.  With this tool, it is now very easy to create your responsive framework.

2.50 containes a lot of new stuff, as you’ve read in the posts on this blog: ABMChat, ABMPlanner and ABMPercentSlider are only a few of the new things.  Worth mentioning are the major changes in the ABMPivot component, adding new features like exporting to Excel, collapsable rows and columns, new presentations and so on.

Check out the online demo abmaterial.com or download your free copy from the B4J website.

Donators will receive a download link for 2.50 shortly.

Happy Programming!

Alwaysbusy

Click here to Donation if you like my work

B4J: New ABMPlanner and ABMPercentSlider (ABMaterial 2.50)

abmplanner
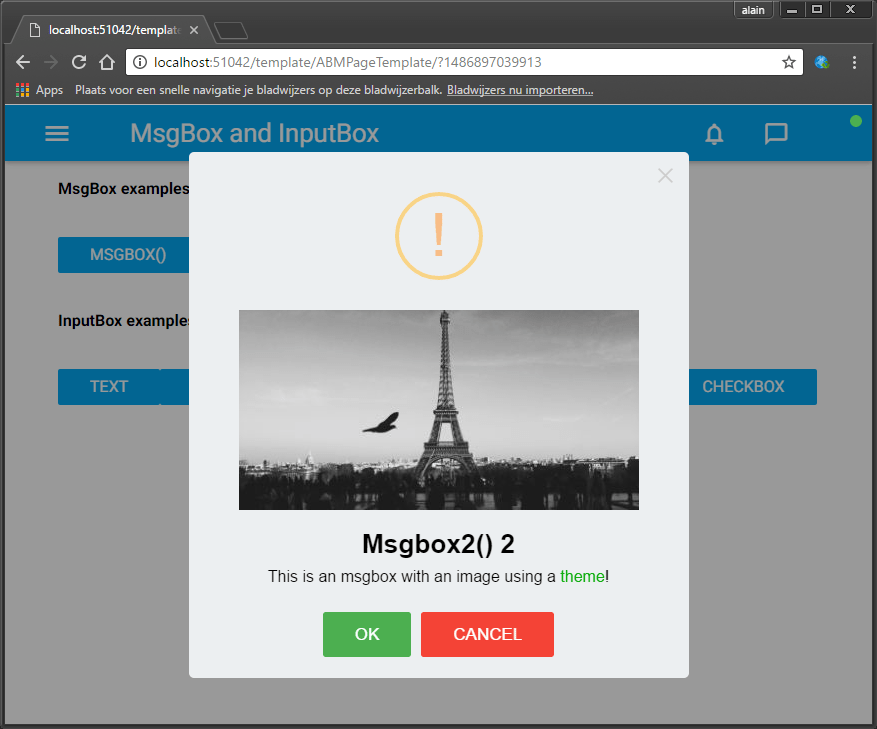
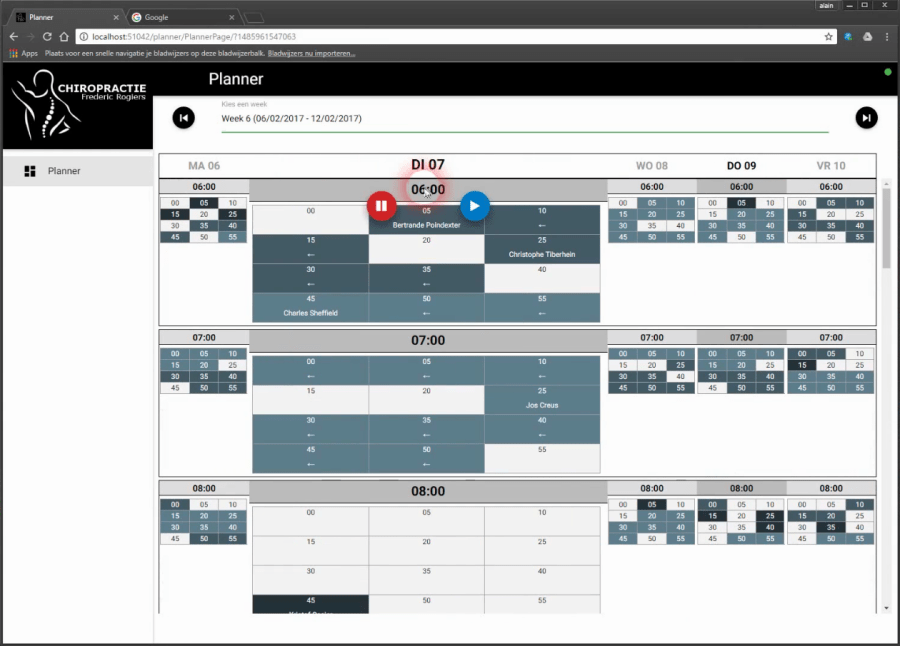
A friend of mine, who is a doctor, wanted me to write a scheduling webapp. He had some perticular requests:

1. You should be able to schedule per 5 minutes
2. But still need to be able to see the whole week
3. Wanted only to see the 5 working days (no weekends)
4. Should see from 06:00 to 21:00
5. As his assistant has to ‘fill’ the schedule, he also wanted somehow to show her when he would not be available.

I told him this quickly added up to showing about 840 possible appointments I had to show him on his desktop, tablet and iPhone. “Yes”, was his dry answer…

I didn’t know any such object, so I’ve put on my thinking hat and came up with ABMPlanner for B4J!

Although it has been written especially for his needs, I’m sure it can come in handy for other kind of projects too. For example you can schedule per 5, 10, 15, 20 or 30 minutes. You can set the start/end time of a day. And it can show a full week (including the weekend). You can give each task different colors etc…

It can also show the week as a ‘HeatMap’, so he can see very fast where he can put someone in-between other patients.

The second component ABMPercentSlider (in the video when the modalsheet is opened) is an alternative radio group component. It ranges the possibilities in a ‘percentage’ range, with 5% intervals.

But have a look at the video (app is work in progress and sorry it is in dutch). It can be intimidating at first glance, but once you ‘get’ it, it’s actually a breeze to schedule stuff.

Some relevant code:

BuildPage:

Dim plan As ABMPlanner
plan.Initialize(page, "plan", False, 6,20, 5,False,"black")
plan.UseHeatMap("1,3,6")
page.Cell(2,1).AddComponent(plan)

Adding a task (loading a random generated week):

Sub LoadRandomWeek(StartDay As Long,doRefresh As Boolean)
   Dim plan As ABMPlanner = page.Component("plan")
   plan.ClearPlanner

   Dim Days(7) As String
   Dim Day As Int = DateTime.GetDayOfMonth(StartDay)
   Dim nextDay As Long = StartDay
   Dim perNext As Period
   perNext.Initialize
   perNext.Days = 1
   For i = 0 To 6
     If ActiveDay = -1 Then
       If DateTime.Date(nextDay) = DateTime.Date(DateTime.Now) Then
         ActiveDay = i
       End If
     End If
     Days(i)   = Day
     If Days(i).Length = 1 Then
       Days(i) = "0" &amp; Days(i)
     End If
     nextDay = DateUtils.AddPeriod(nextDay, perNext)
     Day = DateTime.GetDayOfMonth(nextDay)
   Next
   Dim mins As List
   mins.Initialize
   mins.Add(1)
   mins.Add(3)
   mins.Add(6)
   mins.Add(12)
   plan.SetDayLabels("MA " &amp; Days(0), "DI " &amp; Days(1), "WO " &amp; Days(2), "DO " &amp; Days(3), "VR " &amp; Days(4),  "ZA " &amp; Days(5),  "ZO " &amp; Days(6))
   Dim PerTotal As Int = 12

   For i = 0 To 4
     Dim u As Int = 6
     Dim m As Int = 0
     Dim l As Int = 0
     Dim lIndex As Int
     Do While u &lt; 21
       Do While m &lt; PerTotal    
         m = m + Rnd(1,3)          
         lIndex = Rnd(0,3)
         l = mins.Get(lIndex)
         If (u*PerTotal + m + l) &lt; (21*PerTotal) And m &lt; PerTotal And (i &lt;&gt; 2 Or u &lt;=11 ) Then
           Dim patient As String = FirstNames.get(Rnd(0,19)) &amp; " " &amp; LastNames.get(Rnd(0,19))
           counter = counter + 1
           plan.AddTask(NewTask(i, "T" &amp; counter,u,m,l,patient,lIndex)) ' taskid must be a string!                
         End If
         m = m + l
       Loop
       m = m - PerTotal
       u = u + 1
     Loop
   Next

   plan.SetActiveDay(ActiveDay)
   For i = 12 To 20
     plan.SetHourStatus(2,i,False)
   Next
   If doRefresh Then
     plan.Refresh
   End If
End Sub

Events:

Sub plan_ActiveDayChanged(day As Int)
   Log("New day: " &amp; day)
   ActiveDay = day
   ' important to sync the server with the browser!
   Dim plan As ABMPlanner = page.Component("plan")
   plan.SetActiveDay(ActiveDay)
End Sub

Sub plan_MinutesClicked(Value As String)
   Dim spl() As String = Regex.Split(";", Value)
   ' spl(0) is here always 0, as this would contain the menu item clicked.  This is to be uniform with the MenuClicked Value param
   Log("Day: " &amp; spl(1))
   Log("Hour: " &amp; spl(2))
   Log("MinPer5: " &amp; spl(3))
   ' use the ABM.PLANNER_STATUS_ constants to check the status
   Log("Status: " &amp; spl(4))
   Log("Task ID: " &amp; spl(5))

   page.ShowModalSheet("patientafspraak")
End Sub

Sub plan_MenuClicked(MenuType As String, Value As String)
   Dim spl() As String = Regex.Split(";", Value)
   Dim plan As ABMPlanner = page.Component("plan")
   Log("MenuType: " &amp; MenuType)
   Log("Value: " &amp; Value)
   Select Case MenuType
     Case ABM.PLANNER_MENUTYPE_DAY
       ' update the database

       Log("Day: " &amp; spl(1))

       Select Case spl(0)
         Case ABM.PLANNER_MENU_SETFREE
           plan.SetDayStatus(spl(1), True)
         Case ABM.PLANNER_MENU_SETNOTAVAILABLE
           plan.SetDayStatus(spl(1), False)
       End Select

       ' IMPORTANT to perform the action in the browser
       plan.PerfromDayHourMenuAction
     Case ABM.PLANNER_MENUTYPE_HOUR
       ' update the database

       Log("Day: " &amp; spl(1))
       Log("Hour: " &amp; spl(2))

       Select Case spl(0)
         Case ABM.PLANNER_MENU_SETFREE
           plan.SetHourStatus(spl(1), spl(2), True)
         Case ABM.PLANNER_MENU_SETNOTAVAILABLE
           plan.SetHourStatus(spl(1), spl(2), False)
       End Select

       ' IMPORTANT to perform the action in the browser
       plan.PerfromDayHourMenuAction  
     Case ABM.PLANNER_MENUTYPE_MIN
       ' update the database

       Log("Day: " &amp; spl(1))
       Log("Hour: " &amp; spl(2))
       Log("MinPer5: " &amp; spl(3))
       ' use the ABM.PLANNER_STATUS_ constants to check the status
       Log("Status: " &amp; spl(4))
       Log("Task ID: " &amp; spl(5))

       Select Case spl(0)
         Case ABM.PLANNER_MENU_CUT
           cutTaskID = spl(5)
           copyTask = plan.GetTask(spl(5))
           IsCut = True
           myToastID = myToastID + 1
           page.ShowToast("toast" &amp; myToastID, "toastred", "Verplaats " &amp; copyTask.Text &amp; " naar...", 5000)
         Case ABM.PLANNER_MENU_COPY
           copyTask = plan.GetTask(spl(5))
           IsCut = False
           myToastID = myToastID + 1
           page.ShowToast("toast" &amp; myToastID, "toastred", "Kopieer " &amp; copyTask.Text &amp; " naar...", 5000)
         Case ABM.PLANNER_MENU_PASTE
           If IsCut Then
             plan.RemoveTask2(cutTaskID)
           Else
             counter = counter + 1
             copyTask = copyTask.Clone("T" &amp; counter)
           End If
           copyTask.Day = spl(1)
           copyTask.StartHour = spl(2)      
           copyTask.StartMinututesPer = spl(3)
           plan.AddTask(copyTask)      
           plan.Refresh
           If IsCut Then
             myToastID = myToastID + 1
             page.ShowToast("toast" &amp; myToastID, "toastred", copyTask.Text &amp; " verplaatst!", 5000)
           Else
             myToastID = myToastID + 1
             page.ShowToast("toast" &amp; myToastID, "toastred", copyTask.Text &amp; " gekopieerd!", 5000)
           End If
         Case ABM.PLANNER_MENU_DELETE
           plan.RemoveTask2(spl(5))
           plan.Refresh
       End Select

   End Select
End Sub

These are the final components for ABMaterial 2.50. I’m now going to prepare everything for the next release. (updating the demos etc), so donators will receive these new toys shortly…

Alwaysbusy

Click here to Donation and support ABMaterial