You probably have seen these nifty little IoT Flic buttons around. They are a fun and relative cheap BLE button that allows you to do something when the button is clicked, doubleclicked or hold.
I decided to write a wrapper for the Android SDK to use with B4A.
How to use:
1. Install the Flic app from the Google Play.
2. On their developer page, create a new app: you get a key and a secret.
3. Copy the ABFlicB4A library jar and xml to your library folder and select it in B4A
Here is a small video demonstrating the library. You can the use the full power of B4A to do about, well, everything…
Example usage code:
Sub Process_Globals

End Sub

Sub Globals
   Private flic As ABFlic
   Private Button2 As Button
   Private Button3 As Button
   Private Button4 As Button
   Private Label1 As Label
   Private Button1 As Button

   Private MyFlicID As String

   Private FlicResults As List
End Sub

Sub Activity_Create(FirstTime As Boolean)
   Activity.LoadLayout("1")
   FlicResults.Initialize
   FlicResults.Add("RESULTACTION_HOLD")
   FlicResults.Add("RESULTACTION_SINGLECLICK")
   FlicResults.Add("RESULTACTION_DOUBLECLICK")
End Sub

Sub Activity_Resume
   ' your key and secret
   flic.Initialize("Flic", "d60d36a0-XXXXXXXXXXXXXXXXXXXXXXXXXXXXXXXXX", "db5c2b3d-XXXXXXXXXXXXXXXXXXXXXXXXXXXXXXXXX", "ABFlicTest")
End Sub

Sub Button1_Click
   flic.ForgetButton(MyFlicID)
End Sub

Sub Button2_Click
   flic.GrabButton
End Sub

Sub Button3_Click
   flic.StartListening
End Sub

Sub Button4_Click
   flic.StopListening
End Sub

Sub flic_Added(buttonID As String, Name As String)
   MyFlicID = buttonID
   Log("Added: " & buttonID)
   Label1.Text = "Added: " & buttonID & CRLF & Label1.Text
End Sub

Sub flic_Clicked(buttonID As String, wasQueued As Boolean, timeDiff As Int)
   MyFlicID = buttonID
   Log("Clicked: " & buttonID)
   Label1.Text = "Clicked: " & buttonID & CRLF & Label1.Text
End Sub

Sub flic_DoubleClicked(buttonID As String, wasQueued As Boolean, timeDiff As Int)
   MyFlicID = buttonID
   Log("DoubleClicked: " & buttonID)
   Label1.Text = "DoubleClicked: " & buttonID & CRLF & Label1.Text
End Sub

Sub flic_Holded(buttonID As String, wasQueued As Boolean, timeDiff As Int)
   MyFlicID = buttonID
   Log("Holded: " & buttonID)
   Label1.Text = "Holded: " & buttonID & CRLF & Label1.Text
End Sub

Sub flic_Removed(buttonID As String)
   MyFlicID = ""
   Log("Removed: " & buttonID)
   Label1.Text = "Removed: " & buttonID & CRLF & Label1.Text
End Sub

Sub flic_Error(err As Int)
   Log("Error: " & err)
   Label1.Text = "Error: " & err & CRLF & Label1.Text
End Sub
I’m currently working on a Desktop/Raspberry Pi version of this library, which I will share in the B4J forum later.
I was wondering if it would be possible to use B4J to program the Lego Mindstorms EV3 Brick for some time. So, some weeks ago, I finally spend a couple of evenings looking into it. And yes, B4J goes Robotics! It uses a modified LeJOS Firmware.
I upgraded LeJOS to support Java 1.8, which is probably the most technical part of the project. I cannot provide it here, as it depends on your Java version but if you follow the next steps, you can build your own. This is done on a Windows PC:
Upgrading the LeJOS Firmware to use Java 1.8
The following procedure will install the java 8 environment compatible with leJOS 9.0 from windows 7. The only extra tool needed is 7ZIP (a free tool) which can generate tar and gz format. In the following I use a temporary directoyr as F:\temp. Replace it with your own temp directory wherever it appears.
Create an account if you dont have one then Accept Licensee agreement and download ejdk-8-xxxxxxx-linux-arm-sflt-xxxxxxxx.tar.gz or the latest java8 jre for EV3.
Unzip this file in your F:\temp directory. For simpler process you may rename the extracted directory as ejdk8. Run 7zip as administrator!
Go to directory ejdk8\ejdk1.8.0\bin. Save the file jrecreate.bat. Now right click on jrecreate.bat and select “modify”. Add one first line to the bat file as SET JAVA_HOME=C:\Progra~2\Java\jdk1.8.xxxx. this is where java8 is installed on my system. Program~2 stand for Program Files (x86) but is easier to type.
Start a command window: Start->All prog->Accessory->commands.
In this window type in the following commands
F:
cd temp
cd ejdk8\ejdk1.8.0\bin
jrecreate.bat –dest newjre –profile compact2 –vm clientIt should start creating the new jre files in the directory “newjre” under ejdk8\ejdk1.8.0\bin
Wait for the final message.
Close the command window.
With file explorer go to F:\temp\ejdk8\ejdk1.8.0\bin. Copy “newjre” directory back to F:\temp
Rename the “newjre” directory as something expected by LeJOS such as
ejre-8-b132-linux-arm-sflt
Right click on it. Open with 7ZIP and add to archive. Select tar format. It will create ejre-8-b132-linux-arm-sflt.tar file.
Right click on tar copy then add archive with gzip format. It will create ejre-8-b132-linux-arm-sflt.tar.gz. You have created the JRE file for java8 expected by EV3.
Insert your SD card and format it.
Copy the ejre-8-b132-linux-arm-sflt.tar.gz under the sd card top directory.
Go to C:\Program Files\leJOS EV3
Now remove the SD from PV and insert the card into the EV3 brick then power it. Wait for the end of the install (about 10mn).
If anything goes wrong, format again the SD, empty the F:\temp directory and restart at step 3. if it persist try another SD card.
Your brick is ready!
Next I wrote a B4J wrapper for the basics like motors, sensors etc. This project is just a hobby and may grow in the future. But I just wanted to share this first video (badly directed so no Oscars here, unless…)
Obviously, I wanted to test out my code, but I had to build a bot first. Well, I was in for a surprise! It took me over 3 hours to build EV3D4 and I can tell you, I’m not a very patient person so I may have taken some shortcuts in the construction.
What happens in the video:
1. I uploaded the B4J created .jar file to the brick via ssh and I’m ready to start it.
2. After some time, it runs (on the brick shows a disclamer and waits for a key).
3. I disconnect the brick, put it on the ground and press a button on the brick.
4. I programmed the IR sensor so if it sees a wall, it turns away, else it keeps going.
Fun fact is you can use B4J-Bridge.jar on the brick!
This is handy as debugging a Brick is a b*tch. You must have a lot of patience and prepared to restart your brick A LOT. This is not a B4J limitation, just to say how unstable programming a Brick is in general.
Coding is straightforward in B4J (this is all the code I wrote, including turning if it is about to hit a wall):
Sub Process_Globals
   Private StartTimer As Timer
   Public EV3 As ABLegoEV3
   Public LeftMotor As ABLLargeRegulatedMotor
   Public RightMotor As ABLLargeRegulatedMotor
   Public Sensor As ABLIRSensor
   Public sp As ABLSensorMode

   Public control As Int = 0
   Public distance As Int = 255
End Sub

Sub AppStart (Args() As String)
   LeftMotor.Initialize("B")
   RightMotor.Initialize("C")

   LeftMotor.ResetTachoCount
   RightMotor.resetTachoCount
   LeftMotor.rotateTo(0)
   RightMotor.rotateTo(0)
   LeftMotor.Speed = 400
   RightMotor.Speed = 400
   LeftMotor.Acceleration = 800
   RightMotor.Acceleration = 800

   Log("starting sensor")
   Sensor.Initialize("S4")
   sp = Sensor.DistanceMode

   IntroMessage

   StartTimer.Initialize("StartTimer", 100)
   StartTimer.Enabled = True
   StartMessageLoop
End Sub

Sub StartTimer_Tick
   ' read the sensor
   Dim sample(sp.sampleSize) As Float
   control = Sensor.getRemoteCommand(0)
   sp.fetchSample(sample, 0)
   distance = sample(0)
   Log("Control: " & control & " Distance: " & distance)

   If distance < 70 Then
     Log("A wall!")
     EV3.Button.LEDPattern(2)

     LeftMotor.rotate2(-180, True) ' start Motor.B rotating backward
     RightMotor.rotate(-180)  ' rotate C farther To make the turn
     If Bit.And(DateTime.Now, 1) <> 0 Then
         LeftMotor.rotate2(-180, True) ' start Motor.B rotating backward
         RightMotor.rotate(180)  ' rotate C farther To make the turn
     Else
         RightMotor.rotate2(-180, True) ' start Motor.B rotating backward
         LeftMotor.rotate(180) ' rotate C farther To make the turn
     End If
  Else
     Log("Let's walk")
     EV3.Button.LEDPattern(1)

     LeftMotor.Speed = 400
     RightMotor.Speed = 400
     LeftMotor.Backward ' my motors are installed inverted on this robot
     RightMotor.Backward
  End If
End Sub

Sub IntroMessage()
   Dim g As ABLGraphicsLCD = EV3.GraphicsLCD
   g.clear
   g.drawString("Bumper Car Demo", 5, 0, 0)
   g.Font = g.Font.SmallFont
   g.drawString("Demonstration of the Behavior", 2, 20, 0)
   g.drawString("subsumption classes. Requires", 2, 30, 0)
   g.drawString("a wheeled vehicle with two", 2, 40, 0)
   g.drawString("independently controlled", 2, 50, 0)
   g.drawString("motors connected to motor", 2, 60, 0)
   g.drawString("ports B and C, and an", 2, 70, 0)
   g.drawString("infrared sensor connected", 2, 80, 0)
   g.drawString("to port 4.", 2, 90, 0)

   ' Quit GUI button:
   g.Font = g.Font.SmallFont
   Dim y_quit As Int = 100
   Dim width_quit As Int = 45
   Dim height_quit As Int = width_quit/2
   Dim arc_diam As Int = 6
   g.drawString("QUIT", 9, y_quit+7, 0)
   g.drawLine(0, y_quit,  45, y_quit) ' top line
   g.drawLine(0, y_quit,  0, y_quit+height_quit-arc_diam/2) ' left line
   g.drawLine(width_quit, y_quit,  width_quit, y_quit+height_quit/2) ' right line
   g.drawLine(0+arc_diam/2, y_quit+height_quit,  width_quit-10, y_quit+height_quit) ' bottom line
   g.drawLine(width_quit-10, y_quit+height_quit, width_quit, y_quit+height_quit/2) ' diagonal
   g.drawArc(0, y_quit+height_quit-arc_diam, arc_diam, arc_diam, 180, 90)

   ' Enter GUI button:
   g.fillRect(width_quit+10, y_quit, height_quit, height_quit)
   g.drawString2("GO", width_quit+15, y_quit+7, 0,True)

   EV3.Button.WaitForAnyPress
   If (EV3.Button.ESCAPE.isDown()) Then
     ExitApplication2(0)
   End If
   g.clear
End Sub
As I said, this is just for fun. No idea how far this will go. You can download the source code for the B4J library from my Github.
Sometimes you just need to show a quick Msgbox or a single-field Inputbox to the user. In ABMaterial for B4J you have probably, just like me, already made a couple of modal sheets to do this.
But in 2.51 I’ve integrated the possibility for such cases just to do it in one line of code (like a normal msgbox/inputbox).
It replaces the default looking ‘alert’ box from JavaScript to a more modern looking box. The SweetAlert2 library, which is build on the orginal SweetAlert one, has been extended for ABMaterial so you can ‘Theme’ about anything you want.
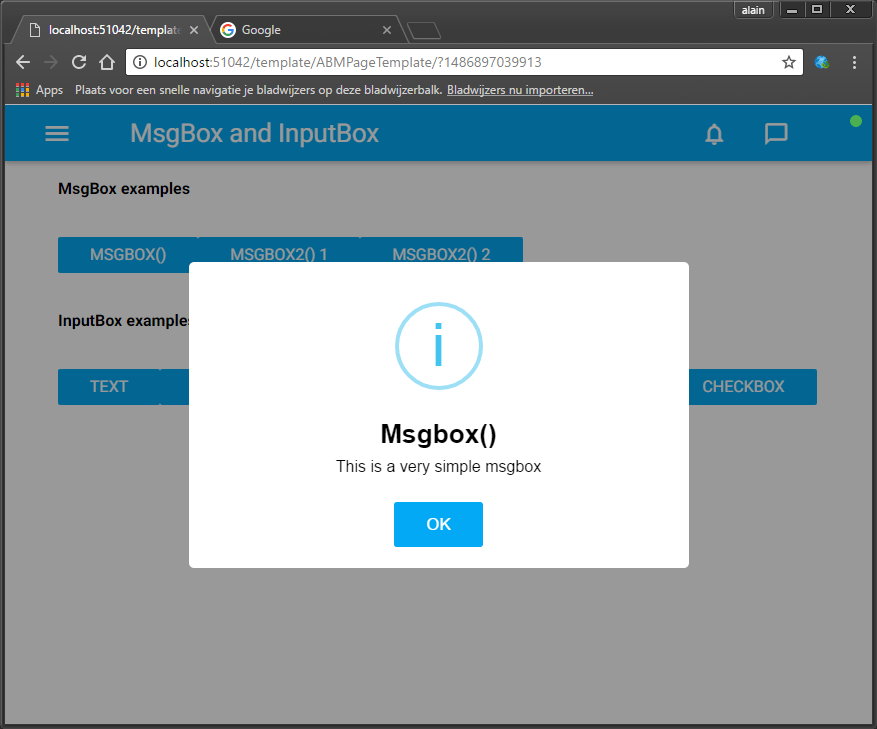
For example, to show the msgbox you see on top of this article, this is the code you need to write:
page.Msgbox("MSGBOX1", "This is a very simple msgbox", "Msgbox()", "OK", "")
Some more examples:
theme.AddMsgBoxTheme("image")
theme.MsgBox("image").ConfirmButtonColor = ABM.COLOR_GREEN
theme.MsgBox("image").CancelButtonColor = ABM.COLOR_RED
theme.MsgBox("image").SetImage("https://unsplash.it/400/200", 400, 200)
theme.MsgBox("image").BackColor = ABM.COLOR_BLUEGREY
theme.MsgBox("image").BackColorIntensity = ABM.INTENSITY_LIGHTEN5

page.Msgbox2("MSGBOX3", "This is an msgbox with an image using a {C:#00AA00}theme{/C}!", "Msgbox2() 2", "OK","CANCEL",True, ABM.MSGBOX_TYPE_WARNING, "image")
page.InputBox("INPUTBOX1", "This is an inputbox for text.","OK", "CANCEL", True, ABM.INPUTBOX_TYPE_QUESTION, ABM.INPUTBOX_QUESTIONTYPE_TEXT,"","Type some text...", "", "Please enter something!", "")
page.InputBox("INPUTBOX3", "This is an inputbox for a password.","OK", "CANCEL", True, ABM.INPUTBOX_TYPE_QUESTION, ABM.INPUTBOX_QUESTIONTYPE_PASSWORD,"","Type your password...", "", "Please enter a password", "")
page.InputBox("INPUTBOX6", "This is an inputbox with a radio selection.","OK", "CANCEL", True, ABM.INPUTBOX_TYPE_QUESTION, ABM.INPUTBOX_QUESTIONTYPE_RADIO,"#00ff00", "","{'#ff0000': 'Red','#00ff00': 'Green','#0000ff': 'Blue'}", "You must select a color", "")
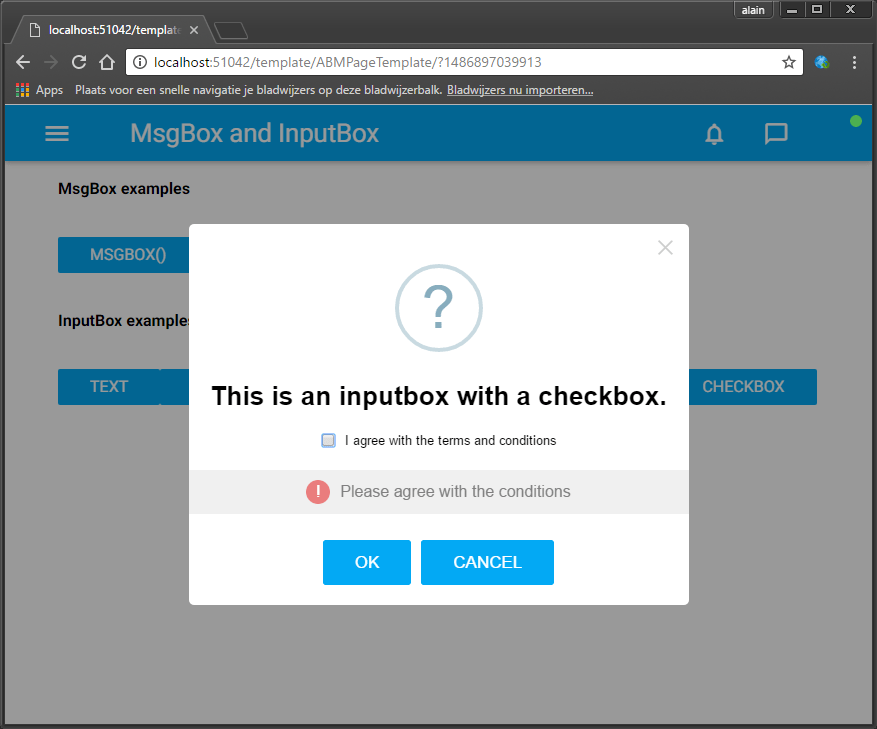
page.InputBox("INPUTBOX7", "This is an inputbox with a checkbox.","OK", "CANCEL", True, ABM.INPUTBOX_TYPE_QUESTION, ABM.INPUTBOX_QUESTIONTYPE_CHECKBOX,"", "I agree with the terms and conditions","", "Please agree with the conditions", "")
Events:
Sub page_MsgboxResult(returnName As String, result As String)
   myToastId = myToastId + 1
   page.ShowToast("toast" & myToastId, "toastgreen", returnName & " " & result, 5000)
End Sub

Sub page_InputboxResult(returnName As String, result As String)
   myToastId = myToastId + 1
   page.ShowToast("toast" & myToastId, "toastred", returnName & " " & result, 5000)
End Sub
ABMaterial Mainenance Release 2.51 will be available for the donators in the following days.
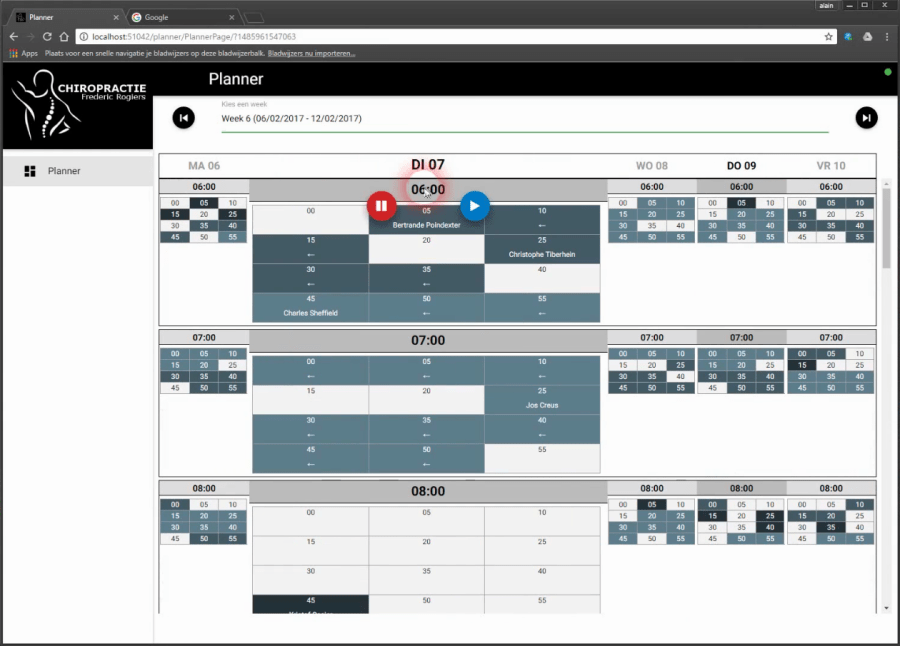
A friend of mine, who is a doctor, wanted me to write a scheduling webapp. He had some perticular requests:
1. You should be able to schedule per 5 minutes
2. But still need to be able to see the whole week
3. Wanted only to see the 5 working days (no weekends)
4. Should see from 06:00 to 21:00
5. As his assistant has to ‘fill’ the schedule, he also wanted somehow to show her when he would not be available.
I told him this quickly added up to showing about 840 possible appointments I had to show him on his desktop, tablet and iPhone. “Yes”, was his dry answer…
I didn’t know any such object, so I’ve put on my thinking hat and came up with ABMPlanner for B4J!
Although it has been written especially for his needs, I’m sure it can come in handy for other kind of projects too. For example you can schedule per 5, 10, 15, 20 or 30 minutes. You can set the start/end time of a day. And it can show a full week (including the weekend). You can give each task different colors etc…
It can also show the week as a ‘HeatMap’, so he can see very fast where he can put someone in-between other patients.
The second component ABMPercentSlider (in the video when the modalsheet is opened) is an alternative radio group component. It ranges the possibilities in a ‘percentage’ range, with 5% intervals.
But have a look at the video (app is work in progress and sorry it is in dutch). It can be intimidating at first glance, but once you ‘get’ it, it’s actually a breeze to schedule stuff.
Some relevant code:
BuildPage:
Dim plan As ABMPlanner
plan.Initialize(page, "plan", False, 6,20, 5,False,"black")
plan.UseHeatMap("1,3,6")
page.Cell(2,1).AddComponent(plan)
Adding a task (loading a random generated week):
Sub LoadRandomWeek(StartDay As Long,doRefresh As Boolean)
   Dim plan As ABMPlanner = page.Component("plan")
   plan.ClearPlanner

   Dim Days(7) As String
   Dim Day As Int = DateTime.GetDayOfMonth(StartDay)
   Dim nextDay As Long = StartDay
   Dim perNext As Period
   perNext.Initialize
   perNext.Days = 1
   For i = 0 To 6
     If ActiveDay = -1 Then
       If DateTime.Date(nextDay) = DateTime.Date(DateTime.Now) Then
         ActiveDay = i
       End If
     End If
     Days(i)   = Day
     If Days(i).Length = 1 Then
       Days(i) = "0" & Days(i)
     End If
     nextDay = DateUtils.AddPeriod(nextDay, perNext)
     Day = DateTime.GetDayOfMonth(nextDay)
   Next
   Dim mins As List
   mins.Initialize
   mins.Add(1)
   mins.Add(3)
   mins.Add(6)
   mins.Add(12)
   plan.SetDayLabels("MA " & Days(0), "DI " & Days(1), "WO " & Days(2), "DO " & Days(3), "VR " & Days(4),  "ZA " & Days(5),  "ZO " & Days(6))
   Dim PerTotal As Int = 12

   For i = 0 To 4
     Dim u As Int = 6
     Dim m As Int = 0
     Dim l As Int = 0
     Dim lIndex As Int
     Do While u < 21
       Do While m < PerTotal
         m = m + Rnd(1,3)
         lIndex = Rnd(0,3)
         l = mins.Get(lIndex)
         If (u*PerTotal + m + l) < (21*PerTotal) And m < PerTotal And (i <> 2 Or u <=11 ) Then
           Dim patient As String = FirstNames.get(Rnd(0,19)) & " " & LastNames.get(Rnd(0,19))
           counter = counter + 1
           plan.AddTask(NewTask(i, "T" & counter,u,m,l,patient,lIndex)) ' taskid must be a string!
         End If
         m = m + l
       Loop
       m = m - PerTotal
       u = u + 1
     Loop
   Next

   plan.SetActiveDay(ActiveDay)
   For i = 12 To 20
     plan.SetHourStatus(2,i,False)
   Next
   If doRefresh Then
     plan.Refresh
   End If
End Sub
Events:
Sub plan_ActiveDayChanged(day As Int)
   Log("New day: " & day)
   ActiveDay = day
   ' important to sync the server with the browser!
   Dim plan As ABMPlanner = page.Component("plan")
   plan.SetActiveDay(ActiveDay)
End Sub

Sub plan_MinutesClicked(Value As String)
   Dim spl() As String = Regex.Split(";", Value)
   ' spl(0) is here always 0, as this would contain the menu item clicked.  This is to be uniform with the MenuClicked Value param
   Log("Day: " & spl(1))
   Log("Hour: " & spl(2))
   Log("MinPer5: " & spl(3))
   ' use the ABM.PLANNER_STATUS_ constants to check the status
   Log("Status: " & spl(4))
   Log("Task ID: " & spl(5))

   page.ShowModalSheet("patientafspraak")
End Sub

Sub plan_MenuClicked(MenuType As String, Value As String)
   Dim spl() As String = Regex.Split(";", Value)
   Dim plan As ABMPlanner = page.Component("plan")
   Log("MenuType: " & MenuType)
   Log("Value: " & Value)
   Select Case MenuType
     Case ABM.PLANNER_MENUTYPE_DAY
       ' update the database

       Log("Day: " & spl(1))

       Select Case spl(0)
         Case ABM.PLANNER_MENU_SETFREE
           plan.SetDayStatus(spl(1), True)
         Case ABM.PLANNER_MENU_SETNOTAVAILABLE
           plan.SetDayStatus(spl(1), False)
       End Select

       ' IMPORTANT to perform the action in the browser
       plan.PerfromDayHourMenuAction
     Case ABM.PLANNER_MENUTYPE_HOUR
       ' update the database

       Log("Day: " & spl(1))
       Log("Hour: " & spl(2))

       Select Case spl(0)
         Case ABM.PLANNER_MENU_SETFREE
           plan.SetHourStatus(spl(1), spl(2), True)
         Case ABM.PLANNER_MENU_SETNOTAVAILABLE
           plan.SetHourStatus(spl(1), spl(2), False)
       End Select

       ' IMPORTANT to perform the action in the browser
       plan.PerfromDayHourMenuAction
     Case ABM.PLANNER_MENUTYPE_MIN
       ' update the database

       Log("Day: " & spl(1))
       Log("Hour: " & spl(2))
       Log("MinPer5: " & spl(3))
       ' use the ABM.PLANNER_STATUS_ constants to check the status
       Log("Status: " & spl(4))
       Log("Task ID: " & spl(5))

       Select Case spl(0)
         Case ABM.PLANNER_MENU_CUT
           cutTaskID = spl(5)
           copyTask = plan.GetTask(spl(5))
           IsCut = True
           myToastID = myToastID + 1
           page.ShowToast("toast" & myToastID, "toastred", "Verplaats " & copyTask.Text & " naar...", 5000)
         Case ABM.PLANNER_MENU_COPY
           copyTask = plan.GetTask(spl(5))
           IsCut = False
           myToastID = myToastID + 1
           page.ShowToast("toast" & myToastID, "toastred", "Kopieer " & copyTask.Text & " naar...", 5000)
         Case ABM.PLANNER_MENU_PASTE
           If IsCut Then
             plan.RemoveTask2(cutTaskID)
           Else
             counter = counter + 1
             copyTask = copyTask.Clone("T" & counter)
           End If
           copyTask.Day = spl(1)
           copyTask.StartHour = spl(2)
           copyTask.StartMinututesPer = spl(3)
           plan.AddTask(copyTask)
           plan.Refresh
           If IsCut Then
             myToastID = myToastID + 1
             page.ShowToast("toast" & myToastID, "toastred", copyTask.Text & " verplaatst!", 5000)
           Else
             myToastID = myToastID + 1
             page.ShowToast("toast" & myToastID, "toastred", copyTask.Text & " gekopieerd!", 5000)
           End If
         Case ABM.PLANNER_MENU_DELETE
           plan.RemoveTask2(spl(5))
           plan.Refresh
       End Select

   End Select
End Sub
These are the final components for ABMaterial 2.50. I’m now going to prepare everything for the next release. (updating the demos etc), so donators will receive these new toys shortly…
ABMChat is a new cool looking ABMaterial component to create a Web based chat program. The inner workings are very much like Erels ChatRoom, but with a slick interface. This can be a useful control if for example you want to give chat-like support within you own B4J webapp.
Some features:
– Balloon/Bubble-like chat
– Support for some ASCII emoji
– IsTyping ballon
Coding this with B4J and ABMaterial is very easy:
Code ChatShared module:
Sub Process_Globals
   Public AvoidDuplicates As Map
   Private connections As Map
   Public LastMessages As List
   Private IsTypingMap As Map
End Sub

public Sub Init
   AvoidDuplicates = Main.srvr.CreateThreadSafeMap
   connections.Initialize
   LastMessages.Initialize
   IsTypingMap.Initialize
End Sub

public Sub NewConnection(page As ChatPage, pageID As String)
   DateTime.TimeFormat = "HH:mm"

   Dim IdentifyBubble As ABMChatBubble
   IdentifyBubble.Initialize("Server", page.ChatName & " has joined the chat...", "Server " & DateTime.Time(DateTime.Now), "server", "server")
   JoinLeftMessage(pageID, IdentifyBubble)
   connections.Put(pageID, page)
   CallSubDelayed2(page, "CurrentConversation", LastMessages)
End Sub

public Sub NewMessage(pageID As String, Message As ABMChatBubble)
   LastMessages.Add(Message)
   For Each page As ChatPage In connections.Values
     CallSubDelayed2(page, "NewMessage", Message)
   Next
End Sub

public Sub JoinLeftMessage(pageID As String, Message As ABMChatBubble)
   For Each page As ChatPage In connections.Values
     CallSubDelayed2(page, "NewMessage", Message)
   Next
End Sub

public Sub IsTyping(pageID As String, Value As String)
   Dim typeBool As Boolean
   If Value = "" Then
     IsTypingMap.Remove(pageID.ToLowerCase)
   Else
     IsTypingMap.put(pageID.ToLowerCase, "true")
   End If
   If IsTypingMap.Size > 0 Then
     typeBool = True
   End If
   For Each page As ChatPage In connections.Values
     CallSubDelayed3(page, "IsTyping", pageID, typeBool)
   Next
End Sub

public Sub Disconnected(page As ChatPage, pageID As String)
   If connections.ContainsKey(pageID) = False Or connections.Get(pageID) <> page Then Return
   Dim LeaveBubble As ABMChatBubble
   LeaveBubble.Initialize("Server", page.ChatName & " has left the chat...", "Server " & DateTime.Time(DateTime.Now), "server","server")
   JoinLeftMessage(pageID, LeaveBubble)
   connections.Remove(pageID)
   AvoidDuplicates.Remove(pageID.ToLowerCase)
End Sub

Public Sub HasIdentified(pageID As String) As Boolean
   Return connections.ContainsKey(pageID)
End Sub
Relevant Code ChatPage class:
Private Sub WebSocket_Disconnected
   Log("Disconnected")
   If ABMPageId <> "" Then CallSubDelayed3(ChatShared, "Disconnected", Me, ABMPageId)
End Sub

public Sub BuildTheme()
   ' start with the base theme defined in ABMShared
   theme.Initialize("pagetheme")
   theme.AddABMTheme(ABMShared.MyTheme)

   ' add additional themes specific for this page
   theme.AddChatTheme("myChat")
   theme.Chat("myChat").AddBubble("server")
   theme.Chat("myChat").Bubble("server").Color = ABM.COLOR_BLACK
   theme.Chat("myChat").Bubble("server").TextColor = ABM.COLOR_WHITE

   theme.Chat("myChat").AddBubble("me")
   theme.Chat("myChat").Bubble("me").Color = ABM.COLOR_LIGHTBLUE
   theme.Chat("myChat").Bubble("me").TextColor = ABM.COLOR_WHITE

   theme.Chat("myChat").AddBubble("them")
   theme.Chat("myChat").Bubble("them").Color = ABM.COLOR_GREY
   theme.Chat("myChat").Bubble("them").ColorIntensity = ABM.INTENSITY_LIGHTEN2
   theme.Chat("myChat").Bubble("them").TextColor = ABM.COLOR_BLACK
End Sub

public Sub ConnectPage()
'   connecting the navigation bar

'   init all your own variables (like a List, Map) and add your components
   Dim chat As ABMChat
   chat.Initialize(page, "conversation",600, 450, 255, "mychat")
   chat.AddBubble("Server", "I'm Server, what is your name?", "The Server", "server", "server")

   page.Cell(1,1).AddComponent(chat)

   Dim ChatInput As ABMInput
   ChatInput.Initialize(page, "ChatInput", ABM.INPUT_TEXT, "", False, "")
   ChatInput.PlaceHolderText = "Type your message here...."
   ChatInput.RaiseChangedEvent = True
   page.Cell(2,1).AddComponent(ChatInput)

   ' refresh the page
   page.Refresh
   ' Tell the browser we finished loading
   page.FinishedLoading
   ' restoring the navigation bar position
   page.RestoreNavigationBarPosition
End Sub

Sub ChatInput_Changed(value As String)
   If ChatShared.HasIdentified(ABMPageId) Then
     CallSubDelayed3(ChatShared, "IsTyping", ABMPageId, value)
   End If
End Sub

Sub ChatInput_EnterPressed(value As String)
   DateTime.TimeFormat = "HH:mm"

   If ChatShared.HasIdentified(ABMPageId) Then
     Dim bubble As ABMChatBubble
     bubble.Initialize(ChatName, value, ChatName & " " & DateTime.Time(DateTime.Now), "me", "them")
     CallSubDelayed3(ChatShared, "NewMessage", ABMPageId, bubble)
     CallSubDelayed3(ChatShared, "IsTyping", ABMPageId, "")
   Else
     If value = "" Then Return
     If ChatShared.AvoidDuplicates.ContainsKey(value.ToLowerCase) Then
       Dim chat As ABMChat = page.Component("conversation")
       chat.AddBubble("Server", "Sorry, but " & value & " is already taken!", "The Server", "server", "server")
       chat.Refresh
     Else
       ChatName = value
       ChatShared.AvoidDuplicates.Put(value.ToLowerCase, value)
       Dim chat As ABMChat = page.Component("conversation")
       chat.SetMyFrom(ChatName)
       chat.AddBubble("Server", "Welcome to ABMChat " & ChatName & "!", "The Server", "server", "server")
       chat.Refresh
       CallSubDelayed3(ChatShared, "NewConnection", Me, ABMPageId)
     End If
   End If

   Dim ChatInput As ABMInput = page.Component("ChatInput")
   ChatInput.Text = ""
   ChatInput.Refresh
End Sub

public Sub NewMessage(bubble As ABMChatBubble)
   Dim chat As ABMChat = page.Component("conversation")
   chat.AddBubble2(bubble)
   chat.Refresh
   chat.ScrollToBottom   ' scroll to the end of the chat
End Sub

public Sub IsTyping(pageID As String, typeBool As Boolean)
   Dim chat As ABMChat = page.Component("conversation")
   If pageID <> ABMPageId Then
     If typeBool = False Then
       chat.ThemAreTyping(False, "") 'hide the 'is typing' bubble
     Else
       chat.ThemAreTyping(True, "") ' show the 'is typing' bubble if not yet shown
     End If
     chat.Refresh
     chat.ScrollToBottom   ' scroll to the end of the chat
   End If
End Sub

public Sub CurrentConversation(LastMessages As List)
   If LastMessages.Size > 0 Then
     Dim chat As ABMChat = page.Component("conversation")
     chat.SetConversation(LastMessages)
     chat.Refresh
     chat.ScrollToBottom   ' scroll to the end of the chat
   End If
End Sub
So, there you have it. A complete modern looking multichat webapp that runs on all platforms in just about 150 lines of code!
As ABMaterial is a hybrid website/webapp framework, you can use SEO (see previous article), and now even Google Analytics in the upcoming version 1.07. This article shows how you can use Google Analytics by adding just one extra line of B4J code on your page!
Note: This post is an ABMaterial adaptation of an excellent article for beginners on Google Analytics by Kristi Hines. Just to make it easier for you, I used and changed it just up to where ABMaterial comes in. At the end of this post you can then continue reading the original one for more tips and tricks.
Why every website/webapp needs Google Analytics
Here are just a few of the many questions about your ABMaterial website/webapp that you can answer using Google Analytics.
How many people visit my website/webapp?
Where do my visitors live?
What websites send traffic to my website/webapp?
What marketing tactics drive the most traffic to my website/webapp?
Which pages on my website/webapp are the most popular?
How many visitors have I converted into leads or customers?
Where did my converting visitors come from and go on my website/webapp?
What content do my visitors like the most?
There are many, many additional questions that Google Analytics can answer, but these are the ones that are most important for most website/webapp owners. Now let’s look at how you can get Google Analytics on your ABMaterial website/webapp.
How to install Google Analytics
First, you need a Google Analytics account. If you have a primary Google account that you use for other services like Gmail, Google Drive, Google Calendar, Google+, or YouTube, then you should set up your Google Analytics using that Google account. Or you will need to create a new one.
This should be a Google account you plan to keep forever and that only you have access to. You can always grant access to your Google Analytics to other people down the road, but you don’t want someone else to have full control over it.
Big tip:
don’t let anyone (your web designer, web developer, web host, SEO person, etc.) create your website’s Google Analytics account under their own Google account so they can “manage” it for you. If you and this person part ways, they will take your Google Analytics data with them, and you will have to start all over.
Set up your account and property
Once you have a Google account, you can go to Google Analytics and click the Sign into Google Analytics button. You will then be greeted with the three steps you must take to set up Google Analytics.
After you click the Sign Up button, you will fill out information for your website.
For the absolute beginner’s guide, we’re going to assume you have one website and only need one view (the default, all data view. The setup would look something like this.
Beneath this, you will have the option to configure where your Google Analytics data can be shared.
Our google account is setup and all we need now is get our Tracking ID and add it in ABMaterial.
Click the Get Tracking ID button. You will get a popup of the Google Analytics terms and conditions, which you have to agree to. Then you will get your Google Analytics Tracking ID.
In our ABMaterial app, all we have to do is add this single line to each of our pages in the BuildPage() method:
ABMaterial 1.07 will be realeased in a couple of weeks for the donators. Addidtional to Google Analytics support, two new components ABMEditor and ABMSocialShare will be included, but more on this in a next article.

 and get the latest ABMaterial first!
 Sometimes you just need to show a quick Msgbox or a single-field Inputbox to the user. In ABMaterial for
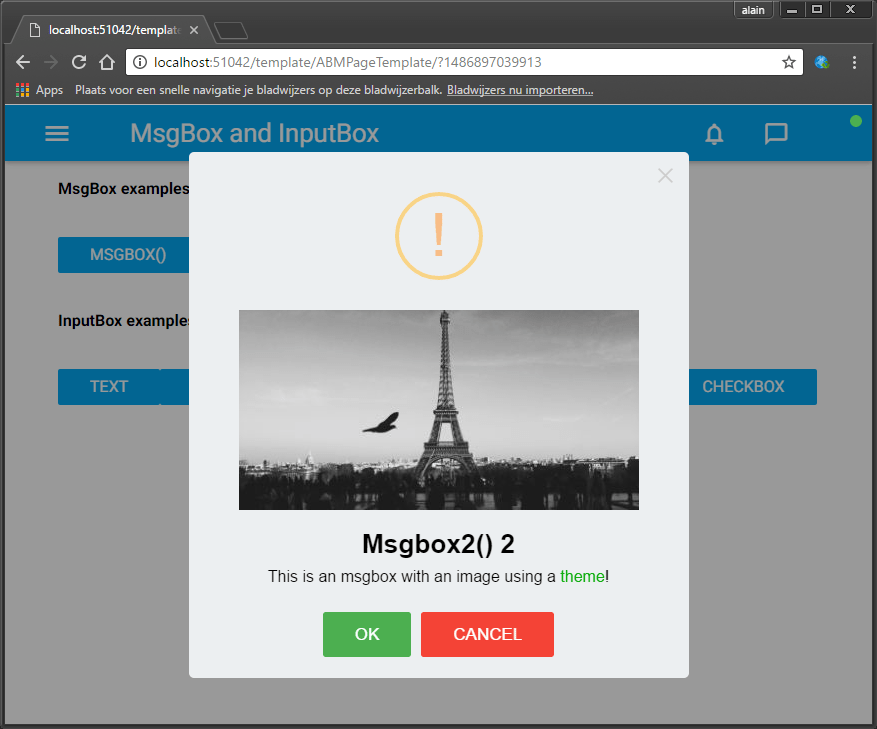


 A friend of mine, who is a doctor, wanted me to write a scheduling webapp. He had some perticular requests:


